
You’ve decided to replace that outdated door stopper or maybe you’re preparing to repaint your walls. Whatever the reason, removing a door stopper can be surprisingly frustrating when you’re faced with rusted screws, paint-sealed hardware, or stubborn mounting mechanisms. Knowing exactly how to remove door stopper fixtures safely is crucial to avoid damaging your walls, floors, or door frames in the process. This guide provides specific, actionable steps to remove any type of door stopper—from basic spring-loaded models to commercial hydraulic units—without causing unnecessary damage to your surfaces. You’ll learn to identify your stopper type, select the right tools, and apply proven techniques that professionals use for clean removal every time.
Identify Your Door Stopper Type Before Starting
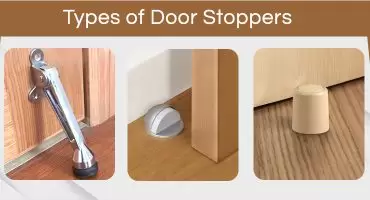
Before grabbing any tools, you need to correctly identify what type of door stopper you’re dealing with. The removal process varies significantly depending on the mounting mechanism and design.
Spring-Loaded Door Stoppers: The Most Common Household Type
These rubber-tipped stoppers feature a spring mechanism that compresses when the door makes contact. They’re typically screwed into baseboards, walls, or floors with a visible or hidden fastener. Look for a small plastic cap covering the mounting screw—gently pry this off with a flathead screwdriver to reveal the fastener underneath. If you see a rubber tip that moves when pressed, you’re dealing with this common type.
Floor-Mounted and Wall-Mounted Stoppers: Location Determines Removal Method
Floor-mounted stoppers screw directly into the flooring material and often have a low-profile design. Wall-mounted versions attach to the wall surface and may have longer arms to catch the door handle. Both types usually secure with visible screws, but paint overspray can make them difficult to spot. Shine a flashlight at a low angle across the surface to reveal hidden fasteners beneath layers of paint.
Hydraulic and Commercial Door Stoppers: Special Handling Required
These heavy-duty units control door movement in commercial settings and contain fluid-filled cylinders. They require specific pressure-release techniques before removal to prevent fluid leaks. If your stopper has a visible cylinder or metal housing with manufacturer labels, treat it carefully—these often need professional handling, especially if installed on fire-rated doors.
Essential Tools for Successful Door Stopper Removal

Having the right tools prevents damage and saves you from making multiple trips to the hardware store mid-project.
Must-Have Basic Tool Kit
- Phillips and flathead screwdrivers (multiple sizes)
- Adjustable wrench or channel-lock pliers
- Penetrating oil (WD-40 or PB Blaster)
- Utility knife for scoring paint
- Safety glasses and work gloves
Pro Tip: Keep a small magnet nearby to locate hidden screws beneath paint layers—many stoppers use metal fasteners that attract magnets even when covered.
Specialized Tools for Problematic Stoppers
For stubborn or damaged hardware, add these to your kit:
* Screw extractor set for stripped screws
* Rubber mallet for gentle persuasion
* Heat gun or hair dryer to soften paint and adhesives
* Plastic pry tools to prevent surface damage
How to Remove Spring-Loaded Door Stoppers Without Damage
These common household stoppers follow a predictable removal pattern when you know the hidden tricks.
Reveal and Remove Hidden Fasteners
Most spring-loaded stoppers hide their mounting screw under a decorative cap. Carefully pry off this cap with a flathead screwdriver—wrap the blade tip with tape to prevent scratching. Once exposed, apply penetrating oil to the screw head and wait 15 minutes to loosen any rust or corrosion before attempting removal.
Proper Screw Removal Technique
Use the correctly sized screwdriver to prevent stripping the head. Apply firm downward pressure while turning counter-clockwise. If the screw resists, tap the screwdriver handle lightly with a hammer to break corrosion, then try again. For completely stripped screws, use a screw extractor set following the manufacturer’s instructions.
Removing Floor-Mounted Door Stoppers Without Floor Damage
Floor-mounted stoppers require different techniques since you’re working with potentially delicate flooring materials.
How to Unscrew Stubborn Floor Stoppers
Many floor-mounted units thread directly into the floor like a bolt. Grip the stopper body with channel-lock pliers (protect the finish with a cloth) and turn counter-clockwise. If it won’t budge, apply heat with a hair dryer to expand the metal for 30 seconds, then try again. For wood floors, be especially gentle to avoid splintering the surface.
Dealing with Adhesive-Bonded Floor Stoppers
Some modern stoppers use strong adhesives instead of screws. Apply heat with a hair dryer for 2 minutes to soften the bond, then carefully insert a thin putty knife at a 45-degree angle between the stopper and floor. Work slowly around the perimeter while gently prying upward—rushing this process can damage your flooring.
Wall-Mounted Stopper Removal Without Wall Damage
Wall-mounted stoppers present unique challenges since you’re working with drywall or plaster that can easily crack.
Safe Removal of Paint-Sealed Wall Stoppers
Score completely around the stopper base with a utility knife to cut through paint seals before attempting removal. This simple step prevents large chunks of paint from peeling off the wall. Apply penetrating oil to any visible fasteners and wait 15 minutes before unscrewing.
Fixing Spinning Drywall Anchors During Removal
If the anchor spins when you try to remove the screw, insert a flathead screwdriver between the stopper base and wall to create resistance while you unscrew the fastener. For completely stripped anchors, you may need to drill out the anchor and repair the hole afterward with a wall patch kit.
Troubleshooting Stripped Screws in Door Stoppers

Stripped screws are the most common headache during door stopper removal—here’s how to conquer them.
Three Effective Methods for Stripped Screws
- Super Glue Method: Apply a small drop of super glue into the stripped screw head, insert your screwdriver, wait 5 minutes for it to set, then carefully unscrew
- Screw Extractor Technique: Drill a small pilot hole into the screw head, then use a reverse-threaded extractor bit to back out the screw
- Dremel Slot Creation: Carefully cut a new slot into the screw head with a rotary tool, then use a flathead screwdriver to remove it
When to Drill Out a Stubborn Screw
If all else fails, drill out the screw completely using a left-handed drill bit. Start with a small pilot hole in the center of the screw, then gradually increase drill bit size until only the threads remain. Clean out the remaining threads with a screwdriver, then patch the hole for your new installation.
Fixing Rusted or Paint-Sealed Door Stoppers
Rust and multiple paint layers turn simple removal into a major challenge—here’s how to handle these problematic stoppers.
Rust Penetration Technique for Frozen Stoppers
Apply penetrating oil liberally to all visible metal surfaces and let it sit overnight for maximum effectiveness. The next day, tap around the stopper base with a rubber mallet to help the oil penetrate further, then attempt removal. For severe cases, repeat the oil application process multiple times over 24-48 hours.
Paint Seal Breaking Method
Use a utility knife to score deeply around the entire perimeter of the stopper base, cutting through all paint layers. Then, insert a thin putty knife at your scored line and gently work it around the base to break the paint seal before attempting to remove mounting screws. This prevents large patches of paint from peeling off your wall.
Post-Removal Wall and Floor Repair Guide
After successful removal, you’ll need to address the resulting holes and surface damage.
Quick Hole Repair for Different Surfaces
- Drywall: Fill with spackle using a putty knife, let dry completely, then sand smooth
- Wood Surfaces: Use wood filler mixed with matching sawdust for seamless repairs
- Tile Floors: Apply matching grout to fill small holes
- Hardwood Floors: Insert a wood plug colored to match your flooring
Matching Paint for Invisible Repairs
Save a small piece of the removed stopper for paint matching. Most home improvement stores can scan this piece to create an exact color match. Apply primer first, then 2 thin coats of paint, feathering outward from the repair site for an invisible finish.
When to Call a Professional for Door Stopper Removal
Some situations warrant professional help to avoid costly damage.
Five Signs You Need Professional Assistance
- The stopper is part of a fire-rated door assembly (illegal to modify improperly)
- You’re dealing with commercial hydraulic door closers that contain pressurized fluid
- Significant structural damage has already occurred during your removal attempt
- The stopper is integrated with electrical components or security systems
- You’ve tried multiple removal methods without success after 30 minutes
Cost Consideration: Professional removal typically costs $50-$150, which may be worthwhile to prevent $200+ in wall or floor repairs from DIY mistakes.
Prevent Future Door Stopper Removal Headaches
Apply these preventative measures when installing new stoppers to make future removal easier.
Anti-Seize Techniques for Long-Term Installations
Before screwing in new hardware, apply a small amount of anti-seize compound or petroleum jelly to the screw threads. This creates a barrier against rust and paint bonding while maintaining holding strength. For visible hardware, use clear silicone lubricant instead to avoid staining.
Strategic Placement for Easier Future Access
When positioning new stoppers, leave a small gap (1/16 inch) between the base and wall/floor surface. This tiny space gives you a starting point for future removal and prevents complete paint sealing. Also, avoid overlapping multiple paint layers directly on the stopper base during future painting projects.
By following these specific removal techniques, you can successfully remove any door stopper without damaging your walls, floors, or door frames. Remember that patience and the right tools make all the difference—rushing the process often leads to costly repairs. If you encounter significant resistance after trying these methods, don’t hesitate to call in a professional to avoid making the situation worse. With proper technique, most door stopper removals can be completed in 15-30 minutes with minimal surface damage.


