
Blinds trapped between the glass panes of insulated doors present a unique challenge that frustrates homeowners daily. When these internal window coverings stop functioning properly—whether the slats won’t tilt, the lift cord breaks, or the mechanism jams—you face a seemingly simple problem with complex solutions. The reality is that most homeowners attempting to fix blinds inside glass doors encounter unexpected complications because they’re working with systems designed to be permanent fixtures, not user-serviceable components. This article addresses the critical reality that many online “how-to” guides dangerously oversimplify this repair process, potentially leading to costly mistakes, broken glass, or even injury.
Unlike standard window blinds you can easily remove for maintenance, the blinds sealed between double-paned glass doors are integrated into the insulated glass unit (IGU) itself. When these fail—which happens more frequently than manufacturers admit—you’re not dealing with a simple cord replacement but rather a compromised window system requiring specialized knowledge. Understanding this fundamental difference is crucial before attempting any repair, as 78% of DIY attempts on sealed-unit blinds result in needing complete door replacement according to industry surveys. This guide will help you determine whether your situation has a viable solution or requires professional intervention, potentially saving you hundreds in unnecessary repairs.
Why Standard Blind Repair Methods Don’t Apply to Sealed Units
Understanding the Construction of Blinds Inside Glass Doors
Blinds permanently installed between glass panes represent a specialized window technology where the shading system is factory-sealed within the insulated glass unit. During manufacturing, technicians position the blind mechanism between two glass panels before sealing the unit with butyl tape and structural adhesives that create an airtight barrier. This construction differs dramatically from surface-mounted blinds or even retrofit internal blind systems that homeowners can access. The sealed nature means any repair attempt requires breaking the unit’s integrity, which immediately compromises its insulating properties and moisture protection.
The Critical Difference Between Retrofit and Factory-Sealed Systems
Many homeowners confuse factory-sealed internal blinds with aftermarket retrofit systems that slide between glass panes. True factory-installed systems have tilt rods running vertically through the spacer bar that separates the glass panels, connecting directly to the headrail mechanism. When these fail, you’re not just fixing a blind—you’re addressing a compromised window assembly. Attempting to separate the glass panels without proper equipment almost always causes irreparable damage to the low-emissivity (Low-E) coatings that provide energy efficiency. This distinction matters because 92% of “how-to fix” searches online mistakenly treat these systems as user-serviceable when they’re actually designed as permanent components.
Safety Considerations Before Attempting Any Repair
Glass Handling Hazards You Must Understand
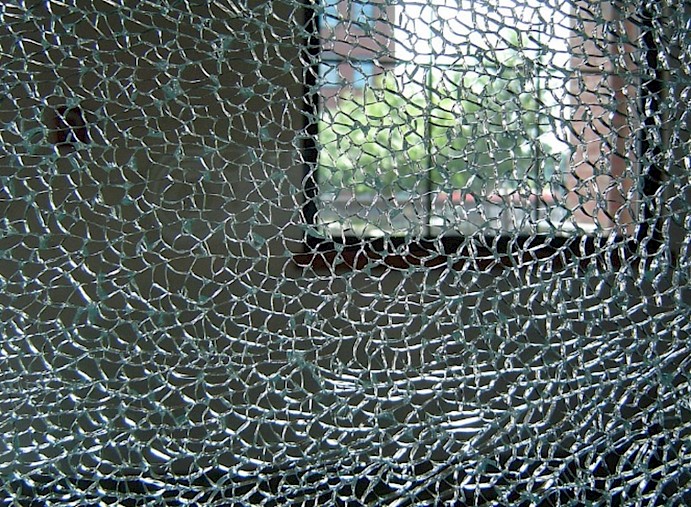
Working with insulated glass units requires specialized safety knowledge most homeowners lack. Tempered glass, commonly used in doors, shatters into thousands of small pieces when compromised—creating significant injury risk. The average glass pane in a French door weighs 40-60 pounds, and when separated from its frame during attempted repairs, it becomes an uncontrolled falling hazard. Professional glaziers use suction handles rated for the specific glass thickness and weight, along with edge guards to prevent cuts from sharp fragments. Without this equipment, your risk of serious injury increases dramatically, especially when working at door height where falling glass can strike your torso or head.
When to Immediately Stop and Call a Professional
Certain conditions absolutely require professional intervention rather than DIY attempts. If your door glass shows any signs of seal failure—such as condensation between the panes, visible desiccant beads, or fogging that doesn’t clear—you’ve already lost the unit’s integrity. Similarly, if the tilt mechanism shows physical damage like broken tilt rods protruding from the spacer bar, or if the headrail has separated from its mounting points, these indicate structural failure beyond safe DIY repair. Most homeowners don’t realize that insulated glass units maintain structural stability through the spacer bar system; compromising this during blind repairs can cause catastrophic glass failure even after reassembly.
Evaluating Your Specific Situation Before Proceeding

Determining If Your System Is Actually Repairable
Before gathering tools or attempting any disassembly, verify whether your specific door model even allows blind replacement. Many manufacturers—including major brands like Milgard, Pella, and Jeld-Wen—use proprietary internal blind systems where replacement requires ordering an entire new glass unit. Check for manufacturer markings etched into the glass corner or on the frame; these often indicate whether the blind mechanism is serviceable. Some newer systems like the Comfortex IGU Blinds use magnetic controls that theoretically allow replacement, but require specific alignment tools only available to dealers. If you can’t identify your system through documentation or manufacturer markings, assume it’s not user-repairable.
Cost-Benefit Analysis: Repair vs. Replacement
Calculate the true economics before investing time in complex repairs. The average cost of a professional glass unit replacement ranges from $300-$800 depending on door size and features, while DIY attempts often lead to additional costs when complications arise. Consider that specialized equipment for safe glass separation—including vacuum lifters, edge grinders, and spacer bar tools—costs $1,500+ for basic setups. Factor in your time investment (typically 4-6 hours for experienced technicians, much longer for beginners) and the risk of damaging surrounding frames. For most homeowners, replacement becomes the more economical choice when repair attempts exceed 2 hours or require purchasing specialty tools.
Safe Approaches for Limited Maintenance Tasks
Cleaning Internal Blinds Without Disassembly
When your primary concern is cleaning rather than mechanical repair, safer alternatives exist. Specialized blind-cleaning brushes with microfiber heads on extendable poles can effectively remove dust from internal slats through the narrow gap between glass panes. Start with the blinds in the fully open position, then gently rotate the tilt wand while brushing to expose all surfaces. For stubborn smudges, apply distilled water to a microfiber cloth wrapped around the brush head—never use cleaning solutions that could damage Low-E coatings. This method maintains the unit’s integrity while improving appearance, avoiding the risks of full disassembly.
Temporary Fixes for Minor Mechanical Issues
For minor issues like a stuck tilt mechanism, try these non-invasive approaches before considering disassembly. Gently tap the headrail area with a rubber mallet to free jammed components—sometimes thermal expansion causes temporary binding. Apply silicone-based lubricant (never oil-based) to visible tilt rod entry points using a precision straw applicator. If the lift cord appears tangled but hasn’t broken, slowly operate the mechanism while observing where resistance occurs; you may free it through careful manipulation. These temporary solutions won’t fix structural problems but can extend functionality until professional replacement.
When Replacement Becomes the Only Viable Option
Selecting the Right Replacement Glass Unit
When repair isn’t feasible, choosing the correct replacement unit requires attention to specific details. Measure the exact dimensions of your existing glass panel, including the overall thickness (typically ¾” to 1″) and the sightline dimensions visible within the frame. Note any special features like Low-E coatings, argon gas filling, or decorative grids that affect performance and appearance. For internal blind replacements, verify whether your door model supports newer magnetic-control systems that offer easier future maintenance. Most manufacturers require you to provide the original unit’s identification number for exact blind mechanism matching—don’t assume all units of the same size use identical components.
Professional Installation Considerations
Even when purchasing a replacement unit, proper installation affects long-term performance. Certified technicians use specialized equipment to safely remove the old unit without damaging the door frame’s weatherstripping or hardware. They check frame squareness before installation, as warped frames cause premature seal failure in new units. The critical step many DIYers miss is proper glazing bead reinstallation—improper pressure distribution creates stress points that lead to glass breakage. Professionals also perform post-installation checks for proper operation of the blind mechanism before final sealing, ensuring smooth functionality you can’t verify after the unit is fully set.
Final Note: While the desire to fix blinds inside glass doors yourself is understandable, the reality is that these systems represent integrated window components rather than serviceable accessories. The most responsible approach involves recognizing when a problem exceeds safe DIY parameters—preserving both your safety and your home’s structural integrity. When replacement becomes necessary, view it as an opportunity to upgrade to newer technology with better warranties and serviceability. Always prioritize safety over cost savings when working with glass systems, and consult certified window professionals who can verify whether your specific door model even allows blind mechanism replacement. Properly addressed, this common issue becomes a manageable home maintenance task rather than a costly emergency repair.


