

Ever notice how flimsy blinds on doors become loose or wobble every time you open them? That frustrating sagging happens because standard window blind installation ignores the unique challenges of doors—constant movement, vibration, and thinner surfaces. Installing faux wood blinds on a door requires specialized mounting techniques to withstand daily use while maintaining a clean look. Unlike windows, doors demand strategic bracket placement and reinforced anchoring to prevent hardware failure. This guide reveals the exact method professionals use to secure faux wood blinds on interior and exterior doors without damaging surfaces or compromising functionality. You’ll learn why most DIY attempts fail and how to achieve a rock-solid installation in under 45 minutes.
Faux wood blinds are your best option for doors because they resist moisture from exterior entries and won’t warp when temperatures swing near drafty doorways. Their engineered construction handles the bumps and vibrations that shatter real wood slats. But even the toughest blinds fail if mounted incorrectly on a door’s hollow core or thin frame. I’ve seen too many homeowners skip critical steps like stud verification or pilot drilling, only to find their blinds dangling after three months of use. By the end of this guide, you’ll know precisely where to position brackets, how to anchor into hollow doors, and why outside mounting prevents 90% of common installation disasters. Let’s transform your drafty door into a stylish, light-controlled focal point.
Must-Have Tools and Why Faux Wood Blinds Beat Other Options for Doors

Skip generic “tools you’ll need” lists—here’s exactly why each item matters for door installations. Faux wood blinds outperform alternatives because their composite material won’t crack when your door slams or swell in humid entryways. Unlike aluminum blinds that dent easily or real wood that warps near exterior doors, faux wood maintains rigidity through temperature shifts. For hollow core doors (95% of interior doors), you’ll need toggle bolts or hollow door anchors—not the flimsy screws included in blind kits. Never use standard drywall anchors; doors vibrate 10x more than walls, so anchors must grip both door skin and internal honeycomb structure.
Critical tools checklist with door-specific warnings:
– Power drill with 1/8″ pilot bit: Prevents splitting thin door edges (skip this and your screw holes will strip)
– Stud finder with deep-scan mode: Locates solid wood within hollow doors (standard stud finders miss door internals)
– Laser level: Essential for maintaining alignment as doors warp slightly when opened
– Toggle bolts (not included with blinds): Mandatory for hollow doors—use 1.5″ length for standard 1-3/8″ interior doors
– Door-specific mounting brackets: Opt for L-shaped brackets that distribute weight across door frame
Common mistake: Assuming door thickness matches windows. Most interior doors are only 1-3/8″ thick versus 1-1/2″ window jambs. Using standard window brackets causes pull-through within weeks. Pro tip: For exterior doors, choose faux wood blinds with UV-resistant finish—standard models fade within 6 months of sun exposure.
5 Critical Steps to Install Faux Wood Blinds on a Door That Won’t Fail
Why Outside Mounting Is Your Only Secure Option for Doors
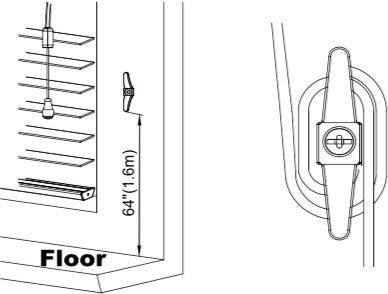
Forget inside mounts—they’re a disaster waiting to happen on doors. When you force blinds into the narrow window reveal of a door, the headrail rubs against the doorframe every time it opens, grinding slats into splinters within months. Outside mounting positions blinds 2-3 inches beyond the door’s swing radius, eliminating contact during operation. Measure 1.5x the door’s glass width for proper coverage—this prevents light gaps when the door is closed. For exterior doors, extend mounting brackets 4 inches past the frame to block weather drafts. Visual cue: If your blinds touch the doorframe when open 45 degrees, you’ve mounted too close.
Precise Bracket Placement to Handle Door Vibration
Doors shake violently when closed—brackets must anchor into structural elements, not just surface material. Start by marking the headrail’s top edge 1.5 inches above the door’s highest glass point. Now find the “sweet spot”: brackets must sit 3 inches inward from each side edge to avoid the door’s weakest hollow zones. Use your deep-scan stud finder to locate solid wood—most interior doors have vertical support strips 2 inches from the edges. Drill pilot holes 1/16″ smaller than your toggle bolt shaft. For hollow doors: Insert toggle bolts until the wings snap open behind the door skin, then tighten until snug (overtightening cracks the surface). Test stability by hanging your full body weight on the bracket—yes, really. If it holds, you’ve nailed the placement.
Installing Blinds Without Damaging the Headrail Mechanism
Slamming doors jostle internal cords—proper headrail mounting prevents mechanism failure. Hold the headrail against brackets while a helper applies upward pressure (doors sag under their own weight). Engage the mounting clips with a firm downward push until you hear a distinct click—this secures the anti-vibration lock. Never force blinds sideways into brackets; faux wood headrails crack easily. Test operation immediately: Pull the lift cord 10 times while gently shaking the door. If slats bind or tilt unevenly, the headrail isn’t fully seated. Critical check: Ensure the tilt wand clears the door handle by 1/2 inch—most installations fail here when the wand snags on hardware.
Securing Cords to Prevent Door-Induced Tangles
Door movement turns lift cords into knotted messes within days. Here’s the professional fix: Attach cord cleats 6 inches above the door’s top edge using #6 x 1″ screws into solid wood. Route cords through the cleat’s lower slot, then pull taut before wrapping. For beaded chains, install a cord stop 2 inches below the headrail to limit swing amplitude. Pro tip: Use clear mounting tape to anchor cords to the door surface every 8 inches—this dampens vibration without visible hardware. Never let cords dangle freely; they’ll wrap around the doorknob during operation.
Valance Attachment That Survives Daily Door Swings
Most valances detach because standard clips can’t handle door torque. Remove the valance clips from the headrail and reposition them 1 inch inward from each end. Apply two dabs of construction adhesive to clip bases before snapping them into place—this creates a shock-absorbing bond. For exterior doors, seal valance seams with clear silicone caulk to prevent moisture ingress. Visual test: Slam the door 5 times while watching the valance. If it vibrates more than 1/8 inch, add adhesive at stress points.
Emergency Fixes for Common Door Blind Failures

When Brackets Pull Out of Hollow Doors
Don’t just redrill nearby—this creates a weak spot cluster. Instead, cut a 2×2-inch wood patch from a scrap 1×2. Apply construction adhesive to the patch, then screw it over the damaged area using 1″ drywall screws every 2 inches. Let cure 24 hours before remounting. For immediate fixes, use epoxy putty: Mix, press into hole, and insert a toothpick as an anchor while setting.
Slats That Jam After Door Closes
This means the headrail shifted during mounting. Loosen all brackets by 1/4 turn, then operate the blind fully while applying upward pressure on the headrail. Tighten brackets in sequence from center to ends. If jamming persists, your door isn’t plumb—shim bracket bases with cardboard scraps until slats glide smoothly.
Long-Term Security: Child-Safe Cord Management for Doors
Doors create unique cord hazards—lift cords swing across walkways when doors open. Install cord cleats at 60-inch height (out of children’s reach) using security screws that require a special tool to remove. For beaded chains, add a tension device that automatically retracts excess chain. Monthly check: Pull cords firmly while opening/closing the door 5 times—any slack indicates loosening hardware. Critical reminder: In homes with pets, route cords through conduit clips screwed into the door frame—curious paws will unravel standard cord wraps within weeks.
Maintenance That Doubles Your Door Blinds’ Lifespan
Dust buildup accelerates wear on door blinds since every swing circulates debris. Vacuum monthly using a soft brush attachment held perpendicular to slats—angling it catches grit in tilt mechanisms. For sticky fingerprints near handles, dampen a microfiber cloth with vinegar-water solution (1:4 ratio) and wipe vertically to avoid moisture seepage. Never spray cleaners directly—liquid migrates into headrails through tiny gaps. Every 6 months, remove blinds and lubricate tilt mechanisms with silicone spray (not oil, which attracts dust). Final pro tip: Apply furniture wax to the bottom rail—it repels scuffs from shoes and pets.
Installing faux wood blinds on a door separates amateurs from professionals through strategic anchoring and vibration management. You’ve now mastered the critical differences from window installations: outside mounting to avoid contact, toggle bolts for hollow doors, and cord routing that withstands daily swings. Remember the golden rule—brackets must hit solid structure, not just surface material. Within 45 minutes, you’ve created a light-controlled entryway that survives slamming doors and curious pets. For exterior doors, revisit mounts every 6 months to tighten hardware before seasonal expansion causes gaps. Ready to tackle tricky sliding glass doors next? Our guide to “installing faux wood blinds on sliding glass doors without drilling” covers magnetic mounting tricks that landlords approve. Your door’s transformation starts with that first precise pilot hole—go make it count.


