

That stubborn interior handle that wobbles every time you turn it, or the front door knob that finally gave up after years of service – we’ve all been there. Replacing a door handle is one of the most satisfying DIY home improvements you can tackle, instantly boosting security and aesthetics without requiring professional skills. Whether you’re fixing a loose lever on your bathroom door or upgrading to a smart lock for keyless entry, this guide walks you through every critical step. You’ll learn how to replace standard handles in under 30 minutes, bypass non-standard hole patterns, and avoid costly mistakes that damage your door. Most replacements require just basic tools and careful measurements – and by the end, you’ll have a door handle that operates smoothly for years.
Why Standard Door Handle Replacement Takes Under 30 Minutes
Replacing a handle on a pre-drilled door is simpler than you think because modern hardware aligns with standard bore holes. The critical factor is matching your new hardware to the existing 2-1/8″ cross-bore and backset measurement (the distance from the door edge to the handle center). Most interior doors use a 2-3/8″ backset while exterior doors typically require 2-3/4″. Before starting, test your current setup: close the door and measure from the edge to the center of the knob. If these dimensions match your new hardware, you’re ready to proceed without drilling new holes.
Step 1: Remove the Old Handle Without Damaging the Door
Locate the release mechanism on your interior handle – this is usually a small set screw on the side knob base or a hidden tab under the rose plate. For privacy locks (common on bathrooms), insert a paperclip into the exterior pinhole to unlock it first. Once released, pull both handles apart to expose the long mounting screws. Never force stubborn handles; many modern sets have spring-loaded clips that release when you depress a tab with a flathead screwdriver. After removing the two long screws, slide out the latch mechanism from the door edge. If screws are stripped, use a rubber band for extra grip or carefully drill them out as a last resort.
Step 2: Install the New Latch Mechanism Correctly
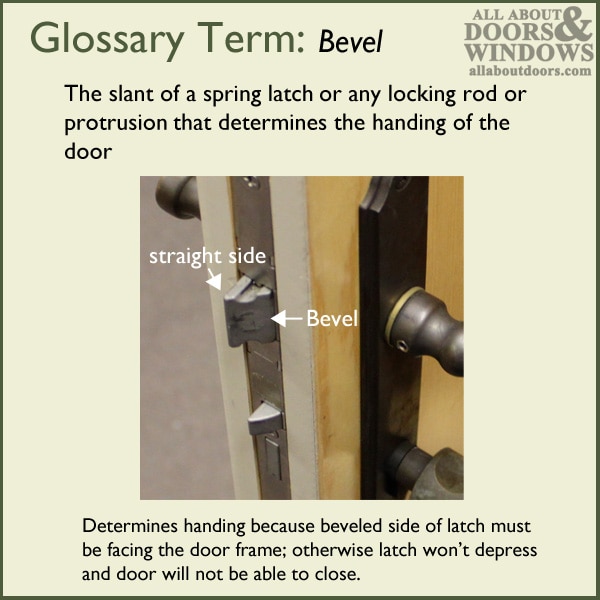
Hold your new latch against the door edge with the beveled side facing the direction the door closes (the angled portion should contact the strike plate first). Ensure the latch bolt moves freely when pressed – if it sticks, apply graphite powder (never oil) to the mechanism. Position the latch plate so its top edge aligns with your existing screw holes, then secure it with the provided screws. Critical visual check: When you close the door, the latch bolt should smoothly enter the strike plate hole without scraping the jamb. If it hits the top or bottom, you’ll need to adjust the strike plate position later.
Step 3: Align and Secure the New Handle Assembly
Slide the exterior handle’s square spindle through the latch mechanism, then position the interior handle over the spindle. Before tightening, test the operation: turn the handle to ensure the latch retracts fully. Misalignment here causes binding – if resistance occurs, slightly loosen the mounting screws and adjust the handles until movement feels smooth. Tighten screws firmly but stop immediately when you feel resistance; overtightening warps the spindle and destroys smooth operation. Finally, verify the handle returns to neutral position when released – if it sticks, the spring mechanism may be misaligned.
Installing a Smart Lock When Your Door Has Non-Standard Hole Spacing

Many older homes feature non-standard hardware spacing where doorknobs and deadbolts sit only 2.75″ apart – incompatible with modern 5-1/2″ standard spacing. Forcing new hardware into these holes creates weak points and security risks. The Dutchman patch method solves this permanently by filling old holes with wood inserts before drilling new ones. This approach takes 2 hours but ensures your smart lock (like Schlage Encode or Yale Assure) installs securely without wobbling.
The Dutchman Patch Method: Filling Old Holes for a Clean Installation
Cut hardwood dowels slightly longer than your door thickness (1-3/4″ for standard doors). Apply wood glue inside the old bore holes, then hammer dowels flush with both door faces. After 24 hours of drying, sand smooth and mark new hole positions using your smart lock’s template. Pro tip: Clamp scrap wood to the drill exit point to prevent splintering. Drill the new 2-1/8″ cross-bore slowly at 400 RPM, stopping when the pilot bit emerges, then complete from the opposite side. For the latch hole, use a 1″ spade bit and drill perpendicular to avoid angled bores that cause latch binding.
Choosing a Smart Lock That Fits Your Door’s Backset
Smart locks require precise backset matching – most support 2-3/8″ or 2-3/4″ out of the box. Measure your door carefully before purchasing; if your measurement falls between standards (e.g., 2-1/2″), select a model with adjustable backset like the August Wi-Fi Smart Lock. During installation, verify the exterior keypad aligns with your hand position – if it feels awkward when operating the lever, swap to a left-handed model. Critical security note: Always choose ANSI Grade 1 or 2 locks (look for this rating on packaging) which withstand 800,000+ operations and forced entry attempts.
Emergency Fix: Removing a Stuck Door Handle When You’re Locked Out
Interior privacy locks (bathrooms/bedrooms) often jam when the spring mechanism fails. Unlike exterior locks, these lack keyholes but include emergency release points. For most models, insert a straightened paperclip into the 1/8″ pinhole on the exterior knob face and push firmly until you feel the latch release. If no pinhole exists, look for a thin slot around the rose plate – slide a flathead screwdriver in and twist gently to pop off the cover.
How to Unlock a Privacy Lock with a Paperclip
Position the paperclip perpendicular to the pinhole and apply steady pressure (not force) straight inward. You’ll hear a distinct click when the release engages. If the paperclip bends, use a 1/16″ Allen wrench for better leverage. Never drill or hammer on privacy locks – the thin spindle breaks easily, trapping you outside. Once unlocked, replace the handle immediately; repeated jamming indicates failing internal springs.
What to Do When the Handle Won’t Budge (Without a Key)
For exterior doors without keys, stop immediately if the knob won’t turn. Attempting DIY removal often strips screws or damages the latch. Instead, call a bonded locksmith – their specialized tools extract handles without door damage. If you’re inside a room with a stuck privacy lock, remove the interior knob by locating the set screw (often hidden under the lever base). Once the knob comes off, use a flathead screwdriver to manually retract the latch bolt from the edge.
Why Your New Door Handle Won’t Latch Smoothly (And How to Fix It)
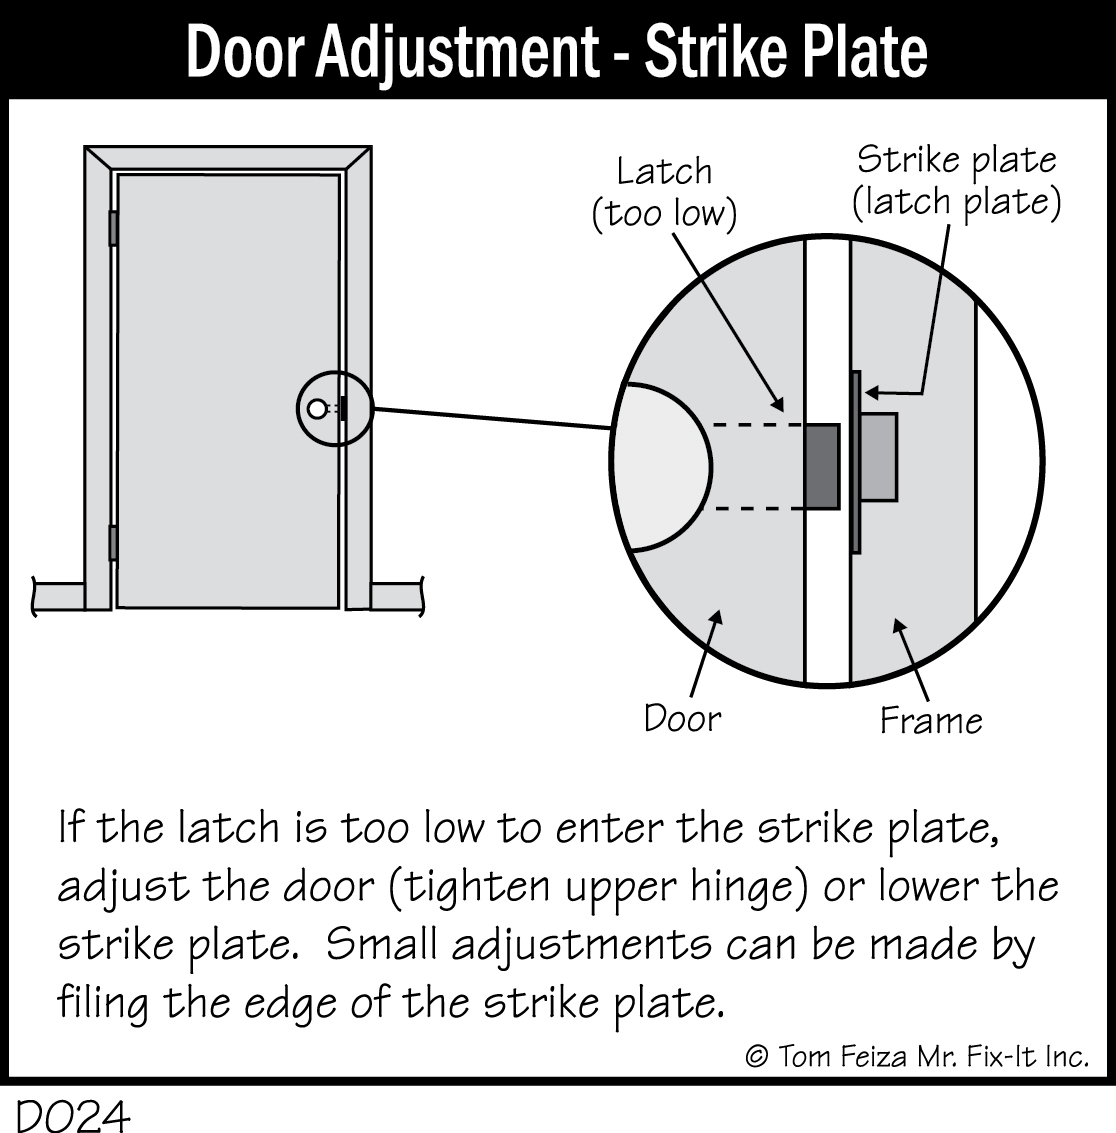
Misaligned strike plates cause 90% of latching failures. When the door closes, the latch bolt should enter the strike plate hole with minimal resistance. If it scrapes the top edge, the plate is too high; if it hits the bottom, it’s too low. Fix this in 5 minutes without removing the door: loosen the strike plate screws slightly, then tap the plate upward or downward with a hammer while testing closure. Pro technique: Close the door slowly and mark where the latch scrapes the plate with a pencil – this shows exactly where to adjust.
Fixing a Misaligned Strike Plate in 5 Minutes
After repositioning, chisel the jamb deeper where needed – but only remove wood in the latch cavity, not the bolt hole. Test frequently: the latch should click into place with light pressure. If the door still won’t close fully, check the hinge side; an out-of-plumb door requires hinge adjustment, not handle fixes. Warning: Never force a misaligned handle shut – this bends the latch mechanism.
When to Lubricate Your Door Latch (And What to Use)
Sticky latches often need lubrication, but using the wrong product worsens problems. Oil attracts dust and gumming up mechanisms within months. Instead, apply dry graphite powder (sold as “lock lubricant”) directly into the latch assembly. Work the handle 10 times to distribute it. Avoid WD-40 at all costs – it dries out internal springs. If lubrication doesn’t help, the latch mechanism is likely worn and needs replacement.
5 Critical Mistakes That Damage Your Door During Handle Replacement
Mistake #1: Drilling Too Fast and Splintering the Wood
Drilling door bores at high speeds causes tear-out that weakens the structure. Always use a sharp hole saw at 400 RPM max, and clamp scrap wood behind the drill exit point. Stop drilling when the pilot bit pierces through, then finish from the opposite side. Visual cue: If wood fibers start fraying around the hole edge, you’re drilling too fast.
Mistake #2: Overtightening Screws and Binding the Mechanism
This single error causes more handle failures than any other. Screws should be snug but never tightened to the point where handle movement feels stiff. Test operation after each quarter-turn – if resistance increases, back off immediately. Use the manufacturer’s torque specifications if provided (typically 15-20 inch-pounds).
When to Call a Professional Locksmith
Stop your DIY project immediately if you encounter these red flags:
– The door frame is cracked or split around existing holes (requires structural repair first)
– You need to move a deadbolt hole more than 1/2″ (risks weakening the door edge)
– Your smart lock requires wiring for door sensors or Wi-Fi integration
– The door is out of plumb causing inconsistent gaps (needs hinge adjustment)
A professional ensures security isn’t compromised – a poorly installed lock can fail during break-in attempts. For complex retrofits like non-standard hole patterns, locksmiths complete Dutchman patches in half the time with specialized tools.
Replacing a door handle transforms your home’s functionality and security in less time than baking a cake. By matching hardware to your door’s measurements, using the Dutchman patch for non-standard holes, and avoiding overtightening, you’ll achieve smooth operation for years. Always prioritize backset accuracy and strike plate alignment – these make the difference between a handle that works and one that frustrates daily. For standard replacements, keep it simple: remove old hardware, insert new latch with bevel facing closing direction, and align handles before final tightening. If you hit obstacles like stripped screws or non-standard spacing, don’t force it – that’s when a $75 locksmith visit saves a $200 door replacement. Now grab your screwdriver and give that wobbly handle the upgrade it deserves.


