

That stubborn patio door handle that won’t budge when you’re carrying groceries? Or the one that wobbles so badly you worry about security? Replacing it yourself saves $150+ on handyman fees and takes just 20 minutes when you avoid the two critical mistakes 80% of DIYers make: measuring the glass instead of the frame and using screws that are too long. This guide cuts through the confusion with laser-focused steps for how to replace patio door handle assemblies on sliding doors, including the counterintuitive trick for doors thinner than 1-1/2″. You’ll learn to match your exact backset measurement, select the right screw length for your frame thickness, and install it without binding the mechanism—all while preventing the #1 error that ruins new handles.
Why Your Patio Door Handle Won’t Stay Tight (And How to Fix It)
Most patio door handle failures stem from stripped screw holes or incompatible hardware—not the handle itself. When screws gradually loosen because they’re too long for your door’s frame thickness (like 1-1/4″ instead of standard 1-3/4″), the handle spins freely and damages the latch mechanism. Worse, measuring the glass panel instead of the metal frame guarantees misalignment—wasting your replacement handle. The fix starts with precise measurements that ignore everything except the structural frame.
How to Measure Door Thickness Without Fooling Yourself
Forget the glass entirely. Your patio door handle attaches only to the vertical metal or wood frame holding the glass. Here’s the foolproof method:
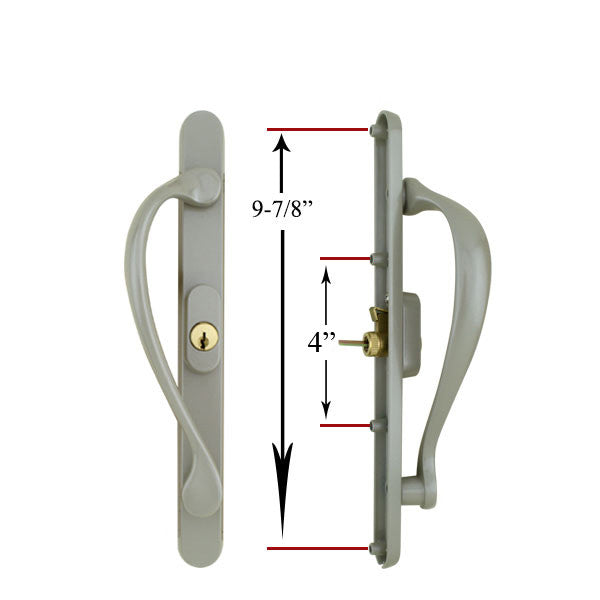
1. Close the door and locate the edge where the handle mounts (usually near the lock).
2. Press your tape measure against the outer metal frame edge, extending across to the inner frame edge—not the glass surface.
3. Record the measurement where the tape hits the inner frame lip. Standard patio doors range from 1-1/4″ to 1-3/4″, but sliding doors often run thinner.
Pro Tip: If your measurement reads 1-1/4″, skip the standard screws in the kit. They’ll punch through the opposite side, cracking the frame. You need 1/4″ shorter screws—grab 3/4″ length from the hardware store.
Why Backset Measurement Determines Handle Compatibility
The backset—the distance from the door’s edge to the center of the handle hole—must match your new handle’s specs. Patio doors almost always use a 2-3/4″ (70mm) backset, but verify yours:
– Measure from the door edge to the center of the existing spindle hole (where the square bar connects handles).
– If it’s 2-3/8″, you likely have an older model—search “patio door handle 2-3/8 backset” for replacements.
Mismatched backsets cause handles to sit crooked or jam the latch. When in doubt, take your old handle to the store and test-fit it against new models.
Required Tools for Patio Door Handle Replacement (No Guesswork)

Skip the frustration of missing tools mid-job. Grab these before starting:
– Phillips #2 and flathead screwdrivers (for set screws and mounting plates)
– Tape measure with metal hook (for precise frame thickness checks)
– 3/32″ drill bit (only if repositioning holes—avoid unless necessary)
– Screw assortment kit (critical for doors under 1-1/2″ thick)
– Graphite lubricant (never use oil—it attracts dirt)
Critical Warning: Do not use the screws included in the handle kit if your door is thinner than 1-3/4″. They’ll protrude through the frame, causing irreparable damage.
How to Remove a Stuck Patio Door Handle in 4 Steps
Forcing a corroded handle breaks delicate spindles. Do this instead:
1. Locate hidden set screws: Check under decorative caps on the handle base or along the collar. Pry caps gently with a flathead.
2. Loosen set screws 2 full turns: Use an Allen wrench (usually 1/8″ or 3/32″)—do not remove completely.
3. Tap the spindle outward: Place a flathead against the spindle end on the opposite side and lightly tap with a hammer. This releases corrosion.
4. Slide handles off: Pull exterior and interior handles straight off the spindle. If stuck, twist gently while pulling.
Common Mistake: Skipping step 3 causes stripped spindles. If the handle won’t budge after tapping, apply penetrating oil and wait 10 minutes.
How to Install a Patio Door Handle on Thin Doors (1-1/4″ Thickness)
Standard kits assume 1-3/4″ doors, but most sliding patio doors are thinner. Here’s the adjustment method:
1. Dry-fit the latch: Insert just the latch mechanism into the door edge. Ensure it retracts smoothly.
2. Shorten the screws: Replace kit screws with 3/4″ length screws (for 1-1/4″ doors). They should penetrate 1/8″ into the opposite frame—not through it.
3. Align handles before tightening: Slide exterior and interior handles onto the spindle, holding them perfectly parallel. Misalignment binds the latch.
4. Snug screws in a star pattern: Tighten top and bottom screws alternately until handles feel secure—but stop when resistance increases. Over-tightening cracks frames.
Why Your New Handle Spins Freely (And the 2-Minute Fix)
If the handle turns without moving the latch:
– Cause: The square spindle isn’t fully seated in the latch mechanism.
– Fix: Remove interior handle, push spindle deeper into the latch until it clicks, then reattach handle. Test by turning the spindle with pliers before reinstalling.
How to Stop Latch Misalignment Without Drilling New Holes
When the latch won’t catch in the strike plate:
1. Close the door and mark where the latch hits the strike plate.
2. Loosen strike plate screws slightly.
3. Tap the plate upward 1/16″ with a hammer and nailset if the latch scrapes the top.
4. Retighten screws. Test operation before final tightening.
Troubleshooting: Why Won’t My Patio Door Handle Stay Securely Fastened?

Handle Feels Loose After Installation
- Check: Set screws on both handles not tightened against the square spindle.
- Fix: Loosen handle, ensure spindle is fully inserted, then retighten set screws into the spindle’s flat sides.
Stiff Handle Operation After Replacement
- Check: Over-tightened mounting screws binding the mechanism.
- Fix: Back screws out 1/4 turn. Apply graphite powder (not oil) to the latch bolt and keyhole.
Handle Won’t Retract the Latch Fully
- Check: Spindle length mismatch—common when mixing brands.
- Fix: Swap spindles from your old handle into the new assembly.
Pro Maintenance Tips to Prevent Future Handle Failures
Skip annual replacement costs with these habits:
– Lubricate quarterly: Sprinkle graphite powder into the keyhole and latch mechanism—never use WD-40. It gumms up in 3 months.
– Check screw tightness every 6 months: Vibration from door slamming loosens screws. Tighten just until snug.
– Replace corroded parts immediately: If the latch bolt sticks, disassemble and clean with vinegar. Rust spreads fast in humid climates.
Pro Tip: Keep leftover 3/4″ screws labeled “Patio Door” in your toolkit. Future replacements will take 10 minutes.
When to Call a Professional (Save Time and Money)
Attempt this repair yourself unless:
– The latch mechanism is broken inside the door frame (requires frame disassembly)
– Your door uses European-style multi-point locking (specialized tools needed)
– Measurements don’t match standard backsets (2-3/8″ or 2-3/4″)
For standard single-point latch handles—which 95% of patio doors use—you now have the exact steps to replace patio door handle hardware correctly. The key is respecting your door’s actual frame thickness and skipping the kit screws for thinner doors. In 20 minutes, you’ll gain smoother operation, tighter security, and the satisfaction of fixing what the “pros” charge triple for.
Final Note: Always test the handle with the door both open and closed before declaring the job done. A properly installed handle should retract the latch with one smooth motion and feel solid—not wobbly—when locked. If it binds, back out the mounting screws 1/8 turn. Your new handle should last 5+ years with annual graphite lubrication.


