
You reach for your front door handle only to find it grimy and dull—a sticky film of skin oils, dust, and tarnish clinging to what was once gleaming brass. This frustrating reality hits millions of homeowners monthly, especially in high-touch areas like entryways. If you’ve ever scrubbed aggressively only to discover pink spots or stripped plating, you’re not alone. The critical mistake? Treating all brass hardware the same. Real brass door handles demand customized care based on whether they’re solid brass, plated, or lacquered. Using vinegar on plated brass or heavy polish on lacquered finishes causes irreversible damage. In this guide, you’ll learn exactly how to clean brass door handles safely by identifying your hardware type first, then applying targeted methods that restore shine without harming the metal. We’ll cover foolproof identification tests, step-by-step cleaning protocols, and professional waxing techniques to make your brass stay lustrous for months.
Spot Solid Brass vs. Plated Handles in 2 Minutes

Your cleaning approach hinges entirely on whether you have solid brass or plated hardware. Mistaking plated for solid brass leads to costly damage—like scrubbing through the thin brass layer to expose dull gray base metal. Skip generic “brass identification” advice and use these field-tested methods instead.
Perform the Magnet and Scratch Test Immediately
Grab a refrigerator magnet and inspect the back of your handle. Solid brass won’t attract the magnet—if it sticks firmly, you have plated steel or zinc underneath. For absolute confirmation, conduct the scratch test in a hidden spot like the handle’s underside. Gently scrape with a coin: solid brass reveals consistent golden-copper color throughout, while plated brass shows silvery metal beneath the surface. Lacquered brass feels smooth and glassy when scratched, with no metal color showing.
Recognize These 3 Brass Handle Types Visually
- Solid brass handles develop uniform tarnish (dark brown or black) and feel heavy for their size. When polished in a hidden area, they shine brightly with no color change.
- Brass-plated handles often have lighter weight and show uneven tarnish—like blotchy spots where plating has worn thin near high-touch areas. Polishing reveals silvery metal.
- Lacquered brass handles have a plastic-like sheen that repels water. Tarnish appears only in scratches or worn spots, creating a patchy look. Never use acid cleaners here.
Essential Prep: Safety Gear and Patch Testing
Before touching your brass door handles, skip this step and risk permanent damage. Commercial cleaners release fumes, and untested methods can etch metal in seconds.
Safety Protocol for Non-Toxic and Chemical Cleaners
Work outdoors or in a ventilated area when using polishes like Brasso. Wear nitrile gloves (not latex—they degrade with acids) and safety glasses. Lay down newspaper to catch drips. For natural cleaners like vinegar, gloves are still mandatory—acids weaken skin oils over time.
The 10-Minute Patch Test That Saves Your Hardware
Never skip this: Apply your chosen cleaner to a hidden spot (e.g., handle mounting plate). Wait 5 minutes, then wipe off. If you see cloudiness, pitting, or color change—stop immediately. For plated brass, even mild soap requires testing. If the patch looks worse, switch methods. Document results with your phone to compare later.
Clean Solid Brass Handles: 2 Proven Methods
Solid brass door handles tolerate aggressive cleaning since you’re only removing surface tarnish. But skip proper technique, and you’ll create uneven shine or pink copper spots.
Natural Tarnish Removal Paste (For Light to Moderate Tarnish)
Why it works: Baking soda’s mild abrasion lifts tarnish while lemon juice dissolves oxides without dezincification. Skip salt—it accelerates copper exposure.
1. Mix 2 tbsp lemon juice + 1 tbsp baking soda into a thick paste.
2. Apply with microfiber cloth, rubbing in circular motions for 30 seconds.
3. For crevices, use a soft toothbrush (never metal) for 15 seconds max.
4. Let sit 15 minutes—do not exceed 20 minutes or copper may show.
5. Rinse under lukewarm water until runoff runs clear.
6. Dry immediately with a lint-free cloth using light pressure.
Time estimate: 25 minutes total | Difficulty: Easy
Commercial Polish for Heavy Tarnish (Skip Vinegar for Deep Cleaning)
Critical tip: Avoid ammonia-based polishes—they corrode brass. Brasso works but contains harsh solvents; opt for Wright’s Copper Cream for safer results.
1. Apply dime-sized polish to a microfiber cloth.
2. Rub handle using firm, circular motions for 60 seconds per side.
3. Switch to a clean cloth section every 20 seconds to avoid redepositing tarnish.
4. Wipe residue with a vinegar-dampened cloth (1 tsp vinegar in 1 cup water) to neutralize polish.
5. Rinse and dry thoroughly.
Pro tip: For handles with intricate designs, use a cotton swab dipped in polish to target recessed areas without scratching raised surfaces.
Clean Plated or Lacquered Handles Safely
Plated brass door handles demand surgical precision—aggressive cleaning strips the microscopic brass layer in seconds. Lacquered finishes react poorly to solvents, causing hazing.
Gentle Soap-and-Water Method for Plated Brass
Why harsh cleaners fail: Vinegar dissolves the thin brass plating, exposing base metal. Stick to pH-neutral solutions only.
1. Mix 1 drop dish soap into 1 cup lukewarm water.
2. Dampen microfiber cloth (wring until barely damp—never wet).
3. Wipe handle using light pressure, following the metal grain.
4. Immediately dry with a second cloth using upward strokes to prevent water pooling.
5. Repeat only if grime persists—max 2 passes to avoid plating wear.
Warning: If you see silvery spots during cleaning, STOP—plating is compromised. Switch to dry microfiber only.
Lacquered Brass Handle Maintenance (Zero Polish Zone)
Lacquer creates a plastic-like barrier. Cleaning mistakes cause irreversible hazing:
– Daily upkeep: Dust with dry microfiber cloth.
– Sticky residue: Dampen cloth corner with distilled water only. Wipe gently, then dry in 10 seconds.
– Never use: Paper towels (scratch), vinegar (clouds lacquer), or commercial polishes (dissolves coating).
Fix Pink Tint & Green Corrosion Fast

Pink spots or green crusts signal chemical reactions—not just surface dirt. Handle incorrectly, and you’ll destroy the metal.
Eliminate Pink Copper Exposure in 3 Steps
Pink tint appears when acids strip zinc from brass (dezincification). Do not rinse and hope it fades—it won’t.
1. Apply Brasso to a microfiber cloth.
2. Rub pink areas with medium pressure for 45 seconds.
3. Wipe clean with dry cloth—brass should regain yellow-gold color immediately.
If pink persists, plating is gone; consult a professional.
Remove Verdigris (Green Corrosion) Safely
Green crust indicates advanced copper corrosion. Never scrub—it embeds particles deeper.
1. Gently brush loose flakes with soft nylon toothbrush.
2. Dab area with vinegar-water mix (1:1) using cotton swab for 10 seconds.
3. Wipe with dry cloth. Repeat only if needed—max 2 applications.
For thick deposits, stop—you risk exposing base metal.
Make Shine Last: Waxing in 3 Steps
Cleaning is pointless without protection. Unwaxed brass re-tarnishes in days in humid climates. Skip generic “apply wax” advice—use this pro technique.
Apply Protective Wax Barrier Correctly
- Ensure handle is 100% clean and dry (any moisture traps tarnish underneath).
- Warm butcher’s wax block slightly in hands, then rub onto handle in thin layer.
- Wait 20 minutes, then buff vigorously with microfiber cloth until no streaks remain.
Key: Wax fills microscopic pores where tarnish starts. Reapply every 3 months.
Monthly Maintenance Routine That Prevents Tarnish
Preventative care takes 2 minutes weekly but saves hours of deep cleaning. Skip abrasive wipes—they micro-scratch brass.
- Weekly: Dust with dry microfiber cloth (never feather duster—it redistributes oils).
- Bi-weekly: Wipe with cloth dampened with distilled water only. Dry in 5 seconds.
- Monthly: Inspect for early tarnish; spot-treat with baking soda paste if needed.
Critical: In coastal areas, wax monthly—salt air accelerates tarnish 300%.
When to Call a Professional Restorer
DIY cleaning destroys value on these brass door handles:
– Antique hardware: Original patina is irreplaceable; polishing drops value by 50-90%.
– Historical pieces: Pre-1940s solid brass often has delicate casting details.
– Lacquer failure: If coating is peeling, only professional stripping/re-lacquering works.
Pro tip: Photograph handles before sending to restorers—they’ll assess value and method.
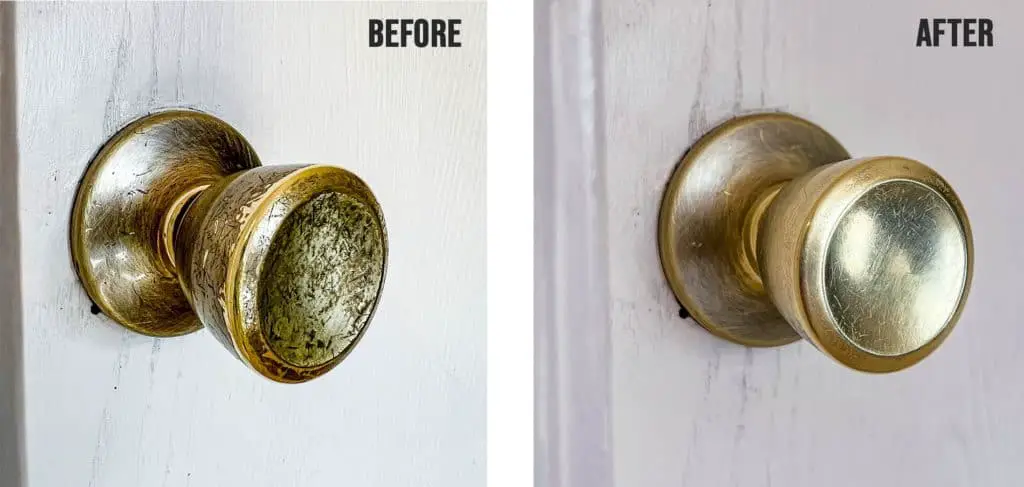
Final Note: Properly cleaned brass door handles transform entryways from dull to dazzling—but only when matched to your hardware type. Solid brass handles shine for years with vinegar-baking soda paste and regular waxing, while plated brass lasts decades with soap-and-water care alone. The magnet test takes 10 seconds yet prevents irreversible damage 90% of homeowners cause. Commit to monthly waxing in humid climates, and your brass will resist tarnish 4x longer. For valuable antiques, always consult a conservator—your DIY effort could erase centuries of history. Start with the patch test today, and within 30 minutes, you’ll revive handles that look professionally restored.


