

That annoying wiggle in your aluminum door handle isn’t just irritating—it’s a security risk inviting drafts, moisture, and potential intruders into your home. Aluminum doors commonly develop loose handles due to thermal expansion from temperature swings, daily usage wear, or improper initial installation. When your handle wobbles during operation or fails to retract the latch smoothly, you’re dealing with compromised functionality that demands immediate attention. This guide delivers a proven, tool-light solution to fix aluminum door handles securely using simple techniques that restore rock-solid operation. You’ll learn exactly where to tighten hidden fasteners, avoid common stripping mistakes, and recognize when professional help is truly needed—all without removing the entire handle assembly.
Why Your Aluminum Door Handle Keeps Loosening
Aluminum door handles loosen primarily because of thermal cycling—the constant expansion and contraction as temperatures fluctuate throughout the day. Unlike wood or steel, aluminum expands significantly when heated and contracts when cooled, gradually working set screws loose from their threaded holes. This movement creates microscopic gaps that worsen with every use, eventually causing that telltale wobble. You’ll notice this most in exterior doors exposed to direct sunlight or extreme climate shifts. The problem accelerates if your handle uses soft aluminum threading instead of brass inserts, as aluminum’s malleability allows screws to gradually back out. Don’t mistake this for latch mechanism failure; if the handle spins freely without engaging the latch, you’re dealing with a spindle alignment issue rather than simple looseness.
How to Identify Your Handle Type Before Fixing
Examine your handle carefully before grabbing tools—aluminum doors typically feature two distinct handle mechanisms requiring different approaches. Lever-style handles (common on modern sliding or French doors) have a curved operating arm mounted on a square spindle, with the critical set screw usually hidden underneath the lever base. Knob-style handles (often on older installations) feature a rotating sphere where the set screw sits along the shank where it meets the door face. For lever handles, check beneath the lever for a small dimple indicating the set screw location—this recessed hole is intentionally concealed to maintain clean aesthetics. Knob handles typically reveal their set screw through a tiny hole in the side of the knob’s base plate. If your handle has a decorative cover plate, gently pry it upward with a flathead screwdriver; it usually snaps into place without fasteners. Never force covers as aluminum bends easily.
Essential Tools for Aluminum Handle Repair

You won’t need a full toolbox for this fix—just these precise items to avoid damaging soft aluminum components:
- #2 Phillips screwdriver (crucial for most set screws; verify fit to prevent stripping)
- #3 Phillips screwdriver (for larger mounting screws on commercial-grade handles)
- Needle-nose pliers (only if set screw is seized—use gently to avoid marring)
- Penetrating oil (sparingly applied for frozen screws; wait 10 minutes before loosening)
Critical Warning: Never use power drills or impact drivers on aluminum handles. The soft metal strips instantly under excessive torque. Always test screwdriver fit first—if the bit wobbles in the screw head, you’ll need a different size. For stubborn set screws, apply just one drop of penetrating oil and wait—aggressive force cracks aluminum housings.
Step-by-Step Handle Tightening Procedure
Locate the Hidden Set Screw on Your Handle
Your handle’s Achilles’ heel is the tiny set screw securing it to the square spindle—typically 1/8″ to 3/16″ in diameter and nearly invisible. For lever handles, rotate the lever upward to expose the underside where it meets the base plate; you’ll spot a small dimple or recessed hole about 1/4″ from the pivot point. On knob handles, inspect the shank just above the mounting plate for a similar indentation. Use a bright flashlight at a low angle to reveal the screw head—if it’s obscured by paint or grime, gently scrape debris with a utility knife tip. Pro Tip: Press your fingernail into the recess—if it catches, that’s your set screw location. Never assume placement; aluminum handles vary significantly by manufacturer.
Tighten the Set Screw Without Stripping Aluminum
Now apply precise torque to the set screw using your #2 Phillips driver. Place firm downward pressure while turning clockwise—aluminum requires 50% less force than steel. Stop immediately when resistance increases sharply; overtightening cracks the housing within 1-2 full turns. If the screw spins freely without tightening, it’s stripped—don’t force it. Instead, back it out completely and inspect: A clean screw head means the threading is stripped, while a chewed head indicates incorrect driver size. For stripped threads, apply a tiny drop of threadlocker to the screw before reinserting, but only as a last resort since aluminum handles rarely need adhesives. Most wobbles resolve with just 1/4 turn of proper tightening.
Fix Persistent Looseness with Spindle Realignment

When tightening doesn’t eliminate wobble, the square spindle inside the handle has likely rotated out of position. Here’s how to correct it: First, completely loosen the set screw and gently pull the handle straight off the spindle—it should slide off easily. Inspect the spindle’s square cross-section for rounded corners indicating wear; if smooth, replace it. With the handle removed, rotate the spindle 90 degrees using pliers (wrap jaws with tape to prevent marring). Reattach the handle ensuring it seats fully against the door plate, then align the set screw hole with a flat side of the spindle—this is critical. Misalignment causes immediate re-loosening. Tighten the set screw while holding the handle firmly against the door to eliminate play. Test operation before final tightening; the handle should move the latch without resistance.
Handle Cover Plate Removal Techniques
Decorative cover plates on premium aluminum doors conceal mounting hardware but often resist removal. Never pry vertically—aluminum bends permanently. Instead, insert a thin putty knife under the top edge and gently twist to release clips. Most plates have 2-4 hidden snap clips; work slowly around the perimeter. If you spot a tiny screw (usually 4mm), remove it first with a jeweler’s screwdriver. For glued plates, apply heat from a hairdryer for 30 seconds to soften adhesive before prying. Once removed, you’ll expose either the set screw we’ve already addressed or two vertical mounting screws securing the entire assembly. Tighten these with your #3 Phillips driver using short, firm strokes—overtightening pulls screws through thin aluminum backplates.
Repairing Stripped Mounting Screw Holes
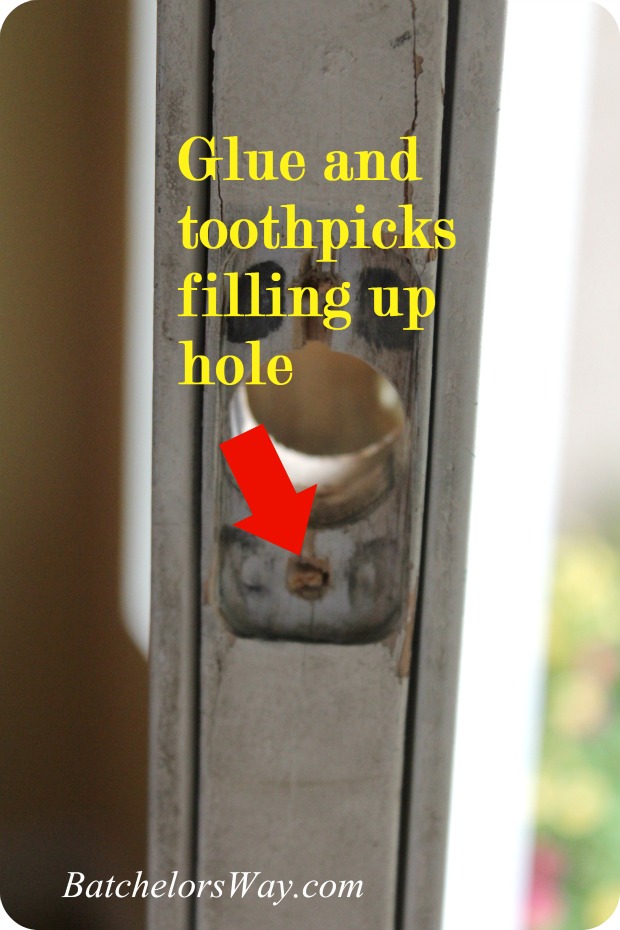
When visible mounting screws won’t tighten, stripped threads are the culprit. Never install longer screws—they’ll protrude through the door frame. Instead, remove the screw and examine the hole: If the aluminum shows clean threads, apply toothpicks or matchsticks dipped in wood glue into the hole. Break them off flush and let dry 1 hour. The glue-swollen wood fills the void while providing fresh gripping material. For severe stripping, use aluminum-specific epoxy like JB Weld AluminumWeld: Mix a pea-sized amount, pack into the hole, and insert the screw before curing. Wait 4 hours before handle use. Critical: Never use standard wall anchors—they compress aluminum and worsen the problem. If the latch mechanism itself is loose, tighten its interior mounting screws through the edge of the door.
When Professional Help Saves Time and Money
Stop immediately if you encounter these red flags requiring a locksmith or door technician:
– The spindle spins freely without moving the latch (indicates broken internal linkage)
– Set screws won’t engage after multiple attempts (housing threads completely stripped)
– Aluminum shows cracks around mounting points (structural damage needing replacement)
– Handle operates but won’t retract the latch fully (misaligned strike plate)
Attempting DIY fixes on these issues risks permanent damage to expensive aluminum door systems. Professionals have specialty tools like thread-sleeve inserts that restore integrity without visible repairs. For under $75, most locksmiths complete complex handle repairs in 20 minutes—far cheaper than replacing a damaged door frame.
Final Security and Functionality Check
After tightening, perform this 30-second validation: Grasp the handle firmly and wiggle vertically/horizontally—zero movement should occur. Operate the latch 10 times while listening for smooth engagement sounds; any grinding indicates misalignment. Close the door and test locking from both sides—intermittent locking means the spindle isn’t seated properly. Pro Maintenance Tip: Every 6 months, apply a graphite lubricant (never oil) to the spindle through the set screw hole to prevent seizing. For coastal homes, check handles quarterly due to salt-air corrosion accelerating looseness. Remember: A solid handle isn’t just convenient—it’s your first line of defense against forced entry.
Don’t let a wobbly handle compromise your home’s security any longer. By following these precise aluminum-specific techniques, you’ve transformed a frustrating loose handle into a rock-solid entry point in under 10 minutes. The key was targeting the hidden set screw with calibrated force while respecting aluminum’s unique properties. For persistent issues after proper tightening, contact a door specialist—but in 90% of cases, this method delivers immediate, lasting results. Now that your handle operates smoothly, consider inspecting other exterior hardware using these same diagnostic principles to prevent future security vulnerabilities.


