
Your Vivint doorbell camera suddenly stops recording, and the app shows it’s offline. Before calling expensive tech support, you might need to open the unit for a quick inspection or battery replacement. Opening your Vivint doorbell camera isn’t complicated, but doing it wrong can damage the device or create safety hazards.
This guide walks you through the exact steps to open any Vivint doorbell camera model safely, from the original Pro to the latest Pro 3. You’ll learn which tools you need, how to identify your specific model, and the safest techniques for accessing internal components without voiding your warranty.
Power Down Your Doorbell Safely
Turn Off Circuit Breaker
Locate your home’s electrical panel and flip the breaker labeled “Doorbell” or “Front Door” to the OFF position. Don’t rely on the doorbell’s built-in power switch—complete electrical disconnection prevents shock hazards during opening. Most Vivint doorbells operate on 16-24VAC, but even this low voltage can cause problems if mishandled.
Verify Zero Voltage
Use a non-contact voltage tester near the doorbell’s wiring to confirm no electrical current remains. Test both the main unit and any visible wiring connections. If the tester lights up or beeps, recheck your breaker panel—you may have turned off the wrong circuit. This verification step takes just 30 seconds but prevents potentially dangerous situations.
Weather Check
Never open your Vivint doorbell camera during rain, snow, or high humidity. Moisture inside the unit can cause permanent damage and create additional safety risks. Wait for dry conditions with low humidity before proceeding. Operating temperature for these devices ranges from -4°F to 122°F, but internal components need completely dry conditions for safe access.
Gather Required Opening Tools

Essential Toolkit
- Phillips screwdriver (#1 and #2 sizes) for standard screws
- Small flat-head screwdriver for prying delicate components
- Torx T15 security bit (newer Pro 2/3 models require this specialized tool)
- Plastic pry tools or spudger (prevents scratches on sensitive surfaces)
- Needle-nose pliers for tight wire connections
- Headlamp for clear visibility in dark areas
Optional Accessories
Consider adding an anti-static wrist strap to prevent damaging sensitive electronics with static electricity. A small parts container keeps screws organized during disassembly, while labeling tape helps identify wires for proper reconnection. If you’re troubleshooting electrical issues, a multimeter becomes essential for testing connections before and after opening your Vivint doorbell camera.
Identify Your Vivint Model First

Physical Model Check
Look for a white label on the back or bottom of your doorbell camera. This label displays your exact model number—typically “VDB1” for original Pro, “VDB2” for Pro 2, or “VDB3” for Pro 3. The model determines which opening method applies to your device. Without proper identification, you risk using the wrong tools and potentially damaging your unit.
App Verification Method
Open your Vivint app → Device Settings → Device Information. The displayed model should match your physical label. If they differ, use the physical label as the authoritative source since some older units received firmware updates that changed app identification. This verification takes less than a minute but prevents costly mistakes.
Model-Specific Features
- VDB1: Standard Phillips screws only, no security features (easiest to open)
- VDB2: Security Torx screws requiring special bit (medium difficulty)
- VDB3: Snap-fit design with hidden release tabs (requires careful prying)
Remove Front Faceplate (Standard Models)
Locate Release Notch
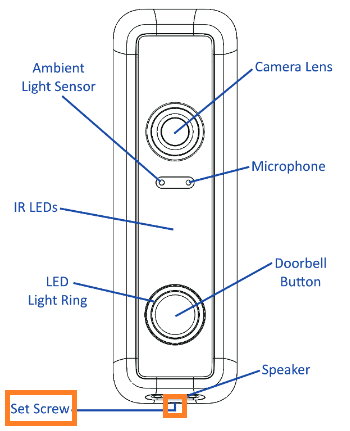
Examine the bottom edge of your doorbell camera face. You’ll find a small, almost invisible notch or gap—this is your entry point for faceplate removal. The notch measures approximately 2mm wide and sits dead center. This tiny opening is designed specifically for maintenance access without damaging the unit.
Pry Faceplate Free
Insert a plastic pry tool into the notch at a 45-degree angle. Apply gentle upward pressure until you hear/feel the first plastic tab release. Continue prying along the bottom edge, then work your way up both sides. The faceplate should pop off smoothly—never force it. If resistance feels excessive, you may be using the wrong technique for your specific model.
Disconnect Ribbon Cable
Behind the faceplate, you’ll see a thin ribbon cable connecting the front assembly to the main circuit board. Gently pull the connector straight out—don’t twist or bend the ribbon. This cable carries video, audio, and LED signals between components. Damaging this fragile connection could require complete replacement of the front assembly.
Complete Unit Removal Process
Document Wire Positions
Before touching any wires, take clear photos showing the exact wire positions and colors. Most Vivint installations use three wires: red (power), white (front), and sometimes green (rear). These photos become your reassembly roadmap. Skipping this step is the #1 cause of installation errors when learning how to open Vivint doorbell camera units.
Remove Mounting Screws
Look for two security screws at the bottom of the mounting bracket. Use your Torx T15 bit (Pro 2/3) or Phillips screwdriver (Pro 1) to remove them completely. These screws prevent theft and require your specific bit type. Keep these small screws in a designated container—losing them means ordering replacements before you can remount your camera.
Slide Unit Upward
With screws removed, slide the entire camera assembly straight up approximately 1 inch. The unit will disengage from the wall bracket. Support the camera’s weight—don’t let it hang by the wires. Gently pull it away from the wall to access wire connections. This upward sliding motion is counterintuitive but prevents damage to the mounting mechanism.
Battery Access for Wireless Models
Find Battery Compartment
Wireless Vivint doorbell cameras feature a small rectangular panel on the back or bottom surface. Look for a tiny tab or sliding mechanism marked with a small arrow or “Battery” text. This compartment houses the rechargeable battery pack. Unlike wired models, wireless units require this specific access point for power replacement.
Slide Battery Door Down
Press the retention tab inward with your thumb while sliding the battery door downward. The door will move approximately 5mm, then stop. Continue sliding until the battery pack partially ejects from the compartment—about 1/4 inch. This sliding mechanism is designed to prevent accidental battery removal during normal operation.
Pull Battery Pack Out
Grasp the exposed battery pack firmly and pull straight out. The battery connects via a simple plug-in connector—no tools required for removal. Check the battery’s charge level indicator lights before deciding on replacement. Most Vivint batteries last 6-12 months depending on usage and weather conditions.
Troubleshoot Common Opening Problems
Stripped Screw Solutions
If screws won’t turn, place a rubber band between the screwdriver tip and screw head. This provides extra grip and often removes mildly stripped screws. For severely stripped screws, use a screw extractor kit—available at any hardware store. Stripped screws are common when users attempt how to open Vivint doorbell camera units without proper tools.
Stuck Faceplate Fixes
Apply gentle heat using a hair dryer on low setting for 30-60 seconds. Warm plastic becomes more flexible, making faceplate removal easier. Focus heat on the bottom edge where the release tabs engage. Never use open flame or excessive heat—this could melt internal components and void any remaining warranty.
Corroded Terminal Cleaning
For green or white corrosion on wire terminals, spray electrical contact cleaner directly onto affected areas. Use a small wire brush to remove buildup gently. Rinse with isopropyl alcohol and allow complete drying before reassembly. Corrosion typically indicates moisture intrusion that needs addressing before closing your Vivint doorbell camera.
Safe Reassembly Procedures
Verify All Connections
Before mounting, ensure every cable clicks firmly into place. Loose connections cause intermittent failures that are difficult to diagnose later. Test each connection by gently tugging—proper connections won’t pull free. This verification step takes just 2 minutes but prevents hours of troubleshooting later.
Test Functionality First
Restore power temporarily to verify camera operation before final mounting. Check live view in your Vivint app, test the doorbell chime, and confirm motion detection works. This prevents discovering problems after everything is buttoned up. Always test all functions before sealing the unit completely.
Weather Seal Check
Examine all rubber gaskets and weather seals for proper alignment. Damaged or misaligned seals allow moisture intrusion, leading to future failures. Replace any cracked or missing seals before final installation. Proper sealing ensures your Vivint doorbell camera operates reliably through changing weather conditions.
When Professional Help Makes Sense
Warranty Warning Signs
Opening your Vivint doorbell camera may void the manufacturer warranty. Check your warranty status through the Vivint app before proceeding. If your unit is under warranty, contact Vivint support at 1-800-216-5232 for authorized service options. Self-repair might save $50 now but cost $200 later if something goes wrong.
Water Damage Indicators
If you notice water inside the unit, corrosion on circuit boards, or a burnt smell, stop immediately. These conditions require professional evaluation—water damage often causes secondary failures that aren’t immediately apparent. Attempting how to open Vivint doorbell camera units with water damage can create electrical hazards.
Persistent Power Issues
After reassembly, if your doorbell camera won’t power on or constantly reboots, you may have a deeper electrical problem. Professional technicians have diagnostic equipment to identify transformer issues, wiring problems, or component failures beyond simple battery replacement. Don’t keep disassembling the unit—this often creates additional problems.
Opening your Vivint doorbell camera successfully requires patience, the right tools, and attention to safety. Whether you’re replacing a battery, cleaning the lens, or troubleshooting a connection issue, following these specific steps prevents damage and maintains your warranty where possible. Remember: when in doubt, professional service costs less than replacing a damaged unit. Schedule quarterly inspections to catch developing issues before they become expensive problems requiring complete replacement.


