
You’ve just moved into your new home and discovered a Ring doorbell already mounted by the previous owners. Now what? Transferring ownership of an existing Ring doorbell is simpler than you think—most homeowners complete the entire process in under 30 minutes using just their smartphone. Unlike installing a new unit, you skip wiring hassles but face unique challenges like removing the old owner’s access. This guide cuts through the confusion with step-by-step instructions verified by Ring’s official protocols. You’ll learn exactly how to claim your inherited device, configure critical security settings, and start receiving alerts—all without technical expertise.
The key hurdle is ownership transfer, which requires either cooperation from the previous homeowner or direct intervention from Ring support. Many new owners mistakenly attempt setup without resetting the device first, triggering frustrating “device already registered” errors. By following this sequence precisely, you’ll avoid common pitfalls that leave your security system inactive. Within minutes, you’ll transform that inherited hardware into your personalized home protection tool with live video, motion alerts, and two-way talk fully operational.
Identify Your Ring Model and Check Physical Status
Locate Critical Device Information Behind the Faceplate
Remove the security screw at the bottom using a star-shaped screwdriver (often left in kitchen drawers by previous owners). Behind the faceplate, you’ll find three essentials: the model name (e.g., “Ring Video Doorbell 2” or “Ring Pro”), a QR code, and the MAC ID. The MAC ID—typically 12 alphanumeric characters—is non-negotiable for ownership transfers. Photograph both the QR code and MAC ID before proceeding; Ring Support requires this during verification. For battery models, check the micro-USB port near the wiring terminals—these require charging if the LED doesn’t illuminate when pressing the doorbell button.
Verify Power Source and Battery Readiness
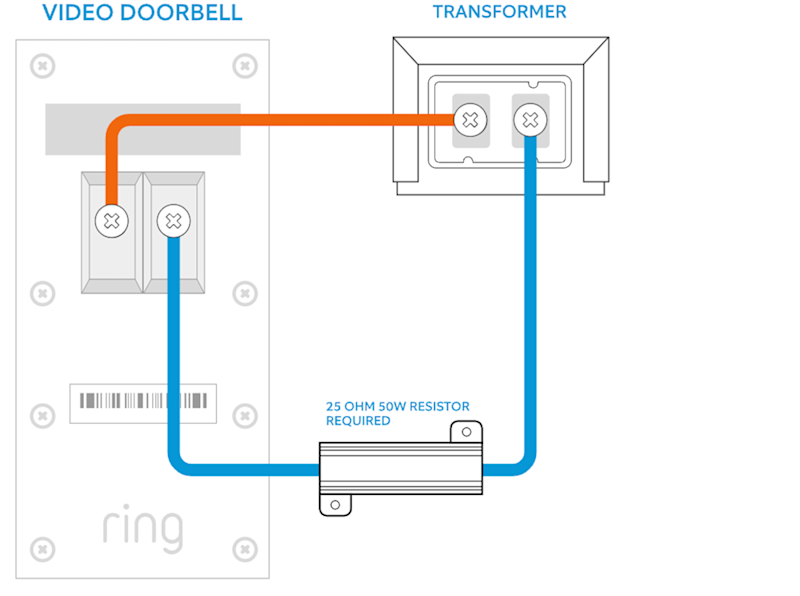
Hardwired models (like Ring Pro) draw power from your home’s existing doorbell wiring, so no battery checks are needed. Battery-powered units (e.g., Ring Video Doorbell 3) require immediate attention if the LED shows red or no light. Use the included orange USB cable—commonly abandoned in junk drawers—to connect to any USB port. Charging takes 5-10 hours; a solid green light confirms readiness. Critical warning: Never force setup with a depleted battery, as this causes failed connections. If the previous owner left spare batteries, store them in a cool, dry place for future swaps.
Remove Previous Owner Access Permanently
Direct Removal Through Original Owner Cooperation
Contact the seller immediately—they can delete the device from their Ring account in 90 seconds. Have them open their Ring app, tap the device icon, select “Device Settings,” then “Remove Device.” This is the fastest path to ownership transfer, but requires their willingness. Understand that all recorded videos remain with them; you gain zero access to historical footage. If they refuse or can’t be reached, proceed to Ring Support—do not attempt setup yet, as the device remains locked to their account.
Ring Support Ownership Transfer Protocol
Call Ring at 1-800-656-1918 (5 AM–9 PM MST) with three items ready: your property deed or closing documents, government-issued ID matching the address, and the device’s MAC ID. International users access 24/7 support via Ring’s website. Pro tip: Request a case number and save the agent’s name—this speeds up follow-ups. Ring Support typically processes transfers within 24 hours, but complex cases may take 72 hours. Never pay third parties for “instant transfers”; Ring handles this free.
Factory Reset the Doorbell Completely
Execute Physical Reset Steps Correctly
Turn off power at the breaker for hardwired models (though low-voltage wiring makes this optional). Remove the faceplate, locate the black setup button near the QR code, and press/hold for 15-20 seconds. Release only when the LED flashes rapidly—this indicates factory reset initiation. Common mistake: Releasing too early. Hold until the light cycles through colors (usually 15+ seconds). The doorbell now reboots for 2-3 minutes, erasing all Wi-Fi credentials and owner data.
Confirm Reset Success Before Proceeding
Watch for these critical indicators: the LED transitions from rapid flashing to a steady spinning white light, signaling setup mode activation. Your phone won’t detect the device on Wi-Fi yet—this is normal. If the light turns solid blue or remains amber, repeat the reset. Never skip this step; incomplete resets cause “device already registered” errors during app setup. Once spinning white appears, you have 10 minutes to begin app pairing before the doorbell sleeps.
Install Ring App and Create Your Account
Download and Verify Your Account Securely
Search “Ring” in your app store—ensure it’s the official Ring LLC app (blue icon with white bell). Installation takes under 60 seconds. During account creation, use your legal name and a dedicated email (not shared with family). Passwords must include uppercase letters, numbers, and symbols. Critical step: Check spam folders for Ring’s verification email—it expires in 24 hours. Click the link immediately; unverified accounts cannot add devices.
Connect Doorbell to Your Wi-Fi Network

Scan QR Code and Join Temporary Network
Open the Ring app, tap “+”, select “Doorbells,” then “Set Up Device.” Scan the QR code you photographed earlier. If scanning fails, manually enter the 5-digit PIN below the code. Your phone will disconnect from home Wi-Fi to join the doorbell’s temporary “Ring-XXXX” network—this is intentional. Select your 2.4GHz home network (5GHz works only on newer models like Ring Pro 2), and enter the password carefully. Warning: Misspelled passwords cause 90% of connection failures; type slowly without spaces.
Optimize Signal Strength for Reliable Alerts
Weak Wi-Fi triggers “offline” errors. If the app shows poor signal, place a Wi-Fi extender midway between your router and doorbell. Test signal strength by standing at your door with your phone—if you have 3+ bars, the doorbell will too. For homes with metal siding, use 2.4GHz exclusively as 5GHz signals struggle to penetrate. Complete setup when the LED turns solid blue, confirming successful pairing.
Configure Motion Detection Zones Precisely
Map Activity Zones to Eliminate False Alerts
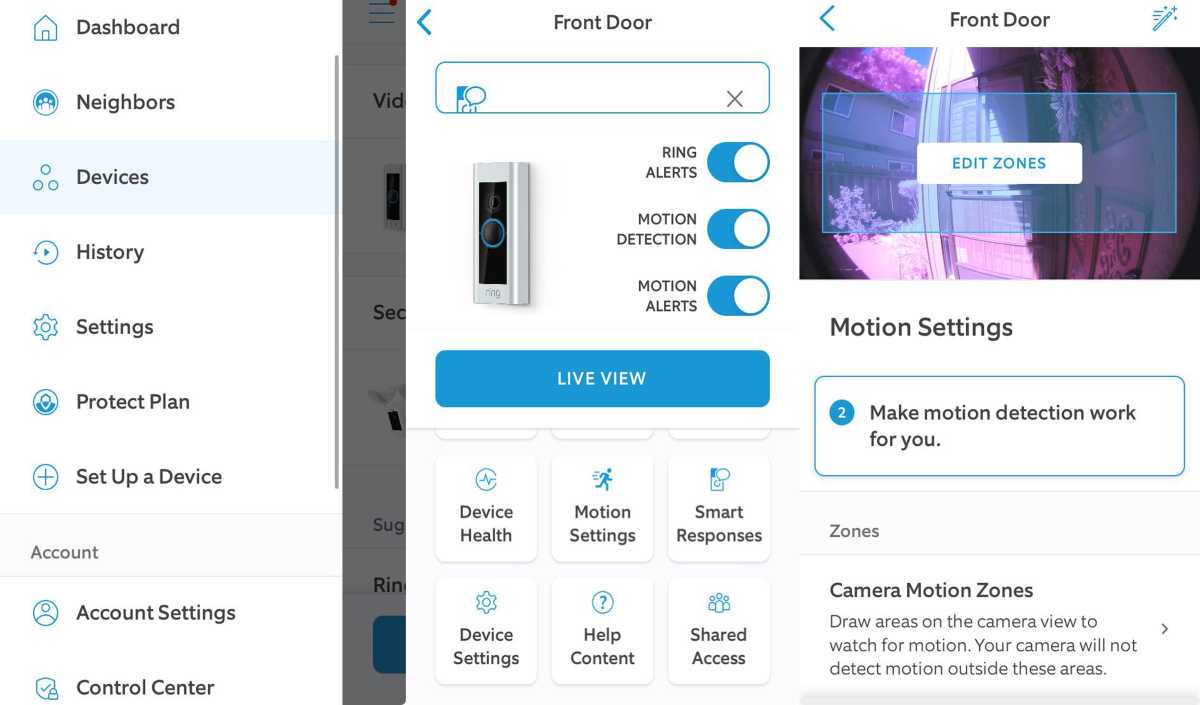
Open Device Settings > Motion Settings > Motion Zones. Drag zone boundaries to cover only your porch and walkway—exclude streets, sidewalks, and tree branches. Pro tip: Start with a single zone covering the path to your door, then expand after testing. Incorrect zone mapping causes nuisance alerts from passing cars or wildlife. Save configurations with the checkmark icon; changes apply instantly.
Adjust Sensitivity Based on Your Environment
Set sensitivity to “Medium” initially for balanced alerts. In high-traffic areas, lower to “Low” to ignore distant movement. For rural properties, raise to “High” to catch approaching animals. Test by walking through zones at varying distances—adjust until it triggers only when someone reaches your steps. Review alerts daily for the first week to refine settings.
Activate Ring Protect Plan Appropriately
Choose Between Free and Paid Recording Features
Without a plan, you get live view and real-time alerts but zero video history. Ring Protect Basic ($3.99/month) adds 60-day cloud recordings and video sharing—ideal for most single-doorbell setups. Opt for Plus ($10/month) only if you own multiple Ring devices; it includes extended warranties and smart home discounts. Critical note: Free users cannot review past events—recordings require an active plan.
Grant Family Access Securely
Add Users Without Password Sharing
In Device Settings > Shared Users, enter family emails. Each member gets a unique login link—no password sharing required. Administrators (you) control permissions: “Shared Users” view live feeds but can’t change settings, while “Owners” have full control. Security essential: Remove unknown users immediately after transfer; previous owners sometimes retain access.
Test All Functions Before Finalizing
Verify Critical Features in Under 10 Minutes
Press the doorbell button—your phone should vibrate instantly with a notification. Open live view to confirm clear video. Speak into your phone; sound must transmit through the doorbell’s speaker. Walk through motion zones to test alerts. If two-way audio fails, restart the doorbell by holding the setup button for 10 seconds. Common fix: Reboot your router if video appears choppy.
Maintain Your Ring Doorbell Long-Term
Implement Essential Monthly Maintenance
Wipe the camera lens weekly with a microfiber cloth to prevent blurry footage. Check battery levels weekly in the app (for non-hardwired models); recharge at 20% to prolong lifespan. After heavy rain or snow, inspect weather seals for cracks. Update the Ring app immediately when prompted—these patches fix security vulnerabilities.
Address Battery Drain in Extreme Weather
Battery models lose 30% capacity in freezing temperatures. Expect 2-3 months winter runtime versus 6-8 months in mild climates. During cold snaps, bring the doorbell indoors overnight to recharge faster. Hardwired units (e.g., Ring Pro) avoid this issue entirely—consider upgrading if you live in sub-zero regions.
Your inherited Ring doorbell is now fully operational under your control. Complete setup typically takes 15-25 minutes once ownership transfers, with zero hardware changes needed. Bookmark the Motion Settings page in your Ring app—you’ll tweak zones frequently during the first month. For ongoing reliability, perform the 5-minute monthly maintenance checklist and keep Ring Support’s number (1-800-656-1918) saved in your contacts. Within days, you’ll wonder how you ever managed home security without real-time visitor alerts right in your pocket.


