

You’ve seen them in farmhouse kitchens, modern bathrooms, and cozy bedrooms sliding smoothly along a track, combining rustic charm with smart space-saving design. Building your own barn door isn’t just affordable; it’s a satisfying DIY project that lets you customize size, style, and finish to match your home perfectly. This guide walks you through exactly how to build a barn door from scratch using proven techniques, budget-friendly materials, and pro tips to avoid warping, paint bleed, and structural issues.
Plan Your Barn Door Dimensions
Measure Your Doorway Opening Exactly
Start by measuring your doorway width and height. Standard interior doors are 30 to 36 inches wide, but barn doors should overlap the opening by 1 to 2 inches on each side to prevent gaps and ensure full coverage. Typical door height ranges from 84 inches (7 feet) for standard spaces up to 90 inches for taller rooms. Allow a half-inch to 1 inch gap at top and bottom for smooth sliding without floor contact.
Key measurements to record include the opening width, opening height, and desired overlap. A 36.5-inch-wide door using alternating 1×8 and 1×6 boards provides good coverage for most standard openings. Sketch your layout on paper or use design software to visualize board patterns before cutting any lumber.
Choose Single or Double Door Configuration
Single doors work best for openings up to 48 inches wide and require a 6-foot track system. Double doors are ideal for wider spaces like closet walls or room dividers, requiring an 8-foot track system. Double doors cost more in hardware but create a balanced, dramatic look. Consider your traffic patterns and available wall space before deciding, since barn doors need clear wall space to slide open.
Select the Right Wood Materials
Pick Stable Lumber to Prevent Warping
The biggest threat to a barn door is warping, especially in wide, flat panels. Avoid cheap construction-grade pine if durability matters to you. Different lumber types offer varying levels of stability and aesthetic appeal.
| Lumber Type | Best Use | Warp Risk |
|---|---|---|
| Tongue-and-groove pine | Budget panel core | High |
| 1×6 or 1×8 whitewood | Base planks | Medium |
| Quarter-sawn hardwood | Frame and braces | Low |
| Reclaimed barn wood | Rustic aesthetic | High (needs prep) |
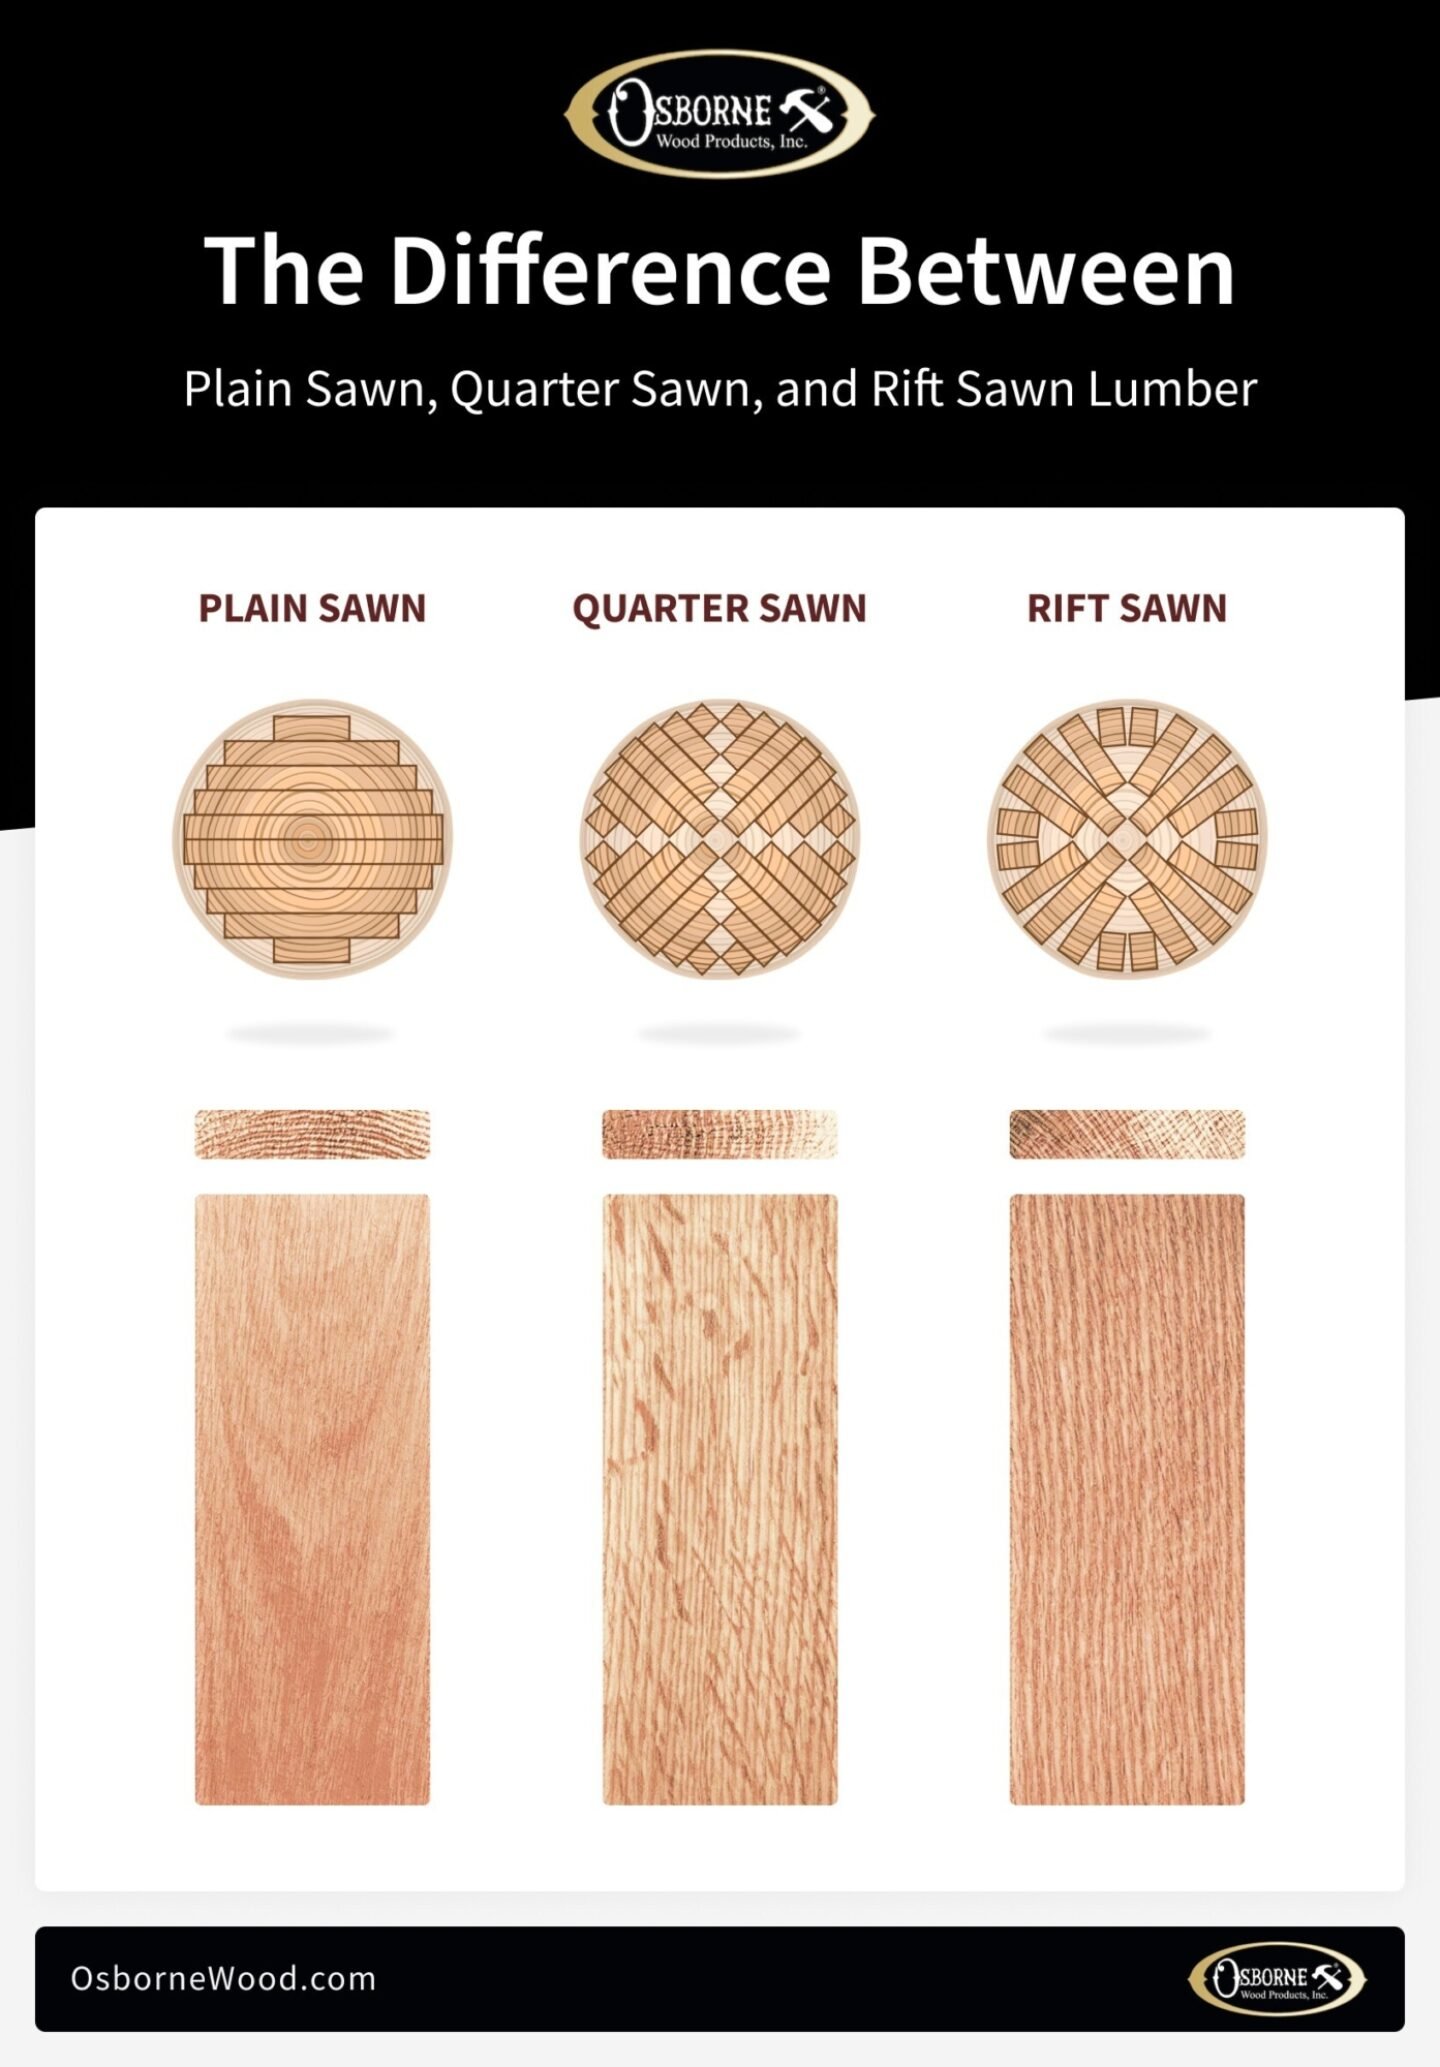
Quarter-sawn lumber resists warping better than flat-sawn because of its grain orientation, making it worth the upgrade for frame pieces and structural components. For budget projects, tongue-and-groove boards interlock tightly, minimizing gaps between planks without needing extra framing.
Gather Essential Tools for Precision Work
You do not need a full workshop, but these tools are essential for a quality build. A miter saw provides clean, square cuts. Clamps (expandable preferred) hold boards flat during glue-up, with at least 4 to 6 clamps recommended. An orbital sander smooths joints and prepares surfaces for paint. A finish nailer (18-gauge) temporarily secures boards before screwing. A drill with bits creates pilot holes and drives screws. A straight edge marks diagonal brace lines accurately. Always wear safety goggles during cutting and sanding operations.
Optional but helpful tools include a paint sprayer like HomeRight, a compressor for pneumatic nailing, and sawhorses with flat tops for assembly.
Cut Boards and Perform Dry Fit
Cut All Planks to Final Length First
Using your miter saw, cut all planks to the same length based on your door height (84 inches or 90 inches). Use a stop block for consistent measurements across all pieces. Alternate 1×8 and 1×6 boards for visual interest in the final design. Stagger end joints if building multiple doors to avoid weak points aligning across the panel.
Lay Out All Boards Before Gluing
Perform a full dry fit by laying out all boards on a flat surface before applying any glue. Check for gaps, twists, or misalignment during this critical step. Adjust any warped or uneven pieces now, since glue will not fix alignment problems after assembly. Label boards with tape to maintain their order during final assembly.
Warning: If a board does not lie flat during dry fit, it will not lie flat after gluing. Replace or plane that piece before proceeding.
Glue the Tongue-and-Groove Panel
Apply Wood Glue to Each Joint
Work one board at a time during assembly. Squeeze wood glue into the groove of each board, then slide the next board’s tongue into place. Wipe excess glue immediately with a damp rag to prevent interfere with finishing later. Never skip clamping, because even tight-fitting tongue-and-groove needs pressure to bond fully.
Clamp Flat and Allow Full Drying Time
Place the assembled panel on sawhorses with a flat top like a plywood sheet. Use clamps every 12 to 16 inches across the width of the panel. Add scrap wood strips over the top to distribute pressure evenly and prevent denting. Avoid over-tightening, which can cup the boards. Allow at least 24 hours of drying time before adding any bracing or moving the panel.
Fact: Clamping prevents immediate warping, but it does not guarantee long-term stability. Material choice matters most for dimensional stability over years of use.
Sand and Prepare All Surfaces
Smooth Every Surface Thoroughly
Once dry, sand the entire panel starting with 120-grit to remove glue residue and high spots. Finish with 220-grit for a silky-smooth surface ready for primer. Focus extra attention on seams between boards, end grain (which absorbs more finish), and corners (round these slightly to prevent chipping). Wipe down with a tack cloth or damp rag to remove all dust before priming.
Pay particular attention to the end grain at the top and bottom of the door. These areas absorb more paint or stain than flat surfaces and need thorough sealing.
Add Structural Frame and Bracing
Attach Rails and Stiles in Order
A strong frame prevents racking, where the door shifts into a parallelogram shape. Build the frame in this specific sequence. First, attach the bottom rail using a 1×8 or 1×10 board. Second, add the top rail using a 1×6. Third, install side stiles using 1×4 boards. Fourth, add the center brace (horizontal or diagonal 1×6). Use wood glue plus 1-inch screws from the back to avoid damaging the face of the door. Always pre-drill pilot holes in softwood to prevent splitting.
Install Diagonal Brace for Maximum Strength
The classic diagonal brace does more than look authentic; it adds critical rigidity to resist warping over time. Run the brace from the top corner to the opposite bottom corner. Cut angles using a straight edge as a guide for accuracy. Test fit, adjust as needed, then secure in place using clamps while screwing. A centered horizontal rail offers simpler styling but provides less anti-warp protection than a diagonal design.
Fill Gaps and Prepare for Paint
Seal All Imperfections Before Finishing
Even well-built doors have minor flaws. Fix them now rather than after painting. Use wood filler for screw holes, dents, and knots. Apply painter’s caulk (which stays flexible and paintable) for any board gaps wider than 1/8 inch. Let all fillers dry completely according to product instructions before sanding.
Perform Final Sanding Pass
Lightly sand filled areas with 220-grit to blend repairs seamlessly. Feather edges so patches do not create visible bumps under paint. Wipe clean again, because dust ruins paint jobs and creates rough texture. Run your hand over the entire surface; if you feel a bump, so will the paint.
Prime to Prevent Knot Bleed
Use Quality Primer on All Wood
Cheap wood contains many knots, and the tannins in these knots bleed through paint as brown or yellow spots. Block this problem with proper priming. Zinsser Cover Stain or BIN shellac-based primer performs best on knotty wood. Apply two thick coats minimum, then add 3 to 4 spot coats on stubborn knots until no yellow seepage appears. Apply with brush or roller, and do not rush this step.
Mistake to Avoid: Skipping extra primer on knots leads to brown spots bleeding through white paint, requiring sand-and-repaint cycles to fix.
Paint for Durable Finish
Choose the Right Paint Type
For high-traffic areas, semi-gloss latex offers easy cleaning and scuff resistance. Behr Paint and Primer or Valspar Signature provide good coverage with low odor. Consider custom color matching for a perfect match to your existing trim, such as Kelly Moore Swiss Coffee for a warm soft white.
Apply Minimum Three Coats
Even with primer, soft pine absorbs paint unevenly. The first coat soaks in abnormally, which is normal. The second and third coats build opacity and smoothness for a professional appearance. Lightly sand between coats if needed for the smoothest final result. Use a paint sprayer like HomeRight for fast, even coverage that cuts finishing time from hours to minutes.
Install Handle and Hardware

Mount Pull After Paint Cures Completely
Wait until paint is fully cured, typically 48 or more hours, before installing hardware. Use basic pulls costing around $3 from hardware stores. Spray paint handles matte black for striking contrast against white doors. Align the handle centered or slightly offset for visual interest.
Pre-Drill Clean Mounting Holes
Prevent wood splitting by using a drill bit slightly smaller than the screw shaft. Drill straight holes, because angled holes weaken grip and cause hardware to loosen over time.
Prevent Warping and Sagging Long-Term
Understand Why Doors Warp
Solid wood moves with humidity changes throughout the year. Without proper design, your door may cup (edges curl up), twist diagonally, or sag over time. This movement is natural and cannot be completely eliminated, but it can be minimized.
Build to Resist Movement
Use diagonal bracing as a structural necessity, not just decoration. Upgrade frame lumber to quarter-sawn or kiln-dried wood for better stability. Do not fully glue the panel to the frame; allow slight float to accommodate natural expansion. Avoid thick paint on edges, because uneven drying stresses the wood.
Truth: No DIY door is completely immune to movement. But smart design with proper bracing and material selection minimizes risk significantly.
Buy Quality Barn Door Hardware

Invest in a Proper Track System
Hardware makes or breaks the performance of your barn door. Cheap track systems stick, squeak, and fail prematurely. A 6-foot track for a single door costs approximately $60, while an 8-foot track for double doors runs about $125. Caldwell Company track systems receive strong recommendations for smooth rollers, strong hangers, and easy installation. This cost includes the floor guide, which prevents swinging.
Critical Advice: Never attempt to DIY the track system. Buy a complete kit designed for barn door installation.
Hang the Door Properly
Mount Track to Wall Studs Securely
The track must support the full weight of the door plus years of use. Use a level and stud finder to locate at least three wall studs for secure anchoring. Follow manufacturer instructions exactly for your specific track system. Mounting into drywall alone will fail.
Adjust Rollers and Install Floor Guide
After hanging the door, fine-tune roller height so the door glides smoothly along the entire track. Install the floor guide to prevent swinging and keep the door aligned in its track. Test the open and close motion; it should feel effortless with no binding or sticking.
Maintain Your Barn Door
Clean and Inspect Regularly
Even indoor doors need periodic care to perform their best. Wipe the door surface with mild soap and water as needed. Check screws and braces annually, tightening any that have loosened. Lubricate rollers every six months using silicone spray. Touch up paint as needed to prevent small chips from becoming bigger problems.
Accept Some Character Over Time
DIY doors are not factory-perfect, and that is part of their charm. Small dings add character and tell the story of your home. If significant damage occurs, refinishing is always possible.
Real Builder Cost Breakdown
What You Will Actually Spend
Materials alone cost approximately $75 for a budget-friendly tongue-and-groove pine door. A more finished multiple-door project runs about $213 using whitewood from Lowe’s with a contractor discount. Hardware adds $60 to $125 depending on single or double door setup. Total project cost stays under $300 for two doors, compared to $300 to $800 or more for pre-made barn doors.
| Issue | Cause | Solution |
|---|---|---|
| Knot bleed-through | Tannins in pine | Spot-prime 3 to 4 times |
| Paint soaks in | Porous softwood | Use paint plus primer formula |
| Warping over time | Unstable lumber | Add diagonal brace, upgrade wood |
| Long prep time | Filling, sanding, priming | Use sprayer, plan ahead |
Key Takeaways for Building Your Barn Door
Building a barn door is a rewarding project that saves hundreds compared to store-bought versions. Choose stable lumber like tongue-and-groove pine for the panel and upgrade to quarter-sawn wood for structural frame pieces. Always clamp during glue-up, add a diagonal brace for rigidity, and prime thoroughly to block knot bleed. Apply at least three paint coats for a durable finish, and invest in quality hardware rather than attempting to DIY the track system. Measure twice, clamp well, and take your time with finishing work, because 90 percent of the result comes from proper preparation. A well-built barn door lasts a decade or more with basic maintenance.
Frequently Asked Questions About Building Barn Doors
What is the best wood for building a barn door?
Tongue-and-groove pine offers the best balance of affordability and ease for beginners. For superior stability, quarter-sawn hardwood works well for frame pieces and braces. Avoid construction-grade pine for wide doors, because it warps easily.
How much does it cost to build a barn door yourself?
Materials cost $75 to $213 depending on wood quality and door size. Hardware adds $60 to $125. Total project cost stays under $300 for two doors, compared to $300 to $800 or more for pre-made options.
How do I prevent my barn door from warping?
Use stable lumber, incorporate diagonal bracing, and avoid over-constraining the panel within the frame. Allow slight float for wood movement, and keep paint thickness even across all surfaces.
Do I need special tools to build a barn door?
A miter saw, clamps, sander, drill, and finish nailer are essential. A paint sprayer saves significant time on finishing. Basic woodworking experience helps, but careful measurement and clamping can compensate for advanced skill.
How many coats of paint does a barn door need?
Apply at minimum three coats of paint, with proper priming first. Porous softwood may require additional coats for complete opacity. Lightly sand between coats for the smoothest finish.
Can I use a barn door in a bathroom?
Yes, but use moisture-resistant finishes and ensure adequate ventilation. Standard pine doors work in bathrooms with proper paint and sealants, but monitor for moisture-related movement over time.


