
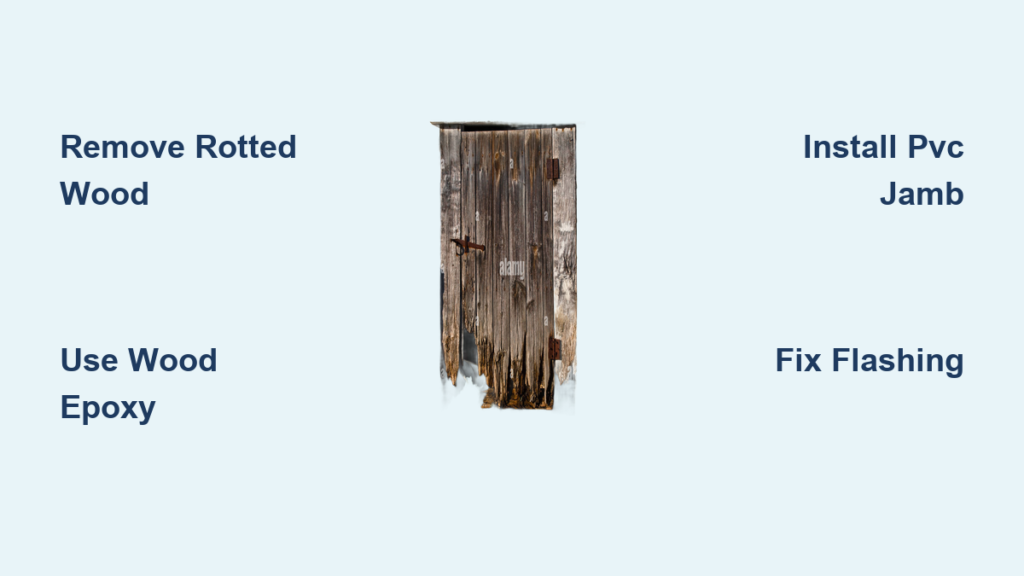
A rotted door frame isn’t just an eyesore. It’s a warning sign that moisture has compromised your home’s structural integrity. Left untreated, wood rot weakens the jamb, causes doors to stick or misalign, and can spread to surrounding framing. Whether you’re dealing with soft, spongy spots at the base of an exterior door or crumbling trim, addressing the problem promptly is essential. The good news? Most repairs can be done DIY with common tools and materials. This guide walks you through how to fix a rotted door frame using proven methods, from epoxy patching to full jamb replacement, so you can restore durability and prevent future decay.
Identify the Type and Extent of Rot

Before grabbing tools, determine how serious the damage is. Not all rot is the same, and the repair method depends on whether you’re dealing with wet rot or dry rot and how deeply it has penetrated.
Wet Rot vs. Dry Rot
Wet rot appears in areas constantly exposed to moisture, like the bottom 6 to 18 inches of an exterior door jamb. The wood turns dark, soft, and spongy but usually stays localized. It is manageable if caught early.
Dry rot is more dangerous. It looks brittle, cracked, or powdery and can travel through wood beyond visible damage. If you suspect dry rot, especially near structural studs or the header, consider consulting a professional.
Probe for Hidden Damage
Use a screwdriver or awl to test the jamb. Press firmly along both vertical jambs and the threshold. Soft spots that dent easily indicate rot. Mark where the wood transitions from soft to firm, and cut at least 2 to 4 inches above this line to ensure all decayed material is removed. Do not forget the interior stop, the lip the door seals against, because it can rot too, especially if water sneaks behind the weatherstripping.
Pro Tip: Shine a flashlight at an angle to spot paint cracks, discoloration, or gaps in the trim, because these often reveal hidden rot underneath.
Gather Tools and Materials
Having the right supplies on hand prevents mid-repair delays and ensures a long-lasting fix.
Essential Repair Tools
- Oscillating multi-tool for precise cuts in tight spaces
- Reciprocating saw (Sawzall) for removing large rotted sections
- Chisel and hammer for cleaning out soft wood
- Utility knife and pry bar for removing brickmold and trim
- Measuring tape and level for ensuring accurate alignment
- Angle grinder or sanding block for smoothing filled areas
- Clamps for holding replacement pieces during glue-up
Safety Gear
Always wear safety glasses, a dust mask or respirator, work gloves, and hearing protection when using loud power tools.
Choose the Right Repair Materials
The material you use determines how long your fix will last.
For Minor Repairs: Wood Epoxy
- Minwax Wood Hardener or Abatron WoodEpox penetrates and strengthens weakened fibers
- Two-part epoxy fillers rebuild missing wood with strength comparable to solid timber
For Moderate to Severe Damage: Replacement Jamb Stock
- PVC or composite jamb never rots and is ideal for bottom sections
- Pressure-treated lumber resists moisture but must have cut edges sealed
- Clear heart redwood or cedar is naturally rot-resistant and requires priming on all six sides before install
- Avoid standard pine jambs outdoors because they absorb water quickly
Sealants and Fasteners
- Exterior construction adhesive (PL Premium or Liquid Nails)
- Galvanized or stainless steel screws; never use regular steel
- Backer rod and polyurethane caulk for sealing gaps
- Peel-and-stick flashing tape (Grace Vycor) for waterproofing
Repair Methods Based on Damage Level
Not every rotted jamb needs full replacement. Match your fix to the severity.
Patch Small Rot with Epoxy
This method works best for surface-level damage less than one-third the jamb’s depth.
Remove All Soft Wood
- Use a chisel or oscillating tool to dig out rotted material
- Stop when only firm, dry wood remains
- Let the cavity air-dry completely; use a fan if needed
Harden and Fill
- Apply wood hardener to exposed surfaces and let cure
- Mix two-part wood epoxy according to manufacturer instructions
- Press into void with a putty knife and overfill slightly
- After curing, sand smooth and shape to match original profile
- Prime and paint immediately
Expert Note: Big-box store wood fillers fail long-term. Use professional-grade two-part epoxy from a lumberyard for strength and water resistance.
Replace Bottom Section with Durable Material
This approach is ideal when rot extends more than a few inches up the jamb.
Cut Out Damaged Wood
- Remove brickmold with a pry bar
- Use a Sawzall or multi-tool to make clean, square cuts 4 inches above visible rot
- Cut through both sides of the jamb leg
Install New Bottom Section
- Measure and cut replacement piece from PVC, cedar, or pressure-treated wood
- Apply construction adhesive to mating surfaces
- Insert new section, align flush, and clamp
- Secure with toe-nailed screws or angled finish nails
- Seal joints with exterior caulk
Pro Tip: Paint or prime the replacement piece before installation for better edge protection and a seamless finish.
Replace Entire Jamb or Install Prehung Door
If rot reaches the header, threshold, or studs, go all the way.
Remove Old Frame
- Unscrew hinges and remove the door
- Demolish the jamb carefully, preserving the rough opening
- Inspect the rough sill, nailing flange, and flashing
Install New Prehung Unit
- Set the prehung door in place
- Shim and level using a 4-foot level
- Fasten with exterior-rated screws through the jambs into framing
- Flash top and sides with peel-and-stick membrane
- Seal the bottom sill with flexible caulk; do not trap water
User Insight: Prehung doors cost around $350 at Home Depot. Replacing the whole unit saves time and prevents repeat repairs.
Fix Flashing and Prevent Water Intrusion
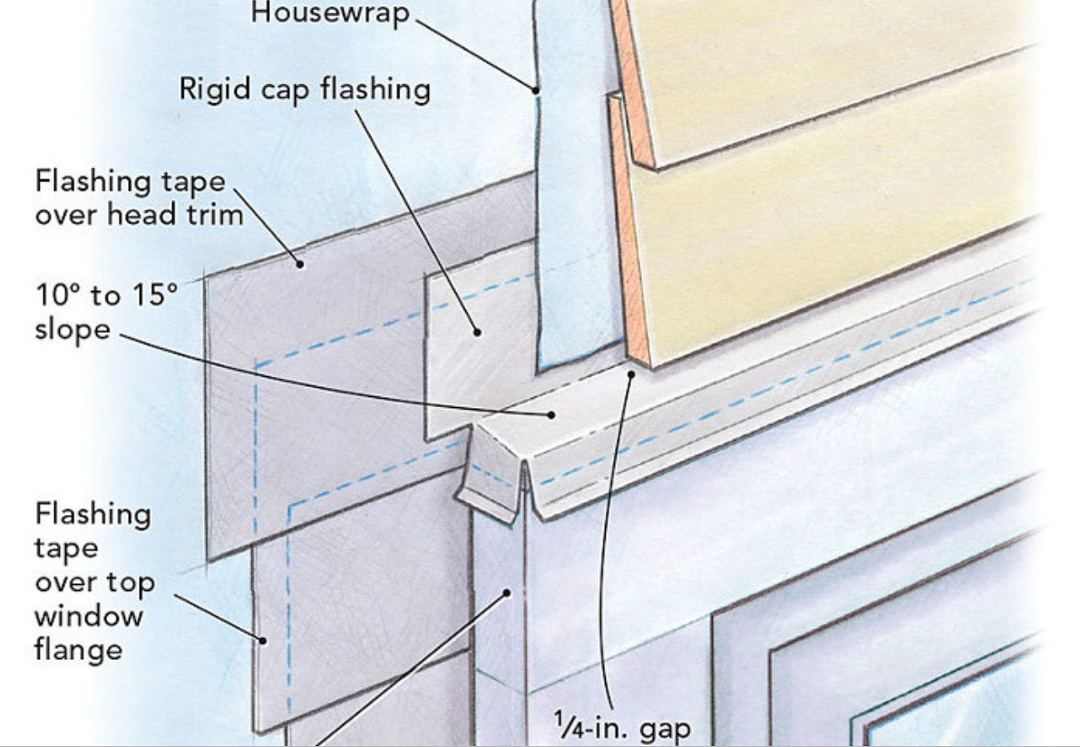
Most rot starts because water gets in and stays trapped. Fixing the frame without fixing drainage leads to repeat failure.
Install Proper Flashing
Apply continuous flashing tape behind jamb legs before reassembly. Extend it over the sheathing and slope it outward to shed water. Never rely on caulk alone because flashing is your first defense.
Seal Gaps Correctly
Fill wide gaps between jamb and wall with backer rod before caulking. Use DAP 3.0 insulating foam sealant to fill voids behind the jamb, because it stops drafts and moisture. Avoid overfilling because expanding foam can warp the frame.
Never Caulk the Bottom of Trim
One of the most common mistakes is sealing the bottom edge of brickmold. Caulking here traps water inside the jamb and speeds up rot. Leave the bottom uncalked to allow moisture to escape.
Contractor Advice: Do NOT caulk the bottom edges. Water will get in eventually, and sealing it in makes it worse.
Reassemble and Finish for Longevity
A strong repair means nothing without proper finishing.
Reattach Components
Snap the door seal (weatherstripping) back into the groove. Reinstall brickmold or trim with galvanized nails or screws. Caulk all joints except the bottom.
Prime and Paint Every Surface
Apply oil-based primer to all wood surfaces, including cut ends and back sides. Use high-quality exterior paint with two coats recommended. Re-paint every 3 to 5 years to maintain protection.
Critical Step: Unprimed cut edges absorb water like a sponge. Always seal them before installation.
Prevent Future Rot with Smart Maintenance
Stopping rot before it starts is easier and cheaper than fixing it.
Grade Soil Away from Foundation
Ensure ground slopes 6 inches over 10 feet away from the house. Eliminate puddles near door bases after rain.
Install a Storm Door
A storm door blocks 90 to 99 percent of wind-driven rain and extends the life of your entry door and frame dramatically.
Maintain Gutters and Downspouts
Clean gutters twice a year. Extend downspouts at least 3 to 5 feet from the foundation.
Inspect Twice a Year
Check every spring and fall for soft spots, paint peeling, cracks in caulk, and loose trim.
| Task | Frequency |
|---|---|
| Visual inspection | Every 6 months |
| Re-caulking | Annually |
| Re-painting | Every 3 to 5 years |
| Drainage check | After heavy rains |
When to Call a Professional
Some repairs go beyond DIY. Call a licensed contractor if rot extends into king studs, headers, or floor joists. Also call if the door won’t close or stay aligned after jamb removal, if you are unsure about flashing or waterproofing details, or if the door has aluminum cladding that needs rewrapping because this requires special tools.
Time Saver: A pro can replace a jamb in 2 to 4 hours and ensure everything is flashed and sealed right the first time.
Material Comparison: What Lasts Longest
| Material | Rot Resistance | Cost | Best Use Case |
|---|---|---|---|
| PVC/Composite | Excellent | $$ | Bottom 16 inch replacement |
| Clear Cedar/Redwood | Very Good | $$$ | Full jamb, natural look |
| Pressure-Treated Wood | Good (if sealed) | $ | Budget outdoor repair |
| Standard Pine | Poor | $ | Interior only |
Top Recommendation: Replace the bottom 16 inches with PVC jamb and brickmold. You can make it look good if you take your time.
Frequently Asked Questions About Fixing a Rotted Door Frame
Can I repair a rotted door frame myself, or do I need a professional?
You can repair most rotted door frames yourself using epoxy patching for minor damage or partial jamb replacement for moderate rot. However, call a professional if rot has spread to structural components like headers, king studs, or floor joists, or if you are unsure about flashing and waterproofing details.
What is the best material for replacing a rotted door frame section?
PVC or composite material is the best choice for replacing rotted sections because it never rots and requires minimal maintenance. Clear heart redwood or cedar is another excellent option if you prefer natural wood, but it must be primed on all six sides before installation.
How do I know if the rot is wet rot or dry rot?
Wet rot appears as dark, soft, spongy wood and is usually localized to areas exposed to moisture. Dry rot looks brittle, cracked, or powdery and can spread beyond visible damage. Dry rot is more dangerous and may require professional assessment.
Should I replace the whole door or just the rotted section?
Replace the whole door if rot has spread to the header, threshold, or surrounding framing. For localized rot limited to the bottom 12 to 18 inches of the jamb, a partial replacement using PVC or rot-resistant lumber is usually sufficient and much more affordable.
How do I prevent rot from coming back after repair?
Prevent rot from returning by ensuring proper grading that directs water away from the house, installing or maintaining gutters and downspouts, applying fresh caulk annually (except at the bottom edges), and repainting wood surfaces every 3 to 5 years. Consider adding a storm door to block wind-driven rain.
Key Takeaways for Fixing Your Rotted Door Frame
Fixing a rotted door frame does not have to mean replacing the entire door. With the right approach, whether patching with epoxy, splicing in a PVC section, or installing a prehung unit, you can restore strength, stop moisture intrusion, and extend your door’s life for decades. The key is acting early, using rot-resistant materials, and focusing on prevention.
Remember to remove all rot completely, because even a small remnant will keep spreading. Use two-part epoxy, not basic wood filler, for structural repairs. Never skip flashing because it is what keeps water out long-term. Partial jamb replacement works if done right, so there is no need to replace the whole door unless necessary.
Once repaired, keep an eye on the area and stick to a simple maintenance routine. Inspect twice a year, re-caulk annually, and repaint every 3 to 5 years. Your home’s entryway will stay secure, weathertight, and rot-free for years to come.


