
Is your sliding glass door sticking, squeaking, or refusing to glide smoothly? You’re not alone. Millions of homeowners face this frustration, and more often than not, the culprit is worn-out rollers. These small components degrade over time due to weight, dirt, and exposure, making door operation difficult and noisy. The good news? Replacing sliding glass door rollers is a manageable DIY project that can restore smooth function and extend your door’s life. In this guide, you’ll learn how to diagnose roller issues, remove the door safely, swap out old rollers, and make precision adjustments using common tools and clear instructions.
Whether you’re dealing with a dragging door or want to stay ahead of maintenance, this article covers everything you need to get it done right the first time.
Recognize Sliding Door Roller Failure Signs
Before grabbing tools, confirm the problem lies with the rollers and not just a dirty track or dry seals.
Stiff or Noisy Operation
If the door drags, sticks, or requires a hard shove to move, rollers may be worn. Squeaking or grinding noises that persist after lubrication often signal failing bearings or metal-on-metal contact. Clean the track first since many users find this resolves the issue without needing replacement.
Sagging or Uneven Movement
A door that sags on one side or rubs against the frame likely has a collapsed or misaligned roller. Check for visible gaps at the bottom corners, as uneven clearance is a clear red flag.
Visible Damage or Debris
Inspect the rollers through the bottom rail. Look for cracked wheels, flattened nylon, rust, or metal shavings in the track. These are definite signs of advanced wear that require replacement.
Pro Tip: Take your time diagnosing. Misdiagnosing track debris as roller failure leads to unnecessary work. Always clean and lubricate first.
Gather Tools and Supplies for Roller Replacement
Having the right tools on hand prevents frustration and ensures a smooth process.
Essential Tools List
-
2 Phillips screwdriver for adjustment and mounting screws
- Flat-blade screwdriver for prying and alignment
- Long-nose pliers to extract snap-in rollers
- Stiff putty knife to lift door onto track
- Rubber mallet for gentle tapping
- Measuring tape to check reveal gaps
Safety and Handling Gear
- Safety goggles to protect from glass shards and metal fragments
- Work gloves to improve grip and prevent cuts
- Glazing suction cups available on Amazon for $25, essential for safe lifting
- Drop cloth or cardboard to protect floors or grass when laying down the door
- Pry bars (2-3) to help lift stubborn doors without damage
Cleaning and Lubrication Supplies
- Shop vacuum with narrow nozzle
- Stiff-bristled brush or wire brush
- Clean rags or damp cloths
- Silicone-based lubricant like CRC Heavy Duty that lasts longer and does not attract dirt
- Avoid WD-40 since it is a solvent, not a long-term lubricant that attracts grime and degrades seals
Expert Note: Take photos of the roller setup before disassembly. This avoids confusion during reinstallation.
Remove the Sliding Door Safely
Proper removal prevents injury and glass breakage.
Standard Door Removal Steps
- Open the door fully since most models require full opening to clear upper guides
- Locate roller adjustment screws found in holes at the bottom edge, one per corner
- Turn screws counter-clockwise to lower rollers and create clearance
- Grasp the door near the top from inside
- Lift straight up to disengage rollers from the track
- Pull bottom toward you to pivot the door out
- Lower carefully onto a protected surface, glass side up
Warning: Sliding glass doors weigh 60-100+ lbs. Use suction cups and a helper. Never force the door.
Alternative Removal Methods
- Putty knife lift method: Insert knives under rollers, lift incrementally, and walk the door out
- Outdoor access method: Remove fixed panel screws, go outside, and pry sliding door upward at center for better leverage
Caution: Forcing can crack glass or damage the frame. If stuck, recheck adjustment screws.
Extract Old Rollers for Inspection
With the door flat, access and remove both rollers even if only one looks bad.
Access by Frame Type
- Aluminum doors: Bottom panel may be removable to expose rollers
- Vinyl doors: Rollers accessed through bottom rail openings
Roller Removal Process
- Remove retaining screws, usually two per roller with the top screw being primary
- Use flat-head screwdriver or pliers to pry out cassette
- Inspect for damage including flattened or cracked wheels, corrosion or rust, and metal shavings indicating disintegration
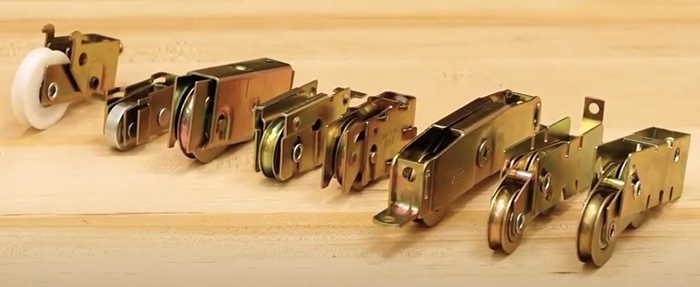
- Keep old rollers to bring when buying replacements for exact match
Critical: Never assume universal fit. Measure width, height, axle diameter, and mounting style.
Clean Tracks and Frame Thoroughly
Skipping cleaning is a top cause of premature roller failure.
Track Cleaning Steps
- Remove lower track if possible by prying gently with flat-head screwdriver
- Vacuum upper and lower tracks using narrow attachment to remove sand, hair, and leaves
- Scrub with stiff brush focusing on grooves where debris accumulates
- Wipe with damp cloth to remove grease and old lubricant residue
- Inspect for damage including dents, warping, or pitting in the track and cracks in the frame
Repair Damaged Tracks
- Use Prime-Line 1579 C-Rail Repair Strip, a stainless steel insert that overlays worn sections
- Press into place to provide smooth glide surface
Final Preparation
- Clean roller mounting channels in the door
- Apply silicone lubricant to track before reinstallation
Pro Tip: Clean monthly in high-traffic or sandy areas to extend roller life.
Install Compatible Replacement Rollers

Matching the original specs ensures smooth operation.
Verify Compatibility First
Compare new rollers to old ones by checking width, height, axle diameter, mounting hole spacing, and retaining tab or screw style.
Warning: Incorrect rollers cause binding, misalignment, and damage.
Roller Installation Steps
- Set new rollers to highest position by turning adjustment screw clockwise fully
- Align tabs or housing with frame channel
- Insert straight into place, securing with screws for screw-in type or pressing firmly until seated for snap-in type
- Hold upright during tightening to prevent twisting
- Tighten securely while avoiding over-tightening to prevent housing damage
- Repeat for second roller
- Test spin to ensure free, smooth rotation
Best Practice: Replace both rollers. Even wear prevents imbalance and future issues.
Reinstall the Door Properly
Reassembly requires care to avoid misalignment.
Door Reinstallation Steps
- Position door near track, tilted inward
- Slide bottom rollers into lower track
- Gently lower top into place
- Guide upper rollers into top track
- Ensure full seating so door moves slightly without binding
Tip: Use a stiff putty knife to lift the door slightly if rollers do not align.
Common Issues During Reinstall
- Rollers will not engage: Rollers may be too low so adjust upward before reinstalling
- Door binds at top: Upper guide may be misaligned so check limiter block
- Difficult to pivot in: Ensure adjustment screws are fully lowered
Safety Note: Use suction cups and a helper. Glass breakage is a real risk.
Adjust and Test for Smooth Operation
Fine-tuning ensures perfect alignment and glide.
Roller Adjustment Process
- Use Phillips screwdriver on adjustment screws where clockwise raises the door and counter-clockwise lowers it
- Relieve pressure if stiff by using flat-head screwdriver to gently pry door up while assistant lifts during adjusting
Check Door Alignment
- Three reveals (gaps) should be even: left, center, right
- Target gap is 2 3/8 inches (approximately 60 mm)
- Use shims only if necessary since improper shimming limits alignment
Test and Fine-Tune
- Open and close multiple times while listening for scraping or noise
- If dragging, raise rollers slightly (1/4 to 1/2 turn)
- If wobbling, lower slightly
- Verify latch and lock engage smoothly without binding
- Address squeaking by lubricating dry weather-stripping with silicone and ensuring rollers are not rubbing frame
Pro Tip: Adjustment is iterative. Make small changes and test frequently.
Choose the Right Rollers for Longevity
Not all rollers are created equal. Pick the best for your environment.
Key Roller Selection Criteria
- Measure old rollers for width, height, axle, and mounting
- Note mounting style whether screw-in, snap-in, or press-fit
- Take photos or old rollers to hardware store
- Avoid universal unless confirmed since fit is not guaranteed
Upgrade for Durability
- Sealed ball bearings provide smoother, longer-lasting operation
- Stainless steel components resist corrosion in humid or coastal areas
- Nylon wheels are quieter and less abrasive than steel
Expert Insight: Higher-end rollers last 2-3x longer and reduce maintenance needs.
Maintain Rollers to Prevent Future Issues
Regular care extends roller life to 10+ years.
Monthly Maintenance
- Clean tracks by vacuuming and brushing out debris
- Check for obstructions including leaves, sand, and pet hair
Quarterly Lubrication
- Apply silicone-based lubricant to tracks and rollers
- Avoid oil-based sprays since they attract dirt
Annual Inspection
- Check rollers for wear, corrosion, and binding
- Inspect weather-stripping and replace if cracked or dry
- Verify alignment since misalignment increases roller stress
Tip: Well-maintained rollers last 5-10 years, with some exceeding 15 years with proper care.
Avoid Common DIY Mistakes
Steer clear of these frequent errors.
Top Mistakes to Skip
- Skipping track cleaning leads to immediate sticking returning
- Forcing the door risks glass breakage
- Replacing only one roller causes imbalance and accelerated wear
- Using wrong rollers leads to binding or damage
- Over-tightening screws strips threads or cracks housing
- Ignoring latch test compromises security and seal
- No photos before disassembly causes confusion during reassembly
Warning: A little patience saves hours of rework.
Know When to Call a Professional
Some situations demand expert help.
Call a Pro If
- Door is too heavy or hard to remove
- Frame has cracks, warping, or rot
- Track is bent, broken, or severely corroded
- Uncertain about roller type or adjustment
- Door still sticks after replacement may indicate structural misalignment
Note: Pros ensure proper sealing, alignment, and energy efficiency, which is critical for insulated doors.
Final Checks for Successful Roller Replacement
Confirm your repair worked before calling it done.
Performance Benchmarks
- Door glides smoothly with minimal effort
- No squeaking, scraping, or binding
- Even reveal gap around the frame
- Latch and lock engage securely
- Improved sealing with less draft when closed
Long-Term Success Factors
- Use frequency affects maintenance needs since high-traffic doors need more frequent care
- Environment impacts durability since sand, salt, or moisture accelerates wear
- Lubrication quality matters since silicone outperforms oil-based options
- Maintenance consistency is key with monthly cleaning being essential
Real-World Insight: Many users find that track cleaning alone fixed their issue. Always diagnose first.
Frequently Asked Questions About Replacing Sliding Glass Door Rollers
How do I know if my sliding glass door rollers need replacing?
Signs include difficulty sliding, squeaking or grinding noises that persist after lubrication, uneven movement or sagging, visible damage like cracked or flattened wheels, and metal shavings in the track. Always clean and lubricate first to rule out track debris.
Can I replace just one roller on a sliding glass door?
It is not recommended. Replacing only one roller causes imbalance and uneven wear on the new roller. Always replace both rollers even if only one appears damaged.
What tools do I need to replace sliding glass door rollers?
Essential tools include a #2 Phillips screwdriver, flat-blade screwdriver, long-nose pliers, stiff putty knife, rubber mallet, and measuring tape. Safety gear includes safety goggles, work gloves, and glazing suction cups.
How often should I lubricate sliding door rollers?
Lubricate rollers and tracks quarterly with silicone-based lubricant. Avoid WD-40 and oil-based sprays since they attract dirt and degrade over time.
How long do sliding glass door rollers last?
With proper maintenance, rollers last 5-10 years. In ideal conditions with monthly cleaning and quarterly lubrication, some rollers exceed 15 years.
Can I replace sliding door rollers myself, or do I need a professional?
Roller replacement is a manageable DIY project for most homeowners. However, call a professional if the door is too heavy to remove safely, the frame is damaged, the track is severely corroded, or if the door still sticks after replacement.
Key Takeaways for Replacing Sliding Glass Door Rollers
Replacing sliding glass door rollers is a high-impact, low-cost fix that restores smooth operation and security. With the right tools, a careful approach, and proper maintenance, you can extend your door’s life for years. Always prioritize safety by using suction cups and getting help for heavy doors. Verify compatibility by bringing old rollers or photos when purchasing replacements. Never skip track cleaning since this is the most common cause of premature roller failure. Whether you are doing it yourself or preparing to call a pro, this guide gives you the knowledge to make the right call.


