
A bare window alcove is wasted space in any home. With basic carpentry skills and a weekend of effort, you can learn how to build a window bench that adds seating, hidden storage, and architectural charm to your room. Whether you live in a small apartment or a house with a bay window, this project delivers real value without requiring professional help.
This guide walks you through the entire process of building a window bench, from initial measurements to final paint. You will discover which materials to buy, how to frame the structure securely, and how to install storage that actually works. By the end, you will have a custom built-in seat that looks like it came with the house.
Plan Your Window Bench Design
Measure Accurately for Fit and Function
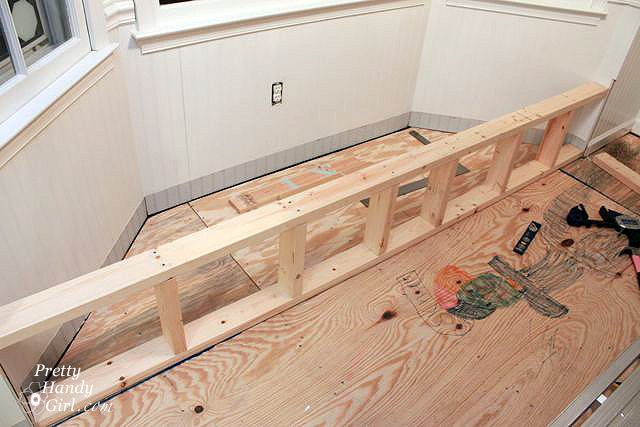
Start by measuring the window area precisely. Use a tape measure to record the width, depth, and height from floor to sill. Walls are rarely straight and floors often slope, so take multiple measurements at different points to account for irregularities. For bay windows, use card stock or masking tape to map angles and transfer exact cuts later.
Your design must accommodate obstructions like air vents, electrical outlets, or skirting boards. If preserving baseboards is important, plan to scribe cladding around them instead of cutting them out. Decide early whether you want lift-up storage lids or drawers, as this affects internal framing layout.
Choose Between Flat or Angled Front
A flat-front bench is easier to build and maximizes interior storage space. It creates a clean, rectangular footprint ideal for drawer systems or large lift-top compartments. This style works well under standard windows and pairs easily with trim for a built-in look.
An angled front follows the contour of a bay window, offering a more tailored appearance. However, it reduces usable storage depth and requires precise mitered cuts. For complex angles, use the cardboard template method: hold two pieces of stiff paper against adjacent walls to capture the exact angle, then trace it onto your cutting plans.
Determine Storage Type and Layout
Storage choice impacts structural design. Lift-top benches with hinged lids are best for bulky, infrequently used items like seasonal blankets or pillows. They need strong cross-supports and piano hinges but allow full access to the cavity.
Drawers offer better organization and easier access for daily use. But they require precise spacing of vertical supports to align with drawer slides. Use 3/4″ plywood and soft-close slides for durability. Plan drawer heights based on what you will store, with taller boxes for linens and shorter ones for books or toys.
Gather Materials and Tools
Essential Lumber and Panels
The frame relies on 2×4 lumber for strength and stability. For an 89-inch-wide bench, expect to use about ten 8-foot boards. These form the floor perimeter, wall supports, and front verticals.
For visible surfaces, you will need:
– 3/4″ smooth plywood for the seat top, drawer boxes, and backing
– 1/8″ sanded plywood for front cladding to create a thin, seamless finish
– 6mm or 12mm MDF for front panels and trim, ideal for painting
– 1×3 and 1×4 poplar boards for face frames and trim
– Half dowels to round lid edges for comfort
Must-Have Hardware and Fasteners
Use the right fastener for each job:
– 3.5″ wood screws for structural frame connections
– 1.5″ pocket hole screws for hidden joints with a Kreg Jig
– 3.5″ masonry screws with Tapcon anchors for concrete wall attachment
– Piano hinges cut to size for lift-top lids
– Drawer slides matched to frame depth
– Wood glue to strengthen joints
– Construction adhesive for non-destructive installation
– Panel pins to attach thin MDF
– Wood filler and caulk for finishing touches
Critical Tools Checklist
You will need a miter saw for accurate angled cuts, a circular saw or table saw for ripping plywood, and a jigsaw for cutting around vents, outlets, and skirting. A Kreg Jig simplifies pocket hole joinery, while a hammer drill handles masonry anchors. Add a brad nailer for fast trim installation, plus a tape measure, square, spirit level, and scribing compass for layout work. Finish with clamps, 220-grit sandpaper, and foam rollers for prep and painting.
Build the Structural Frame

Install Floor Frame and Wall Supports
Begin by marking stud locations on the back wall using a stud finder. The floor frame, made from 2x4s, must be secured into these studs for load-bearing strength. Lay the first 2×4 flush against the wall and screw it in place with two 3.5″ screws per stud.
If there is an air vent behind the bench, box it in now. Extend the duct forward within the frame and seal joints with aluminum foil tape to maintain airflow. Never block HVAC vents.
For side walls, install vertical 2×4 supports plumb and level. Use a spirit level to compensate for uneven floors and mark level lines on the wall as guides. Notch supports around electrical outlets so they sit flush.
Assemble Front Frame with Pocket Holes
The front structure defines the seat depth, typically 24 inches. Cut vertical 2x4s to height, usually 16 to 18 inches for comfort. Drill pocket holes into the top ends using a Kreg Jig, then attach them to a horizontal top front support.
Pre-assemble this unit before mounting it to the floor frame. This avoids tight-space assembly and ensures square alignment. Once attached, add a bottom front support for rigidity.
For lift-top storage, install cross-supports from front to back every 16 to 24 inches to support the lid. These also act as stops to prevent the lid from dropping.
Anchor for Maximum Stability
Long benches over 6 feet must be securely anchored. In new construction, use Tapcon screws into concrete or masonry. In wood-framed walls, drive 3.5″ screws into wall studs.
For renter-friendly builds, avoid floor screws. Instead, use vertical battens cut slightly longer than the gap between floor and top front batten. Tap them in tightly for a friction fit. Add wall-mounted L-brackets or adhesive for extra hold.
Check for squareness at every corner with a framing square. Any misalignment will cause drawers to bind or lids to rub.
Install Storage Solutions
Build and Mount Lift-Top Lids
For hidden storage, cut 3/4″ plywood or 12mm MDF into lid sections. In bay windows, use segmented lids with two fixed side panels and one central opening door.
Attach piano hinges to the back edge of the lid and the rear cross-support. Cut hinges to exact width with a hacksaw. Install hinges after painting to prevent paint buildup in the joints.
Ensure the lid opens smoothly by testing clearance. Walls are not straight, so rip narrow plywood side strips and nail them inside the frame to act as stops. Sand lid edges if needed and aim for a 1/8″ gap.
For a clean look, skip hardware. Instead, drill a 1.5″ finger pull with a hole saw or cut a recessed slot with a jigsaw along the front edge.
Construct and Fit Drawer Systems
Drawers need precise spacing. Install vertical 2x4s inside the frame to match drawer box height plus slide thickness. Use a 1×3 scrap as a spacer to align all drawer slides at the same height.
Attach drawer slides to the frame first. Then build boxes from 3/4″ plywood using pocket holes and wood glue. Attach the bottom panel with glue and nails.
Cut drawer fronts from 3/4″ plywood. For a shaker style, miter 3″ strips and nail them to the front. Attach fronts from inside the box so you can adjust alignment. Use consistent 1/8″ gaps between drawers and shims to help during installation.
Apply Cladding and Trim
Scribe and Install Front Paneling
Cover the frame front with 1/8″ plywood or 6mm MDF. If using multiple panels, align seams with future vertical trim to hide them.
When preserving baseboards, scribe the panel to fit their profile. Set a scribing compass to the gap between floor and panel, then trace the baseboard shape onto the MDF. Cut with a jigsaw for a perfect fit.
For exposed sides where the bench protrudes past the window recess, add plywood or MDF strips to box in edges.
Add Face Frame for Built-In Look
Install 1×3 top trim and 1×6 bottom trim first. Cut a hole in the bottom piece with a jigsaw if it covers an air vent.
Then install evenly spaced 1×4 vertical boards across the front. This creates a board-and-batten effect that hides seams and adds architectural detail.
For a softer lid edge, glue and nail a half dowel to the front of the MDF lid. Sand smooth and paint for a finished look.
Finish with Paint and Detailing
Prep for a Flawless Finish
Fill all screw holes and gaps with wood filler. Sand with 220-grit paper until smooth and wipe away dust with a tack cloth.
Caulk all seams between trim pieces and where the bench meets the wall. This creates a seamless, built-in appearance. Let caulk dry, then sand lightly.
Paint components before final assembly when possible, especially lids and trim. This avoids brush marks in tight corners.
Choose Paint and Match Surroundings
Use a high-quality primer and paint for a crisp, durable finish. Semi-gloss or satin sheens resist wear and are easy to clean.
To enhance the illusion of a custom build, paint the bench the same color as the walls or window frames. Matching the seat top to the sill creates a continuous visual line.
Spray-paint visible hinges white to blend them into the structure.
Adapt for Special Cases

Customize for Bay Windows
Bay windows require angled cuts. Fold an A4 paper diagonally to create a 45° template, or use card stock to trace the real angle.
Build segmented lids with fixed sides and a central lift panel to simplify hinging. A flat front inside a bay maximizes storage while reducing construction complexity.
Extend HVAC ducts to the front edge and cut a grille into the trim or lid to maintain airflow.
Build Renter-Friendly Versions
Avoid permanent changes with non-destructive builds. Use modular cabinet units as a base and top with a custom cushion or plywood cover.
Add casters for mobility. Paint side tables to match walls and place them beside the bench to blend it into the architecture.
Ensure any outlet on the back wall remains accessible by notching the rear support or building a small access door.
Final Touches and Maintenance
Add Cushions and Style the Nook
A 5″ thick cushion in durable fabric makes the bench comfortable for lounging. Custom-sewn box cushions give a tailored look.
Style with throw pillows, a small side table, and a reading lamp to turn the space into a cozy retreat.
For extra function, add a hinged lid with stay-open hinges or soft-close mechanisms.
Maintain Longevity and Reversibility
Wipe down painted surfaces regularly. Vacuum around the base and add quarter-round trim at the bottom to protect the wall and simplify cleaning.
Allow slight gaps between lid panels to prevent binding from wood expansion over time.
If built non-destructively, the entire unit can be removed, leaving original floors and skirting intact. This is ideal for preserving rental property value.
Frequently Asked Questions About Window Benches
What is the best wood to use when building a window bench?
2×4 lumber is the standard for the structural frame because it provides strength and stability. For visible surfaces, use 3/4″ smooth plywood for drawer boxes and seat tops, and 1/8″ plywood or 6mm MDF for front cladding. Poplar boards work well for face frames and trim because they paint cleanly and resist warping.
How do I build a window bench in a bay window with angles?
Use the cardboard template method to capture exact angles. Hold two pieces of stiff card against the intersecting walls, trace the angle, and transfer it to your cutting plans. Build segmented lids with fixed side panels and a central opening door to simplify hinging. A flat front inside the bay maximizes storage volume while reducing construction complexity.
Can I build a window bench without damaging walls or floors?
Yes. Use vertical battens cut slightly longer than the gap between floor and top front batten, then tap them in tightly for a friction fit. Add wall-mounted L-brackets or construction adhesive for extra hold. Alternatively, use modular cabinet units on casters that can be removed entirely when you move out.
How thick should a window bench cushion be?
A 5″ thick cushion provides comfortable seating for extended lounging. High-density foam wrapped in durable fabric like Sunbrella holds its shape over time. Custom-sewn box cushions give the most tailored appearance and prevent the cushion from sliding during use.
How do I handle an air vent behind the bench?
Never block HVAC vents. Extend the ductwork forward to the front edge of the bench location and seal joints with aluminum foil tape. Cut a matching grille or hole into the bench trim or lid panel to maintain proper airflow throughout the room.
What is the standard height for a window bench?
Most window benches measure 16 to 18 inches tall, which matches standard sofa seat height for comfortable sitting. Add 1 to 2 inches for the lid thickness and another 5 inches if you plan to use a thick cushion. The depth should be around 24 inches to allow comfortable seating without extending too far into the room.
Key Takeaways for Building Your Window Bench

Building a window bench comes down to three essentials: accurate measurements, a square and level frame, and clean finishing work. Start by mapping your space carefully and accounting for uneven walls or floors. Anchor the frame into wall studs or use friction-fit battens for stability without permanent damage.
Choose your storage style early, since lift-top lids and drawers require different internal framing. Finish with quality paint, consistent caulk lines, and trim that matches your home’s architecture. The result is a custom-looking built-in that adds function, storage, and charm to any room for years to come.



