
Every winter, homeowners face rising energy bills and chilly drafts, often caused by unseen heat loss through windows. With the average household losing $410 annually due to poor insulation and air leakage, identifying window heat loss is one of the most cost-effective ways to improve comfort and cut heating costs. Windows are a major weak point in your home’s thermal envelope, especially if they’re old, poorly sealed, or single-pane.
The good news? You don’t need to be a contractor to find these leaks. By using simple DIY methods or investing in basic thermal tools, you can pinpoint exactly where heat escapes and take action. This guide walks you through proven techniques, from candle tests to thermal imaging, to accurately detect window heat loss and prioritize fixes that deliver real savings.
Decode Thermal Signatures
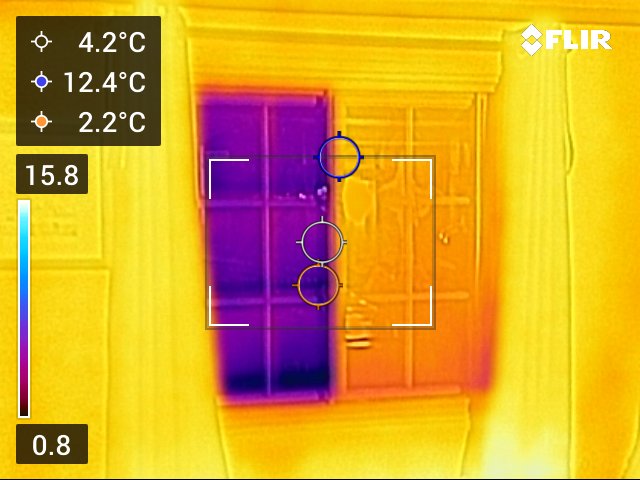
Understanding how heat moves and how we detect it is key to accurate diagnosis. Heat escapes through conduction via materials and convection via air leaks, both visible as temperature differences on surfaces. A thermal camera or infrared thermometer detects these surface temperatures, revealing inefficiencies. Indoors, blue or purple areas on a thermal image indicate cold spots where heat is escaping or cold air is entering. Outdoors, warm colors like red or yellow show heat radiating from your home.
For reliable results, there must be at least a 10°C (18°F) difference between indoor and outdoor temperatures. Otherwise, thermal patterns blend together and become invisible. Also, remember that glass reflects infrared radiation, which can create false readings. To improve accuracy, set your camera’s emissivity to 0.9 for glass, or use masking tape on shiny surfaces to eliminate reflection errors.
Read Infrared Color Patterns
Interpreting thermal images starts with understanding color meaning. On most thermal displays:
- Red, orange, yellow = warmer surfaces (heat retention indoors, heat loss outdoors)
- Blue, purple, green = cooler surfaces (drafts, missing insulation, infiltration)
When inspecting windows from inside, look for cold streaks around frames or sills, which signal air leaks. A uniformly cold pane suggests poor insulation or single glazing. If only the edges are cold, the window may have failing edge seals in double-pane units. Outdoors, bright warm spots at window locations confirm heat leakage. Always compare adjacent windows under the same conditions; one appearing significantly colder or warmer than others often indicates a problem specific to that unit.
Avoid Common Detection Errors
False readings can mislead even experienced users. One major pitfall is reflection off glass or metal, making a cold window appear to “cool” a nearby wall. To test, shift your viewing angle. If the cold spot moves, it’s a reflection. Another issue is insufficient temperature difference. Scanning on a mild day yields weak contrast, hiding real problems. Wait for colder weather or run your heating system for 3 to 4 hours before testing.
Also, solar gain heats exterior walls during the day, masking heat loss. For outdoor scans, go out early in the morning before sunrise or on overcast days. Lastly, don’t mistake thermal mass effects; thick masonry walls release stored heat slowly, appearing warm at night even if well-insulated. Focus on patterns, not isolated spots, for accurate diagnosis.
Perform DIY Leak Detection
You can identify significant window heat loss using simple, low-cost methods that require no special equipment. These techniques are ideal for homeowners looking to start their energy audit without investment. The goal is to detect air movement, a clear sign of convective heat loss. On a cold, windy day, drafts become easier to sense and trace. Start with manual checks, then move to visual smoke tests.
Use the Candle Test
This classic method reveals airflow with high sensitivity. Light a candle or incense stick and slowly move it along window sashes, frames, corners, and meeting rails. Hold it close, within an inch, without touching the surface. If the flame flickers or the smoke stream wavers, you’ve found a draft. Pay special attention to:
- Top and bottom of double-hung windows
- Corners where sashes meet
- Around movable parts where weatherstripping may be worn
Repeat the test on calm days by turning on bathroom or kitchen exhaust fans to create negative indoor pressure, pulling outside air in through leaks. Once identified, mark the spot and plan to reseal with caulk or replace worn gaskets.
Conduct a Hand Inspection
Your hands are sensitive thermal detectors. On a cold day, run your palms slowly around the entire perimeter of each window. Move deliberately because drafts are often subtle. Feel for:
- A stream of cool air
- Sudden drops in surface temperature
- Pulsing airflow (indicating wind-driven infiltration)
Focus on joints between the frame and wall, sill areas, and operable sections. Also check interior trim and baseboards near windows, as gaps can hide behind molding. If you feel cold air, the window likely lacks proper sealing or has deteriorated insulation in the surrounding cavity. This method works best when the indoor-outdoor temperature difference is strong.
Use Consumer Thermal Tools
For more precise detection, consider affordable thermal tools that make invisible heat loss visible. These devices bridge the gap between guesswork and professional-grade diagnostics, offering actionable insights at a fraction of the cost.
Try Smartphone Thermal Cameras
Devices like the FLIR ONE or Seek Thermal attach to your smartphone and display live thermal images. Though lower resolution (e.g., 80×60 pixels) than professional units, they clearly show temperature differences. Use them to:
- Scan multiple windows for comparative performance
- Identify cold corners or frame edges
- Detect hidden leaks behind trim
Hold the device steady and perpendicular to the surface. Move slowly to avoid motion blur. Many apps include color alarms; set them to highlight temperatures below 18°C (65°F) to instantly spot problem zones. These tools excel at before-and-after verification after sealing work.
Apply Infrared Thermometers
An IR gun measures surface temperature from a distance. While it can’t show patterns, it’s excellent for spot comparisons. For window checks:
- Measure the center of the glass
- Measure near the edge or frame
- Compare readings
A difference of 2 to 3°C (3 to 5°F) or more suggests thermal bridging or failed seals. Stand close (6 to 12 inches) to avoid averaging with surrounding areas. Take multiple readings to confirm. Note that shiny glass gives false lows. Wipe a small area with soapy water or apply tape to increase emissivity for accuracy.
Run Professional-Grade Tests

For comprehensive assessment, especially in older homes or when planning major upgrades, professional tools provide definitive data. These methods go beyond detection because they quantify heat loss and air leakage, enabling precise performance tracking.
Schedule a Thermal Imaging Survey
Hiring a certified thermographer ensures accurate, full-home analysis. Professionals use high-resolution cameras and follow strict protocols:
- Heat home for 3 to 4 hours before inspection
- Close all windows, doors, and blinds
- Limit occupancy to avoid body heat interference
They scan both interior and exterior surfaces, identifying:
- Air leaks around window frames
- Missing insulation in walls
- Thermal bridging through studs
Ask for a detailed report with annotated images to help prioritize repairs and track improvements over time. Renting a camera is also an option, but proper interpretation requires practice.
Request a Blower Door Test
This is the gold standard for air leakage detection. A powerful fan is mounted in an exterior door, depressurizing your home to 50 Pascals. This exaggerates drafts, making even tiny leaks detectable. While under pressure:
- Use a thermal camera to see cold streaks intensify around windows
- Run your hand or smoke pencil to feel or see airflow
The test also measures total air changes per hour (ACH50) or CFM50 (cubic feet per minute at 50 Pa), giving you a numerical benchmark for your home’s tightness. Many energy auditors combine this with thermal imaging for maximum insight.
Inspect Critical Window Zones

Not all parts of a window fail equally. Targeted inspection of high-risk areas increases your chances of finding meaningful leaks.
Examine Frame and Glazing Edges
Most heat loss occurs at the junction between glass and frame. Look for:
- Condensation on inner edges, which indicates cold surface and potential seal failure
- Discoloration or fogging between panes, a sign of broken double-glazing seal
- Gaps between frame and wall, often filled with old, cracked caulk
Use your thermal camera to compare edge versus center glass temperature. A cold frame suggests aluminum or steel conductors; consider retrofitting with thermal breaks or replacing with vinyl or wood units.
Check Operable Components
Moving parts wear out. Inspect:
- Weatherstripping on sashes; should compress snugly when closed
- Meeting rails, a common source of vertical gaps in double-hungs
- Locking mechanisms; if latches don’t pull sashes tightly together, air slips through
If the window doesn’t seal fully when closed, adjust or replace hardware. Install brush or compression seals for better contact.
Assess Installation Quality
Poor installation causes hidden leaks. Look for:
- Expanding foam gaps around the frame; should be continuous and cured
- Flashing above the window, which prevents water and air intrusion
- Interior trim gaps, which can hide large voids behind molding
If you suspect installation flaws, remove a section of trim and inspect with a flashlight or boroscope. Recaulk or add foam as needed.
Prioritize and Fix Identified Issues

Once you’ve found heat loss, act in order of return on investment. Most experts agree: seal air leaks first, then add insulation, then upgrade windows.
Seal All Air Leaks
Air sealing is cheap and highly effective. For windows:
- Caulk static joints (frame-to-wall, glass-to-frame)
- Replace weatherstripping on moving parts
- Use removable draft seals for temporary gaps
For electrical outlets on exterior walls, install foam gaskets behind cover plates. They cost less than $1 each and cut convection loops.
Upgrade Insulation Behind Trim
If walls around windows feel cold, insulation may be missing or compressed. Consider:
- Cavity wall insulation injection (for older homes)
- Interior rigid foam board on exterior walls
- Spray foam around window bucks and rough openings
These reduce conductive loss and minimize cold radiation into the room.
Replace or Retrofit Windows
Full replacement is costly but may be justified if:
- Windows are single-pane
- Glazing is fogged or cracked
- Frames are rotting or corroding
Alternatives include:
- Storm windows that add an insulating air gap
- Interior window inserts offering near-dual-pane performance
- Insulated cellular shades that reduce nighttime heat loss by up to 40%
Choose low-E double-pane units with argon fill and warm-edge spacers for best performance.
Frequently Asked Questions About Window Heat Loss
What temperature difference is needed for accurate thermal detection?
You need at least a 10°C (18°F) difference between indoor and outdoor temperatures. Without this delta, thermal anomalies blend together and become invisible on thermal cameras or infrared thermometers.
Can I check window heat loss without buying expensive equipment?
Yes. The candle test and hand inspection are free and effective. Light a candle near window edges and watch for flickering, or run your hand along frames on a cold day to feel drafts. These methods reveal significant air leaks without any investment.
How do I avoid false readings on shiny glass?
Glass reflects infrared radiation, which creates misleading cold spots. Set your thermal camera’s emissivity to 0.9 for glass, or apply masking tape to shiny surfaces before scanning. You can also shift your viewing angle to confirm whether a cold spot is real or a reflection.
Should I seal leaks or replace windows first?
Always seal air leaks first. Caulking and weatherstripping cost very little and offer the fastest payback. Window replacement is expensive and should only follow once you’ve addressed air leakage and insulation issues.
What does fogging between window panes mean?
Fogging or discoloration between panes indicates a broken seal in double-glazed units. Moisture has entered the space, reducing insulation performance. You may need to replace the unit or install a storm window as a retrofit.
How accurate are smartphone thermal cameras?
Smartphone attachments like the FLIR ONE offer moderate accuracy with resolutions around 80×60 pixels. They’re sufficient for identifying relative temperature differences and gross leaks, but they lack the precision of professional-grade cameras costing thousands of dollars.
Key Takeaways for Checking Window Heat Loss
Checking window heat loss doesn’t require a degree in engineering, just a clear day, a few simple tools, and a methodical approach. Start with free techniques like the hand and candle tests, then consider a smartphone thermal camera for deeper insight. Always ensure a strong indoor-outdoor temperature difference, avoid reflective errors, and focus on air sealing first.
By addressing even the smallest drafts, you’ll boost comfort, slash energy bills, and make your home more resilient to winter’s chill. Pick one window in your home today and run the candle test. You’ll likely find at least one draft you can seal in under ten minutes, and that’s where real savings begin.



