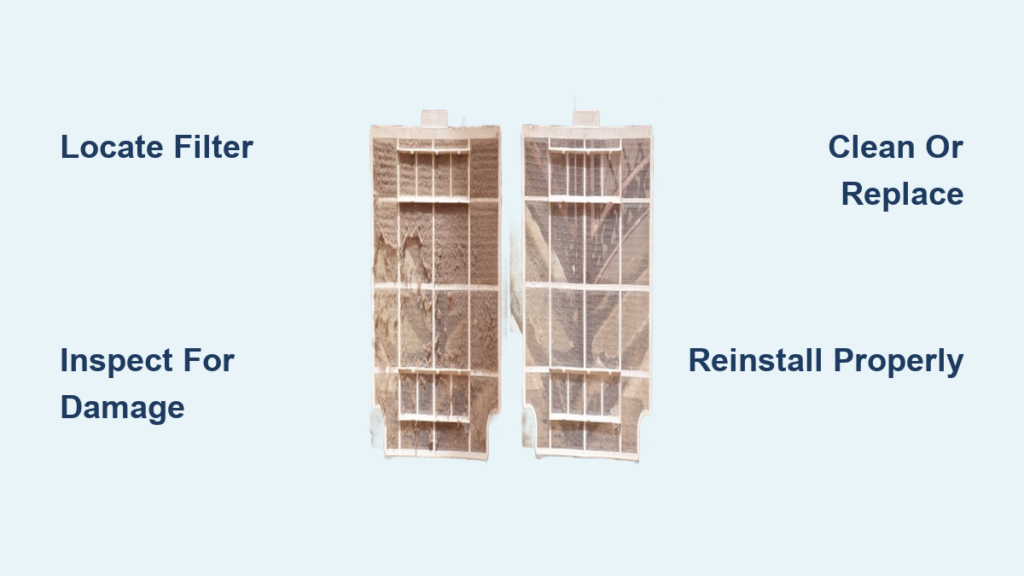
A clogged window AC filter can leave your room stuffy and warm, even when the unit runs nonstop. The real culprit is often a dirty or damaged filter blocking airflow, not a broken compressor. Learning how to replace a window AC filter (and when cleaning is enough) keeps your home cooler, your air cleaner, and your unit running efficiently for years.
This guide covers how to identify your filter type, decide between cleaning and replacing, walk through the full replacement process, and maintain your unit for peak performance season after season.
Locate and Identify the Window AC Filter
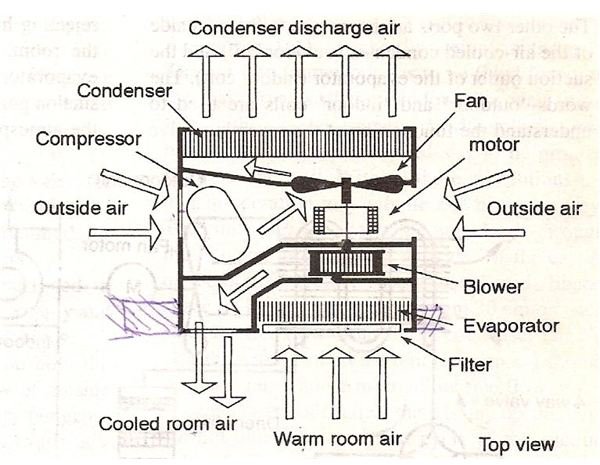
Find the Filter Housing
The air filter sits behind the front control panel of most window AC units. Look for notches or screws along the lower edge of the front grille. On many models, the cover snaps off easily; others require removing a few screws first. Once the cover is off, you’ll see the filter resting in a slide-in track.
Recognize Filter Type
Most window AC filters are reusable and built for cleaning rather than frequent replacement. They consist of a thin membrane (typically paper or fiberglass) that traps dust, pollen, and pet dander. The membrane sits inside a plastic or metal frame. Before purchasing a replacement, note the exact dimensions (length x width x thickness) and the model number, often printed on the frame itself.
Decide Whether to Clean or Replace the Filter
Replace Only If Damaged
Cleaning is the standard approach for routine maintenance. However, replacement becomes necessary when the filter shows clear signs of damage, including:
– Holes, rips, or tears in the mesh membrane
– A warped or cracked frame that prevents a snug fit
– Material that crumbles or disintegrates when touched
– A loose fit that lets unfiltered air bypass the system
A compromised filter allows dust to reach sensitive internal parts like the evaporator coil, reducing efficiency and potentially causing long-term damage.
Clean for Routine Maintenance
If the filter is intact, clean it every 30 days during peak use. Regular cleaning prevents clogs, maintains strong airflow, and saves you from buying unnecessary replacements. Use cleaning as your go-to method for minor dust buildup or light odors.
Gather Tools and Supplies
Essential Cleaning Tools
Even when replacing the filter, you’ll want to clean the surrounding area first. Gather these items:
– Vacuum cleaner (shop vac preferred)
– Old toothbrush with soft bristles
– Soft brush for coil cleaning
– Bucket and access to a garden hose or sink
– Clean towel or cloth
Cleaning Materials
For a thorough deep clean, you’ll also need:
– Mild dish soap
– White vinegar (for mold and odors)
– Warm water
Avoid harsh chemicals, as they can degrade the filter membrane over time.
Safety First
Before starting any work:
1. Turn off the AC and unplug it from the wall
2. Place the unit on a flat, stable surface at waist height (a sturdy table or deck works well)
3. Orient the unit so the control panel side faces you
4. Keep sharp tools away from delicate coil fins
Step-by-Step Window AC Filter Replacement Process
Remove the Front Cover
Locate the front panel on the control side of the unit. Press the release tabs or unscrew the fasteners, depending on your model. Gently pull the cover forward and set it aside. Avoid forcing it, as some models have connecting wires or hidden clips.
Slide Out the Old Filter
Grasp the filter by its edges and slide it straight out of the track. Some models may require a slight upward or downward angle. If the filter feels stuck, check for hidden screws or clips. Once removed, place it on a clean work surface for inspection.
Inspect the Filter: Clean or Replace?

Hold It Up to Light
Shine light through the filter membrane. If you see pinholes, large tears, or missing sections, replacement is required. A compromised membrane cannot filter effectively no matter how clean it is.
Check the Fit
Try sliding the filter back into its track. If it wobbles, leaves gaps, or doesn’t sit flush, the frame may be warped. A poor fit defeats the purpose entirely, since dust will bypass the filter and enter the unit.
Order the Correct Replacement
If replacement is needed, use the model number or exact dimensions (length, width, thickness) to find a compatible filter. OEM (original equipment manufacturer) filters are recommended, though universal-fit options exist. Order from the manufacturer, an HVAC supplier, or a trusted online retailer.
Clean the AC Interior Before Installing the New Filter

Vacuum the Filter Slot
With the filter removed, vacuum the empty track and surrounding area using the hose attachment (never a brush, which can damage fins). Remove all loose dust, hair, and debris to prevent recontamination.
Wipe Down the Cover and Housing
Use a damp cloth to clean the inside of the front panel and filter housing. This step ensures your fresh filter doesn’t collect leftover grime the moment you install it.
Brush the Coils
Behind the filter sits the evaporator coil. Use a soft brush to gently remove dust buildup without bending the delicate fins. Dirty coils reduce cooling efficiency and strain the compressor. Clean the condenser coil at the back of the unit the same way.
Install the New Filter Correctly
Confirm the Fit
Before inserting, double-check that the new filter matches the old one in size and airflow direction. Some filters have arrows indicating airflow orientation. It should slide in smoothly but snugly, with no gaps along the sides.
Slide It In Securely
Insert the filter into the track at the same angle you used during removal. Push it all the way in until it sits flush. Make sure it’s not upside down or backwards.
Reattach the Front Cover
Snap or screw the front panel back into place. Ensure it’s secure and properly aligned; a loose cover can rattle or reduce airflow.
Post-Installation Checks
Power On and Test
Plug the unit back in and turn it on. Set it to cool mode and observe:
– Airflow strength (should feel strong and consistent)
– Cooling performance (room should begin cooling within 15–20 minutes)
– Unusual noises (grinding or rattling may signal improper installation)
Monitor for Leaks or Odors
If you notice water dripping inside or a musty smell, the filter may have been installed wet or incorrectly. Turn off the unit and recheck the installation.
Troubleshooting Common Issues
No Cool Air After Replacement
- Cause: Filter installed backward or housing not sealed
- Fix: Recheck filter orientation and confirm the cover is fully closed
Dust Still Circulating
- Cause: Gaps around the filter or a damaged seal
- Fix: Ensure the filter sits snugly; replace it if the frame is warped
Musty Smell Persists
- Cause: Mold in the coils or housing
- Fix: Clean the interior with a vinegar solution and dry thoroughly
Filter Won’t Slide In
- Cause: Wrong size or debris in the track
- Fix: Measure carefully and clean the slot before reinserting
Maintenance Best Practices for Long-Term Performance
Monthly Cleaning Routine
Even with a new filter, clean it monthly using this simple process:
1. Vacuum both sides thoroughly
2. Wash with warm, soapy water
3. Rinse clean and air-dry completely
4. Wipe down the housing before reinstalling
Deep Clean at Season Start
Before the first heavy use of summer:
– Replace or deep-clean the filter
– Brush both evaporator and condenser coils
– Soak the filter in a 1:3 vinegar-to-water solution for 15 minutes if musty
– Dry in direct sunlight to kill bacteria
End-of-Season Storage Tips
Before storing the unit:
– Clean the filter and coils thoroughly
– Let every component dry completely
– Cover with a breathable cloth (never plastic)
– Store in a dry, indoor location
Expert Tips for Maximum Filter Life
Seal All Gaps
A filter is only as effective as its fit. Even a small gap allows 30–50% of air to bypass filtration. Always confirm a tight, gap-free seal.
Never Reinstall a Wet Filter
Moisture can drip into the motor or electrical components, causing shorts or corrosion. Dry the filter completely, usually 1–2 hours in direct sunlight.
Use Vinegar for Mold Prevention
White vinegar kills mold spores and neutralizes odors. Use it monthly if you live in a humid climate or notice any mustiness.
Replace, Don’t Repair
Taped or patched filters don’t work effectively. If the membrane is damaged, replace the entire filter. It’s not worth risking internal damage to save a few dollars.
Frequently Asked Questions About Window AC Filters
How often should I replace my window AC filter?
Most window AC filters are designed for cleaning, not replacement. Clean your filter every 30 days during peak use, and only replace it when the membrane is torn, the frame is warped, or the material disintegrates.
Can I run my window AC without a filter?
Running the unit without a filter allows dust and debris to accumulate on the evaporator coil and other internal parts. This reduces efficiency, strains the compressor, and shortens the lifespan of your AC.
How do I know if my window AC filter is damaged?
Hold the filter up to a light source. If you see pinholes, tears, or missing sections, the membrane is compromised. Also check whether the frame sits snugly in its track; gaps mean the filter is no longer effective.
What’s the difference between cleaning and replacing a window AC filter?
Cleaning removes dust and debris from an intact filter using vacuuming, soapy water, or vinegar. Replacement is needed only when the filter is physically damaged, warped, or no longer fits properly.
Can I use soap and water to clean my window AC filter?
Yes. Use mild dish soap with warm water and a soft toothbrush to gently scrub both sides. Rinse thoroughly and let the filter dry completely before reinstalling. Avoid harsh chemicals that can degrade the membrane.
How long does it take to clean or replace a window AC filter?
The entire process typically takes 10 to 20 minutes, including removal, cleaning, drying, and reinstallation. Replacement itself is quick once you have the correct filter on hand.
Final Thoughts on Replacing Your Window AC Filter
Knowing how to replace a window AC filter is a simple skill that saves money, boosts cooling efficiency, and extends your unit’s lifespan. Most filters only need regular cleaning, but when damage occurs, prompt replacement protects your AC from costly internal problems.
Inspect your filter monthly, clean it consistently, and replace it only when truly necessary. Start your next maintenance session by checking the filter’s condition, and you’ll enjoy stronger airflow, cleaner air, and reliable cooling all summer long.