

You wake up on a freezing morning and find your windows streaming with water, sills damp, glass fogged beyond recognition. That moisture pooling on the inside of your panes is winter window condensation, and it is one of the most common cold-weather headaches for homeowners. It forms when humid indoor air contacts cold glass, cooling below the dew point and releasing liquid water. Ignore it long enough, and you risk rotted wood, peeling paint, and mold creeping along the sills.
The fix is not a single product or habit. Stopping winter window condensation means managing humidity, moving air around, and making sure your windows can hold their own against the cold. Modern tightly sealed homes trap moisture that older drafty houses once let escape, so even brand-new construction can suffer. This guide walks you through diagnosing the exact type of condensation you have, dialing in humidity levels, boosting airflow, sealing drafts, and upgrading glass so your windows stay clear all season.
Pinpoint the Condensation Location First
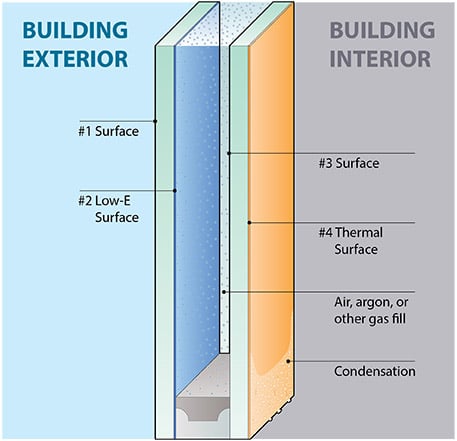
Where the moisture sits determines everything about your next move. Wiping without diagnosing wastes time and leaves the real problem untouched.
Interior, Exterior, or Between the Panes
Condensation on the inside surface of the glass means warm indoor air is hitting a cold pane. This is the classic winter problem and points to excess humidity or weak insulation. It is the only type that signals trouble inside your home.
Condensation on the outside of the glass is actually good news. It means your windows insulate so well that the outer pane stays cold enough to form dew. The sun usually burns it off by mid-morning, and no action is required.
Fog or moisture between the panes of a double- or triple-glazed window means the seal has failed. The desiccant inside the unit is saturated, and the insulating gas has likely escaped. Cleaning will not help, and the window’s performance has dropped permanently.
Confirm a Seal Failure Before Replacing
Before assuming inter-pane fog means a broken seal, clean the glass thoroughly with a streak-free cleaner. Soap residue, kitchen grease, and hard water deposits can mimic internal fogging, especially near cooking areas.
If the cloudiness remains trapped between the layers after a proper cleaning, the seal is compromised. At that point, your options are replacing just the glass unit or the entire window, depending on frame condition.
Drive Indoor Humidity Below the Danger Zone
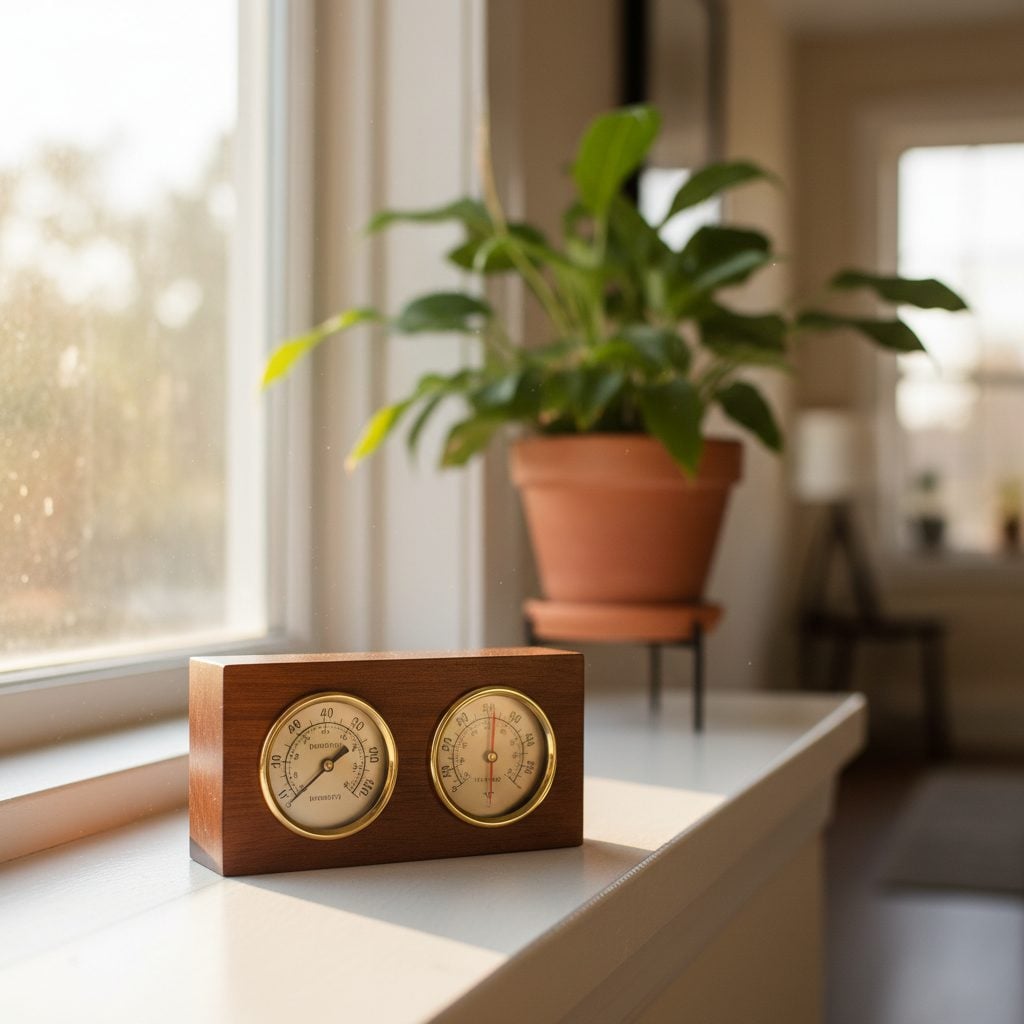
High indoor moisture is the leading cause of condensation on interior glass. Target a relative humidity between 30% and 50% during winter, especially when outdoor temperatures drop below freezing.
Know Your Numbers with a Hygrometer
A hygrometer is a small, inexpensive tool that reads the moisture level in your air. Place one near the problem window, away from direct heat sources and drafts. Check it at different times of day to spot patterns.
When readings climb past 55%, condensation becomes likely. A family of four can release up to four gallons of water vapor daily through breathing, cooking, and showering. Without ventilation, that moisture has nowhere to go.
Run Exhaust Fans the Right Way
Bathroom and kitchen fans only help if you use them correctly and long enough.
- Cooking: Switch on the range hood before you start, and let it run for 15 to 20 minutes after the last burner turns off. Covering pots cuts steam at the source.
- Showering: Run the bathroom fan during your shower and for at least 20 minutes afterward. A timer switch makes this automatic.
- Venting: Confirm that ducts lead outside, not into an attic or crawl space. Trapped moist air causes hidden mold and rots insulation from the inside out.
Weak or noisy fans discourage use. Upgrade to quiet, high-CFM models with sone ratings under 1.0, and add humidity-sensing models that switch on automatically.
Cut Off Moisture at the Source
Stop adding water vapor to your indoor air whenever possible.
- Avoid drying laundry indoors. A single load releases up to two gallons of moisture. If you must dry clothes inside, run a dehumidifier in the same room and keep the door closed.
- Vent your dryer to the outside. A clogged or missing vent hose dumps steam straight into your living space.
- Move houseplants away from cold windows. Plants release moisture through transpiration, and clustering them near glass creates a localized humidity spike.
- Lower humidifier settings the moment you see condensation on glass.
Deploy Dehumidifiers Where They Count

When ventilation cannot keep up, mechanical dehumidification becomes essential, especially in basements, bathrooms, and tightly sealed homes.
Pick the Right Type for the Space
Portable dehumidifiers work well for single rooms. Look for models with built-in hygrometers, auto shut-off, and a continuous drain option so you do not have to empty the tank daily. Full-sized units run $200 to $300 and handle medium to large rooms effectively.
Whole-house dehumidifiers tie into your HVAC system and control moisture across every room. They require professional installation but solve chronic problems in airtight new builds.
Passive absorbers like DampRid use calcium chloride to pull moisture from the air. They suit closets, cabinets, and small bathrooms where electric units are overkill.
Position Units for Maximum Impact
Place portable dehumidifiers in the rooms where condensation appears, usually bedrooms, bathrooms, or sunrooms. Keep them at least six inches from walls for proper airflow. Set the target humidity to 45 to 50% and let the unit cycle automatically.
Move Air to Prevent Cold Spots
Still air lets moisture settle on the coldest surface it can find. Circulating air equalizes temperatures and keeps humidity from pooling near glass.
Run Ceiling Fans in Reverse
Most ceiling fans have a direction switch. In winter, set them to clockwise at low speed. This pulls cool air upward and pushes the warm air that collects at the ceiling back down along the walls and windows, raising the glass temperature.
Run fans daily during cold snaps. You will feel warmer, reduce condensation, and distribute heat more evenly throughout the room.
Keep Interior Doors Open and Vents Clear
Closed doors trap moisture in kitchens and bathrooms. Leave interior doors open so air can mix freely between rooms.
Check that furniture, rugs, and drapes are not blocking heating vents or cold-air returns. Restricted airflow creates cold pockets near windows, which is exactly where condensation forms first.
Flush Out Moisture with Brief Ventilation
When outdoor temperatures allow, open windows for 5 to 10 minutes to exchange stale, humid indoor air for cold, dry outdoor air. Cold air holds far less moisture, so even a short burst drops indoor humidity significantly.
Time this for right after showering or cooking. If opening windows is impractical in deep cold, install trickle vents or small window ventilators that allow controlled airflow without a major heat loss.
Upgrade to Mechanical Ventilation for Tight Homes
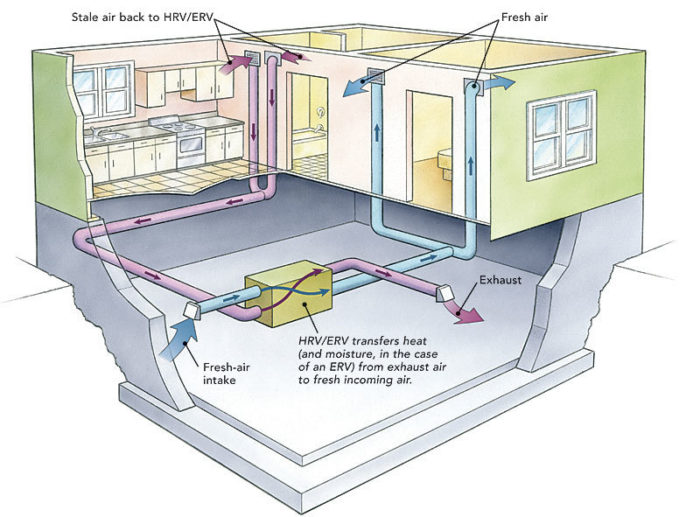
In modern construction with excellent insulation, natural ventilation is rarely enough. Mechanical systems remove moisture at the source while preserving heat.
Install a Heat Recovery Ventilator
A Heat Recovery Ventilator (HRV) or Energy Recovery Ventilator (ERV) pulls stale, moist air out while drawing fresh air in. A heat exchanger transfers warmth from the outgoing air to the incoming air, so you lose almost no heat in the process.
Expect to pay $1,500 to $3,000 installed, depending on home size and ductwork. For new builds or renovated homes with chronic moisture issues, an HRV is one of the most effective long-term solutions.
Replace Undersized Exhaust Fans
Old bathroom and kitchen fans often move too little air to keep up with daily moisture production.
- Bathrooms: At least 50 CFM for standard sizes.
- Kitchens: 100+ CFM for serious steam removal during heavy cooking.
Choose quiet, energy-efficient models and consider humidity-sensing models that activate automatically when moisture rises.
Warm the Glass Surface Directly
Even with controlled humidity, condensation forms if the glass is too cold. Raising the surface temperature keeps the surrounding air above the dew point.
Manage Window Coverings by Time of Day
During daylight hours, keep blinds and shades open so sunlight can warm the glass and air can circulate freely around the window. At night, close thermal curtains to trap a layer of warm air against the pane.
Avoid heavy, non-breathable drapes that seal moisture against the glass. Insulated cellular shades are a better choice because they create a dead-air buffer without trapping humidity.
Push Warm Air Toward Cold Windows
Place a small fan on the floor angled toward a problem window. The moving warm air eliminates cold spots on the glass and prevents dew from forming.
Make sure heating vents near windows are open and unblocked. If certain rooms stay cold despite your system running, consider duct sealing or a booster fan to push more warm air to those areas.
Seal Gaps Around Window Frames
Cold air leaking past the frame cools the glass edges and invites condensation. Sealing those gaps is a low-cost, high-impact fix.
Weather Stripping and Caulk
Inspect every window inside and out for cracks, gaps, and deteriorated seals.
- Weather stripping: Replace worn compression seals on movable sashes with V-strip, foam tape, or silicone.
- Caulking: Apply silicone or acrylic latex caulk where the frame meets the wall, both inside and outside.
Tackle this in early fall before temperatures plummet. You will feel less drafts, lower your heating bill, and reduce condensation at the frame edges.
Try DIY Insulation for Older Windows
If replacement is not in the budget, low-cost solutions still help.
- Plastic film kits: Shrink-wrap clear plastic over the frame to create an insulating air barrier.
- Bubble wrap: Apply with the smooth side out using water or tape. It looks odd but works as a temporary insulator.
- Rope caulk: Press into drafty gaps along sashes for a season-long seal.
- Interior storm panels: Rigid acrylic or polycarbonate inserts fit inside the frame and add a real insulating layer.
These options work well for renters or homeowners saving up for full replacement.
Replace Windows When Nothing Else Works
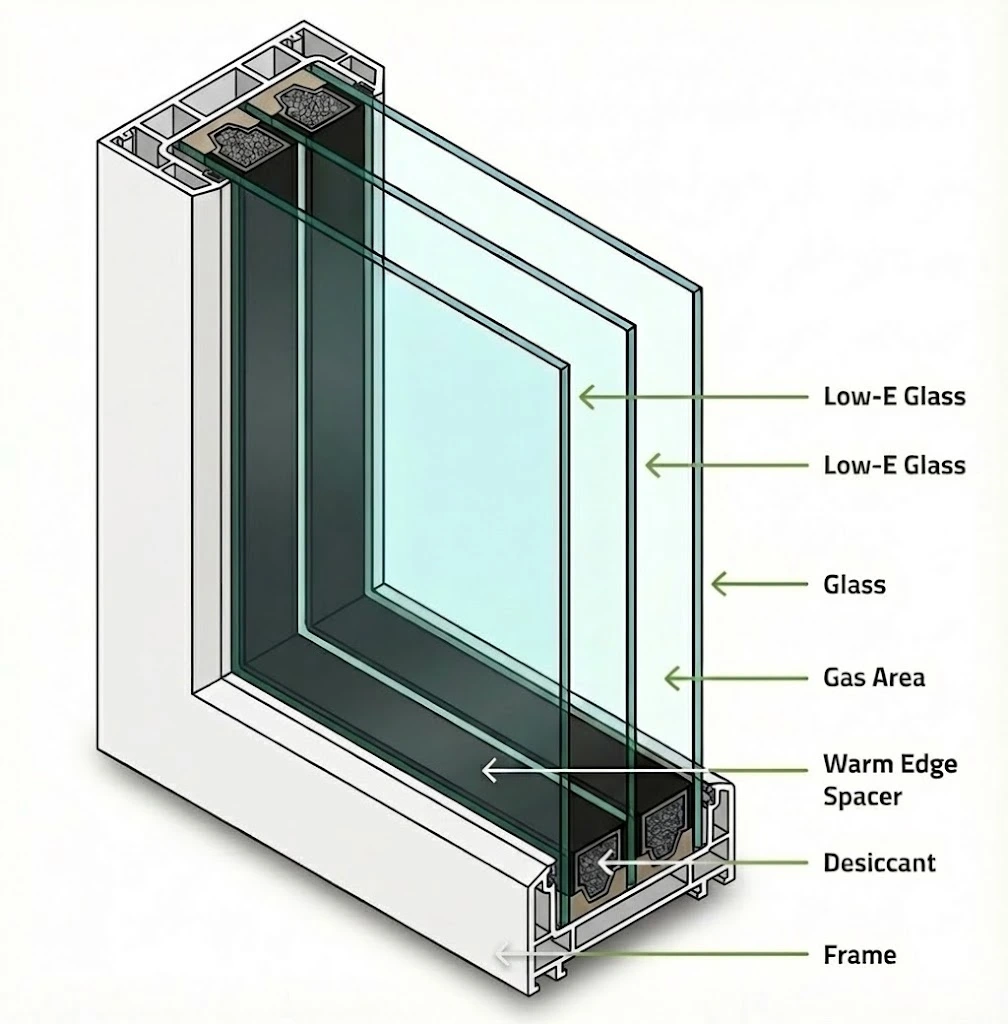
If condensation persists after controlling humidity and sealing drafts, the glass itself may be the weak link.
Upgrade to Modern Energy-Efficient Units
Single-pane windows offer almost no insulation. Even older double-pane units lose performance as seals degrade and insulating gas escapes.
Modern replacements deliver major improvements:
- Double or triple glazing with insulating gas fills
- Low-E coatings that reflect heat back into the room
- Warm-edge spacers that reduce cold spots at the glass perimeter
- Argon or krypton gas between panes for better insulation
New windows keep interior glass 10 to 20°F warmer than older models, which dramatically reduces condensation risk.
Add Storm Windows as a Middle Ground
If full replacement is not feasible, exterior or interior storm windows add a second insulating layer. They raise glass temperature and often eliminate condensation entirely.
If moisture appears on the storm window instead of the primary glass, it usually means the inner window leaks air. Reseal or weatherstrip the primary unit to fix the issue.
Stay Ahead with Year-Round Maintenance
Prevention beats repair, and a few minutes each season keeps your windows performing well.
Wipe Moisture the Moment You See It
Keep a microfiber cloth near problem windows and dry the glass and sills as soon as moisture appears. Standing water soaks into wood, damages paint, and feeds mold growth within days.
Make morning wipe-downs part of your winter routine during the coldest weeks.
Inspect Seals and Hardware Twice a Year
Check windows in fall and spring for cracked caulk, missing weather stripping, sticky locks, or fogging between panes. Lubricate tracks and hinges, tighten loose hardware, and replace any seal that has pulled away from the frame.
Fixing small issues early prevents the expensive repairs that come from long-term water damage.
Track Humidity Through the Seasons
Indoor humidity needs shift with the weather. Keep winter levels at 30 to 40% when outdoor temperatures drop below 20°F, and adjust upward in milder weather.
A smart hygrometer or a thermostat with humidity control can automate responses, such as triggering a dehumidifier when levels climb past your target.
Frequently Asked Questions About Winter Window Condensation
What humidity level should I maintain to prevent window condensation in winter?
Keep indoor relative humidity between 30% and 50% during winter. When outdoor temperatures fall below 20°F, aim for the lower end of that range. Levels above 60% almost guarantee condensation on cold glass.
Is exterior window condensation a sign of a problem?
No. Exterior condensation is dew forming on the outside of well-insulated windows. It typically appears early in the morning and evaporates once the sun warms the glass. It actually confirms that your windows are performing well.
Can I fix fog between window panes without replacing the whole window?
Often yes. If the frame is in good condition, a technician can replace just the insulated glass unit (IGU) for $200 to $400 per sash. This restores clarity and insulation without the cost of full window replacement.
Do dehumidifiers really help with window condensation?
Yes, especially in basements, bathrooms, and tightly sealed homes. A portable dehumidifier in the problem room keeps humidity below the dew point and prevents moisture from settling on cold glass. Whole-house units tied into your HVAC system work even better for chronic issues.
How long should I run my bathroom exhaust fan after a shower?
Run it for at least 20 minutes after you finish showering. That gives the fan enough time to evacuate the steam before it cools and condenses on nearby surfaces. A timer switch makes this automatic.
Why are my new energy-efficient windows causing more condensation?
Tight construction traps moisture that older drafty homes once let escape. Daily activities like cooking, showering, and breathing release gallons of water vapor that now have nowhere to go. The solution is mechanical ventilation, such as exhaust fans, dehumidifiers, or a Heat Recovery Ventilator (HRV).
Final Thoughts on Stopping Winter Window Condensation
The fastest path to clear windows is a combination of three moves: lower indoor humidity below 50%, move air across cold glass with fans and open doors, and seal any drafts around window frames. These steps solve the majority of winter condensation problems without major expense.
If moisture still appears, the next layer is upgrading exhaust fans, adding a dehumidifier, or installing an HRV for whole-house moisture control. Window replacement is the last resort, reserved for single-pane glass, failed seals, or chronic problems that no other fix can solve.
Start today by placing a hygrometer near your worst window and running your bathroom fan for 20 minutes after your next shower. Small changes add up quickly, and within a week you can measure whether your humidity is dropping into the safe range.



