
You’ve planned your dream kitchen, centered the sink beneath a sunny window, and now you’re staring at a plumbing puzzle. The catch is that venting a kitchen sink under a window is tricky because building codes demand specific pipe heights that often clash with window placement. A standard vertical vent pipe simply has nowhere legal to go when a window frame blocks the path.
The good news is that there are several code-approved ways to solve this problem. Whether you’re remodeling or building new, you can achieve smooth drainage without tearing out walls or breaking regulations. This guide walks you through three proven methods, the mistakes that cause failed inspections, and how to pick the right approach for your layout.
Bypass the Window with Side-Wall Venting
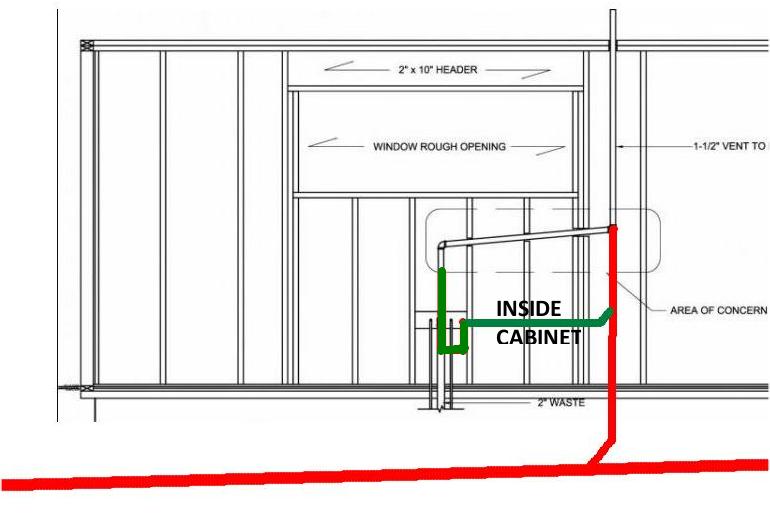
When a window blocks the path for a vertical vent stack, the most reliable solution is to relocate the vent to an adjacent wall where framing allows unobstructed vertical access.
Extend the Trap Arm Under the Window
Instead of venting directly behind the sink, reroute the trap arm horizontally beneath the window to reach a vertical vent on a nearby wall. This keeps the vent pipe out of the window zone while staying within code.
Here’s how it works:
– The sink drain connects to a P-trap under the cabinet.
– From the trap, the 2-inch pipe runs horizontally, parallel to the floor, under the window sill.
– It travels to the nearest side wall where framing permits a vertical run.
– At that point, the pipe turns upward with a long sweep 90-degree fitting to begin the vent rise.
Critical Rule: The trap arm must slope no more than ¼ inch per foot and cannot exceed its maximum allowable length. For a 2-inch pipe, this is typically 5 feet from trap to vent connection. Going beyond this increases siphon risk and violates code.
Connect to Vertical Stack at the Required Height
Once the pipe reaches the side wall, it must rise straight up to meet code height requirements before turning horizontal toward the main vent stack.
Key elevation rules:
– The vent must tie into the stack at least 6 inches above the flood level rim of the sink.
– Any horizontal vent segment must be 42 inches or higher above the finished floor.
That means:
– The vertical pipe should rise to at least 42 inches, then turn with a 45-degree wye or combo fitting into the main vent line.
– Use long sweep 90s only when necessary, since sharp elbows create turbulence and clog easily.
Avoid Structural Framing Damage
Running pipe through walls requires care around load-bearing elements:
– Do not cut jack studs, king studs, or headers without proper reinforcement.
– Drill holes through cavity spaces only, centered in the stud (max 60% of stud width).
– If framing blocks the path, consider building a shallow bulkhead beside the window to conceal the vent.
This method works best when you have accessible wall space to the left or right of the window, the trap arm length stays under code limits, and you have access to the wall cavity or attic above.
Install a Code-Compliant Island Vent Loop

If side-wall venting isn’t possible due to cabinetry, wall layout, or structural constraints, the island vent loop is your next best option. It is specifically designed for fixtures where no vertical stack is nearby.
Build the Loop Under the Cabinet
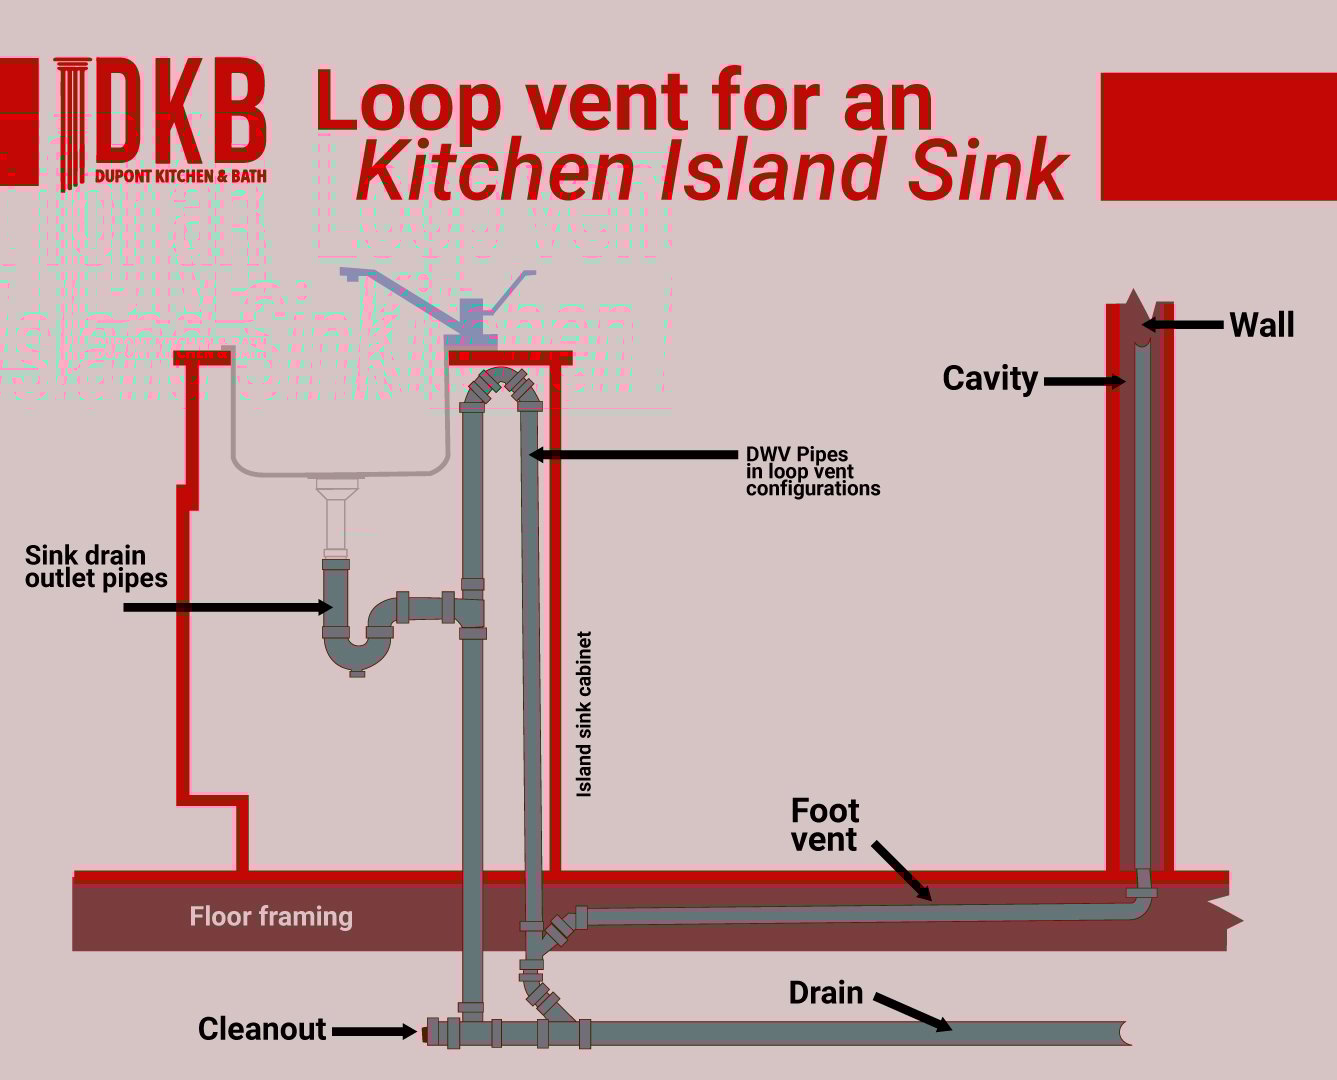
The island loop mimics a traditional vent by rising from the drain, looping high under the sink, then connecting back down to the same drainage line. It creates airflow without needing a roof penetration directly above the sink.
Steps to install:
1. From the P-trap, run the trap arm at least 6 inches horizontally before any upward turn.
2. Use a long sweep 90 to send the pipe upward toward the top of the cabinet.
3. Let it rise as high as possible, ideally within 2–4 inches of the countertop underside.
4. At the apex, use another long sweep 90 to reverse direction downward.
5. The downward leg connects back to the drain line via a 45-degree wye fitting, located downstream of the trap but before the main stack connection.
Use Correct Fittings to Prevent Clogs
Using the wrong fittings is a leading cause of failed inspections and gurgling drains.
Approved fittings include:
– Long sweep 90s at both the base and top of the loop
– Wye or combo fitting for re-entry into the drain at an angle
– Cleanout plug installed at the bottom of the loop or at the wye connection
A simple “U” bend with standard elbows is not a loop vent. It is a trap waiting to clog.
Keep the Loop Accessible and Maintainable
Because debris can collect at the bottom of the loop, a cleanout is mandatory:
– Install a test cap or plug at the lowest point of the loop.
– Ensure it is reachable, so don’t box it in behind drawers or sealed panels.
– Label it clearly for future maintenance.
This method works best when no adjacent wall is available for venting, ceiling or wall penetrations are impractical, and you want a fully passive system with no moving parts.
Use an Air Admittance Valve as a Last Resort
/sink-vent-installing-an-auto-vent-2718828-05-ca0dcb2915be457b9693ccd2655e6c21.jpg)
When neither side-wall venting nor a loop vent is structurally possible, an Air Admittance Valve (AAV) offers a compact, mechanical alternative. It is not the first choice, but it is legal in many areas when used correctly.
How an AAV Replaces a Traditional Vent
An AAV is a one-way mechanical valve that:
– Opens to let air into the drain when negative pressure forms during draining
– Seals shut to block sewer gases from entering your home
It eliminates the need for a vertical pipe run through the wall or roof, making it ideal when a window blocks the path.
Installation steps:
1. After the P-trap, extend the drain arm upward at least 4 inches above the horizontal pipe.
2. Install the AAV vertically upright with no tilting.
3. Secure it so it remains accessible and not buried in a wall or cabinet.
4. Connect downstream to the main drain line.
Check Local Code Before Installing
AAVs are not universally accepted:
– IPC (International Plumbing Code) allows AAVs in most residential applications.
– UPC (Uniform Plumbing Code) often restricts AAVs to remodels only or prohibits them entirely, so check local amendments.
Always contact your city building department or a licensed plumber to confirm before proceeding.
Choose Quality and Ensure Accessibility
Low-cost AAVs fail faster. Invest in a brass or high-grade ABS model rated for kitchen use.
Critical rules:
– Must be installed at least 4 inches above the overflow level of the fixture
– Cannot be placed in a sealed enclosure and must be reachable for replacement
– Should be located where temperatures stay above freezing, so avoid exterior walls
Use AAVs only when structural walls prevent all traditional venting, local code permits mechanical vents, and you can keep the unit accessible and protected from freezing.
Avoid Common Venting Mistakes
Even small errors can lead to failed inspections, clogs, or foul odors. Here’s what to watch out for.
Don’t Run Horizontal Vents Too Low
A frequent DIY mistake is running a vent pipe horizontally under the window at sink level, then turning it up later. Any horizontal vent section below 42 inches violates plumbing code. If the pipe is below the sink’s flood rim, wastewater could back up into the vent during a clog. Either rise to 42+ inches before going horizontal, or use a loop vent or AAV instead.
Don’t Confuse the Trap Arm With the Vent Pipe
The trap arm (from P-trap to vent) can run horizontally under the window as long as slope and length are within limits. The vent pipe (from vent connection upward) cannot go horizontal until it reaches 42 inches. The trap arm is the green zone, while the area below 42 inches is off-limits for vents.
Don’t Use Standard 90-Degree Elbows in Loops
Sharp turns in vent loops create turbulence and trap debris. Code requires long sweep 90s for all direction changes and combo fittings for drain connections. Standard 90s will fail inspection.
Don’t Hide Cleanouts or AAVs
Plumbers need access. Code requires cleanouts on loops and directional changes, and AAVs must be visible and removable. Burying either behind drywall or cabinetry will fail inspection.
Choose the Right Method for Your Layout
Not every solution fits every kitchen. Here’s how to decide.
Best for Wide Side Walls: Offset Drain to Side Vent
If you have at least 12–18 inches of wall space beside the window, use side-wall venting. Extend the trap arm under the window and rise vertically at the side. This is the most reliable, fully passive, and universally code-approved option.
Best for Tight Spaces: Island Vent Loop
If the sink is centered under a wide window with no side access, install a loop vent. Maximize loop height under the cabinet, use proper fittings, and include a cleanout. This approach requires no wall modifications, has no mechanical parts, and stays code-compliant when built right.
Best for Remodels: Air Admittance Valve
If walls are finished, framing is solid, and venting is impossible, install an AAV. Confirm local code allows it and keep it accessible. This is a fast, low-impact install, but carries mechanical failure risk and isn’t allowed everywhere.
Frequently Asked Questions About Venting a Kitchen Sink Under a Window
Can I run a vent pipe horizontally under the window?
No, not as a vent. Horizontal vent pipes must be at least 42 inches above the finished floor. However, the trap arm (the drain portion between the P-trap and the vent connection) can run horizontally under the window if it stays within code length limits and proper slope.
What is the minimum height for a horizontal vent pipe?
Horizontal vent pipes must be at least 42 inches above the finished floor. Additionally, the vent must connect to the stack at least 6 inches above the flood level rim of the highest fixture it serves.
Are Air Admittance Valves legal for kitchen sinks?
It depends on your local code. The IPC generally allows AAVs in residential applications. The UPC often restricts them to remodels or prohibits them entirely. Always verify with your local building department before installing one.
What is the difference between a loop vent and a regular P-trap loop?
A P-trap holds water to block sewer gases. A loop vent is a code-compliant venting configuration that rises from the drain, loops as high as possible under the cabinet, and reconnects to the drain line using long sweep fittings and a wye connection. A simple U-shape with standard elbows is not a legal loop vent.
How long can a trap arm be before it needs a vent?
For a 2-inch pipe with a standard ¼-inch per foot slope, the maximum trap arm length is typically 5 feet from the P-trap to the vent connection. Exceeding this distance increases siphon risk and violates code.
Do I need a cleanout for an island vent loop?
Yes. A cleanout is required at the base of the loop or at the wye connection point. This allows plumbers to clear debris that collects at the bottom turn without disassembling the entire pipe.
Key Takeaways for Venting a Kitchen Sink Under a Window
Venting a kitchen sink under a window comes down to respecting the 42-inch height rule and choosing the right configuration for your space. Side-wall venting is the most reliable option when adjacent wall space exists. Island vent loops work well when no wall access is available, provided you use long sweep fittings and include a cleanout. AAVs serve as a last-resort mechanical solution when structural constraints eliminate other options.
Before closing up any walls, test the system by pouring 5 gallons of water rapidly and listening for gurgling. When in doubt, consult a licensed plumber to verify code compliance and avoid costly rework.



