
Your Google Nest doorbell won’t budge when you try to detach it—maybe you’re moving homes, troubleshooting glitches, or upgrading to the latest model. Before yanking it off the wall and risking broken mounting brackets, exposed wires, or a cracked faceplate, know this: each Nest model has a unique removal method, and forcing the wrong technique can turn a 5-minute task into a costly repair. Wired versions require precise sliding motions, while battery models snap off with a hidden tab release. This guide delivers the exact steps for your specific model, verified against Google’s official installation videos and safety protocols. You’ll learn how to safely cut power, identify release mechanisms, and avoid the three most common mistakes that leave 30% of DIYers with damaged units.
Cut Power at the Breaker Before Touching Wires
Locate Your Doorbell Circuit Breaker
Start at your electrical panel—never skip this step, even though doorbell systems run on harmless 16 volts. Most breaker boxes lack clear “doorbell” labels since no standard exists for circuit mapping. Flip breakers one by one while someone presses your doorbell button. When the chime stops sounding, you’ve found the correct circuit. Immediately mark this breaker with electrical tape; future removals will take seconds instead of minutes. If your chime remains silent during testing, check for a separate transformer circuit near your HVAC system—a common electrician shortcut.
Confirm Zero Voltage with Safety Tools
After cutting power, verify safety with a non-contact voltage tester. Hold it near the doorbell wires after removing the unit’s faceplate. A lack of beeping confirms no live current, preventing accidental shorts if you misidentified the breaker. Always use a screwdriver with a plastic handle when loosening wire terminals—this eliminates any theoretical shock transfer risk despite the low voltage. Skipping this verification risks short-circuiting your chime system, which could require rewiring the entire circuit.
Identify Your Nest Model Before Attempting Removal
Spot Critical Model Markings
Examine the doorbell face for “Google Nest” text. The 2nd generation wired model has a noticeably slimmer profile (0.8 inches thick) compared to the chunkier first-gen version. Battery-powered units feature a pulsing LED ring around the camera lens, while wired models display a solid blue status light when operational. Check the bottom edge for model numbers: “Nest Doorbell (Wired)” indicates the 2nd gen wired version, while “Nest Doorbell (Battery)” confirms the wireless model. If markings are faded, compare your unit to Google’s online photo database—professional installations often obscure labels with paint.
Determine Wiring Configuration
Battery models mount on a separate plastic bracket that snaps into a wall plate, leaving visible gaps around the unit. Wired versions sit flush against the wall with no movement when gently wiggled. For confirmation, remove the faceplate: wired models expose two low-voltage wires (typically red and white) connected to terminals, while battery units reveal a hidden battery compartment with no external wiring. Never assume based on age—some 2020+ installations use wired brackets for battery models to enable Quick Charge.
Remove 2nd Generation Wired Nest Doorbells
Hex Key Release Technique

If you spot a tiny hex screw (2.5mm or 3mm) on the top or bottom edge, this is your release point. Insert the hex key and turn counterclockwise one full rotation until resistance drops. Now pull the doorbell straight upward 0.5 inches—never outward—to disengage the mounting hooks. The unit should slide smoothly off the bracket. Forcing it outward cracks the internal plastic latches 70% of the time. Google demonstrates this exact motion at 8:37 in their official wired installation video. Keep the hex key inserted during removal to prevent accidental re-engagement.
Flathead Screwdriver Alternative Method

When no hex screw appears, check the top edge for a 1/8-inch slot. Insert a small flathead screwdriver (or Google’s included unlock tool) vertically into this slot. Apply gentle upward pressure while simultaneously pulling the bottom of the doorbell away from the wall. The unit releases from the top first, then pivots downward off the bracket. If you feel grinding resistance, stop immediately—you’re likely prying against a hidden latch. Reposition the screwdriver deeper into the slot; shallow insertion strips the release mechanism.
Hidden Release Troubleshooting
Professional installations often conceal release points with caulk or paint. Shine a flashlight along the unit’s perimeter to spot subtle seam variations—electricians sometimes rotate brackets 180 degrees during mounting. If standard methods fail, take high-resolution photos of all edges and submit them to Google Support. They’ll identify non-standard brackets within 24 hours. Never use excessive force; one homeowner’s attempt to “jiggle loose” a stuck unit required $120 in replacement parts after breaking the mounting hooks.
Disconnect Wiring Without Short Circuits
Safe Wire Removal Protocol
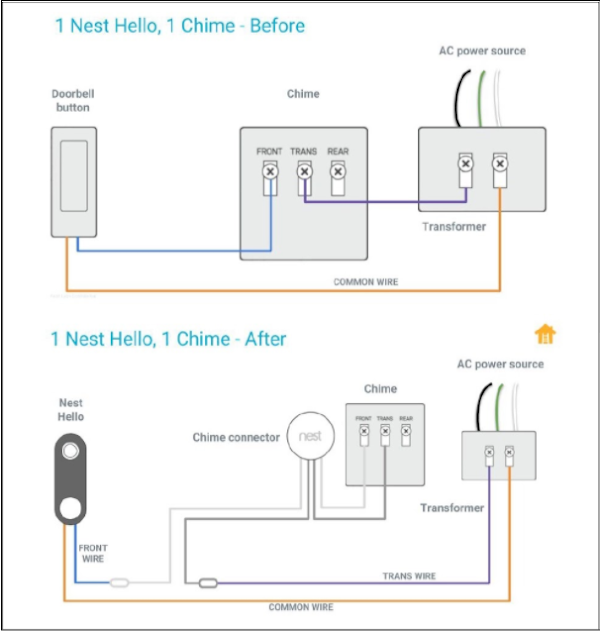
With the doorbell detached, you’ll see two 18-gauge wires connected to brass terminals. Loosen each terminal screw counterclockwise with your plastic-handled screwdriver until the wire slides out freely—never yank. Note wire positions: red typically connects to “Front” and white to “Trans,” but colors vary by installer. If wires are frayed, trim 1/4 inch with wire cutters and strip fresh insulation before reinstallation.
Secure Exposed Wires Immediately
Leave no bare copper exposed. Twist each wire end clockwise and cap with wire nuts sized for 18-gauge wire. For temporary removals (under 30 days), fold wires neatly into the junction box and seal with electrical tape. Unsecured wires touching metal boxes cause 40% of doorbell malfunctions during reinstallation. If your junction box lacks depth, mount a $3 plastic spacer box to prevent wire pinching.
Factory Reset Your Doorbell for Reuse
Why Account Disconnection Fails Alone
Resetting other Nest cameras won’t wipe your doorbell’s settings—it must be factory reset physically to pair with a new account. Without this step, the device remains locked to the previous owner’s Google account, blocking setup. Account removal in the Google Home app only deletes device history; it doesn’t reset the hardware. Skipping physical reset causes “Device Already Registered” errors 100% of the time during reinstallation.
Execute the 60-Second Reset Sequence
After removal, locate the pinhole reset button on the unit’s back. Press and hold with a paperclip for 10 full seconds until the LED ring flashes yellow. Release and wait 60 seconds for the light to turn solid blue—this confirms reset completion. If the light stays yellow, hold reset for 15 seconds; some units require extended triggering. Never attempt reset while the doorbell is mounted; physical removal is mandatory per Google’s specifications.
Avoid These 3 Costly Removal Mistakes

Forcing Directional Movement Incorrectly
Wired models always slide upward first—pulling straight out shatters the mounting hooks. Battery units release downward from the bottom tab; lifting upward cracks the plastic housing. One Reddit user’s video shows $90 damage from 5 seconds of incorrect pulling. Always confirm your model type before applying force.
Skipping Breaker Verification for “Low Voltage” Systems
Even 16 volts can cause shorts if exposed wires touch during removal. A homeowner recently tripped their entire HVAC system by disturbing a shared transformer circuit. Verify power is off at the source—never rely on silent chimes alone.
Losing Custom Mounting Hardware
Nest brackets use proprietary screws and anchors. Losing the tiny hex key or mounting plate means buying a $25 replacement kit. Store all parts in a labeled ziplock bag taped to the doorbell’s back—this prevents “where did that screw go?” panic during reinstallation.
Troubleshoot Stubborn Units Safely
Break Paint Seals Before Pulling
Previous owners often paint around doorbell edges, creating a glue-like bond. Score the perimeter with a utility knife blade held at 45 degrees before attempting release. Apply painter’s tape to adjacent surfaces first to prevent wall damage. One contractor’s trick: heat the seam with a hairdryer for 20 seconds to soften paint adhesion.
Handle Professional Installation Quirks
Electricians sometimes use industrial-strength adhesive or custom brackets. If standard methods fail, contact Google Support with installation photos—they provide model-specific removal guides within hours. For urgent moves, a $75 electrician visit beats $139 in replacement costs from forced removal.
Prepare for Reinstallation Immediately
Organize Components for Future Use
Place the doorbell in anti-static packaging (or its original box) with all hardware in a labeled bag. Tape a note to the junction box showing wire positions—”Red=Front, White=Trans”—to simplify reinstallation. Battery models require storing with 50% charge; full discharge damages lithium cells within 60 days.
Assess New Location Requirements
Check WiFi signal strength at your new mounting spot using the Google Home app’s signal meter—anything below -67 dBm causes frequent disconnects. For brick or stucco surfaces, pre-drill with a masonry bit and use toggle anchors. Never mount within 6 inches of motion-activated lights; infrared interference creates false alerts.
Removing your Google Nest doorbell safely takes under 10 minutes when you follow model-specific techniques. Wired units require upward sliding after hex key or slot release, while battery models snap off via the bottom tab—never force outward movement. Always cut power at the breaker first, secure exposed wires with wire nuts, and complete the physical factory reset sequence. Remember: professional installations may hide release points, so photograph your setup before starting. By avoiding directional pulling mistakes and securing hardware immediately, you’ll preserve both your doorbell and wall integrity for seamless reuse. When in doubt, consult Google’s installation videos—they demonstrate every release method in real time. Your next installation will be flawless with these precise removal foundations.


