
Installing a window in a metal building transforms a dark, enclosed space into a bright, functional area with natural light and ventilation. Done incorrectly, however, the same project can lead to water leaks, air infiltration, structural stress, and premature window failure due to thermal movement in steel construction.
This guide teaches you exactly how to install a window in a metal building using three proven methods. You will learn the specific steps, tools, and sealing protocols that professionals rely on for durable results, even in harsh climates and high-wind regions.
Identify Your Building’s Framing System
The installation method depends entirely on your building’s structural type. Choosing the wrong approach leads to misalignment, leaks, or weak anchoring.
Round-Tube vs. Post-Frame vs. Panel Systems
- Round-Tube Structures: Common in carports and older metal buildings with 2.5-inch galvanized steel posts. These require a dual buck framing system since standard square connectors will not fit curved tubing.
- Post-Frame Buildings: Use wood framing behind metal siding. Ideal for traditional window boxes with 2×4 blocking, house wrap, and J-channel trim.
- Mueller or 3-OT Panel Systems: Feature interlocking metal panels spaced 6 inches apart. Windows install directly into tracks using pins and flange alignment, requiring precise coordination.
Match your installation approach to your building’s structural system before cutting any metal.
Frame the Rough Opening Correctly
Precision in framing prevents gaps, warping, and seal failure. The rough opening must account for thermal expansion, insulation, and flashing requirements.
Measure for Expansion and Clearance
| System Type | Required Gap | Notes |
|---|---|---|
| Post-Frame | ½ inch all around | Allows for spray foam and movement |
| Mueller 303 | ¼ inch per side | Prevents binding during temperature shifts |
| Round-Tube (Dual Buck) | Match window flange plus ¼ inch | Ensures tight seal without stress |
Pro Tip: Always measure twice and verify alignment with a digital plate level. A misaligned header causes binding and poor operation.
Align with Steel Ribs
Steel siding features ribs spaced every 9 inches. The center of your window must align with either a rib or a flat section, never spanning across a rib. This ensures solid backing for screws, proper contact with flashing, and clean trim installation.
Use a Pik-a-Mark pencil to transfer measurements clearly onto metal surfaces.
Cut the Opening Safely
Cutting metal siding requires the right tool and technique to avoid jagged edges or damage to surrounding panels.
Use a Grinder with Diamond Blade
For round-tube retrofits or post-frame buildings, follow these steps:
- Mark the interior rough opening using the inner buck or framing.
- Cut the exterior steel with a grinder and diamond blade.
- Orient the jagged edge upward so the top trim sits flat.
- Remove metal cleanly to avoid snags during window insertion.
Safety First: Wear gloves, eye protection, and a respirator. Metal shards and dust are hazardous.
Install Using the Right Method
Choose the method based on your building type. Each has distinct steps and materials.
Install in Round-Tube Structures (Dual Buck Method)
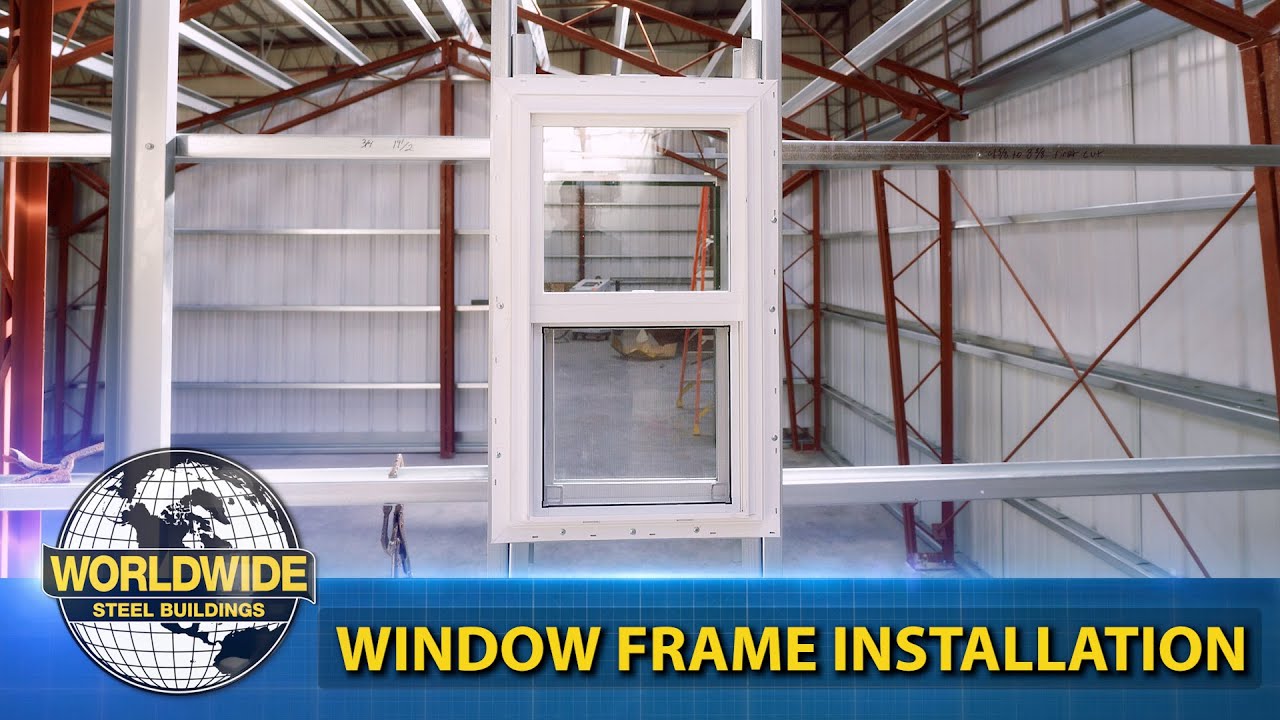
This method bridges round steel posts with a rectangular window frame using two framing layers.
Build the Inner and Outer Bucks
- Outer Buck: Attach metal tubing to the top and bottom plates, aligned with the round posts.
- Inner Buck: Frame to match the window’s flange size and wall depth. This simplifies trim and sealing.
Sequence the Installation
- Frame the opening from the inside first.
- Mark the rough opening on the interior.
- Cut the exterior steel.
- Temporarily remove the inner buck.
- Attach the flanged window to the inner buck using nails and tape.
- Apply caulk to the flange and buck.
- Slip the assembly into the opening.
- Secure the inner buck to the outer buck with screws in the jamb area.
- Add optional sheet metal screws through the exterior J-channel for extra hold.
Why It Works: The cured caulk bonds the assembly, while the dual buck handles structural stress from wind and expansion.
Install in Post-Frame Wood-Framed Walls

This is the most DIY-friendly method, using wood framing behind metal siding.
Step 1: Seal Before You Frame
- Apply house wrap to the entire wall.
- Cut around the opening and fold the wrap over the bottom and sides.
- Leave the top flap loose for later sealing.
- Run a bead of Lexel sealant on the sides and top of the rough opening.
- Never seal the bottom, as this creates a drainage path.
Step 2: Insert and Insulate the Window
- Place the window in the rough opening.
- Fasten with screws at the top, bottom, and center.
- Skip every other nailing fin slot to allow thermal movement.
- Fill the ½-inch perimeter gap with closed-cell spray foam to seal and insulate.
Step 3: Flash and Tape
- Lap the top house wrap flap over the window’s nailing fin.
- Staple to the header and trim excess.
- Apply stretchy seal tape over the wrap and onto the fin. This creates a mechanical flash barrier stronger than caulk alone.
Step 4: Install J-Channel Trim
- Bottom Channel: Cut a 1-inch notch, bend up to create a drip edge, and seal inside before installing.
- Side Channels: Mark at 36.25 inches, snip, add V-notches, and bend 90 degrees. Miter joints allow expansion.
- Top Channel (Critical): Install after the steel siding. Let it hang slightly over the metal to form a drip edge. Seal the joint to block water paths.
Pro Tip: Use a knife to open the hem of one J-channel piece and slide the other underneath for a tight, expandable joint.
Install in Mueller Panel Systems (Direct Integration)
For buildings with 3-OT panels and track-based systems.
Step 1: Set the Pins
- Choose window location.
- Insert a ¾-inch pin into the side track.
- If tight, add a drop of lubricant and tap gently with a rubber mallet.
- Verify track alignment before proceeding.
Step 2: Insert the Window
- Position one person inside and one outside.
- The inside person slides window over bottom sheet.
- The outside person aligns the bottom flange with the metal base.
- Lift slightly to seat the top flange into the track.
- Check for level.
- Drive two screws into the header to hold position.
Step 3: Modify Metal Sheets
- Cut steel with jagged edge up.
- Pre-drill all side fin holes to prevent screws from walking and fin pullout.
- Insert fins and secure with three screws per side.
Step 4: Secure and Trim
- Drive two screws through the panel bottom into the window base.
- Add sealing material on sides.
- Use inside screws to attach the sheet to the frame, hiding fasteners.
- Snap jam trim into place to cover screws and finish the look.
Key Detail: The H-rib line must run directly behind the window. Misalignment breaks the structural and weather seal.
Waterproof Like a Professional
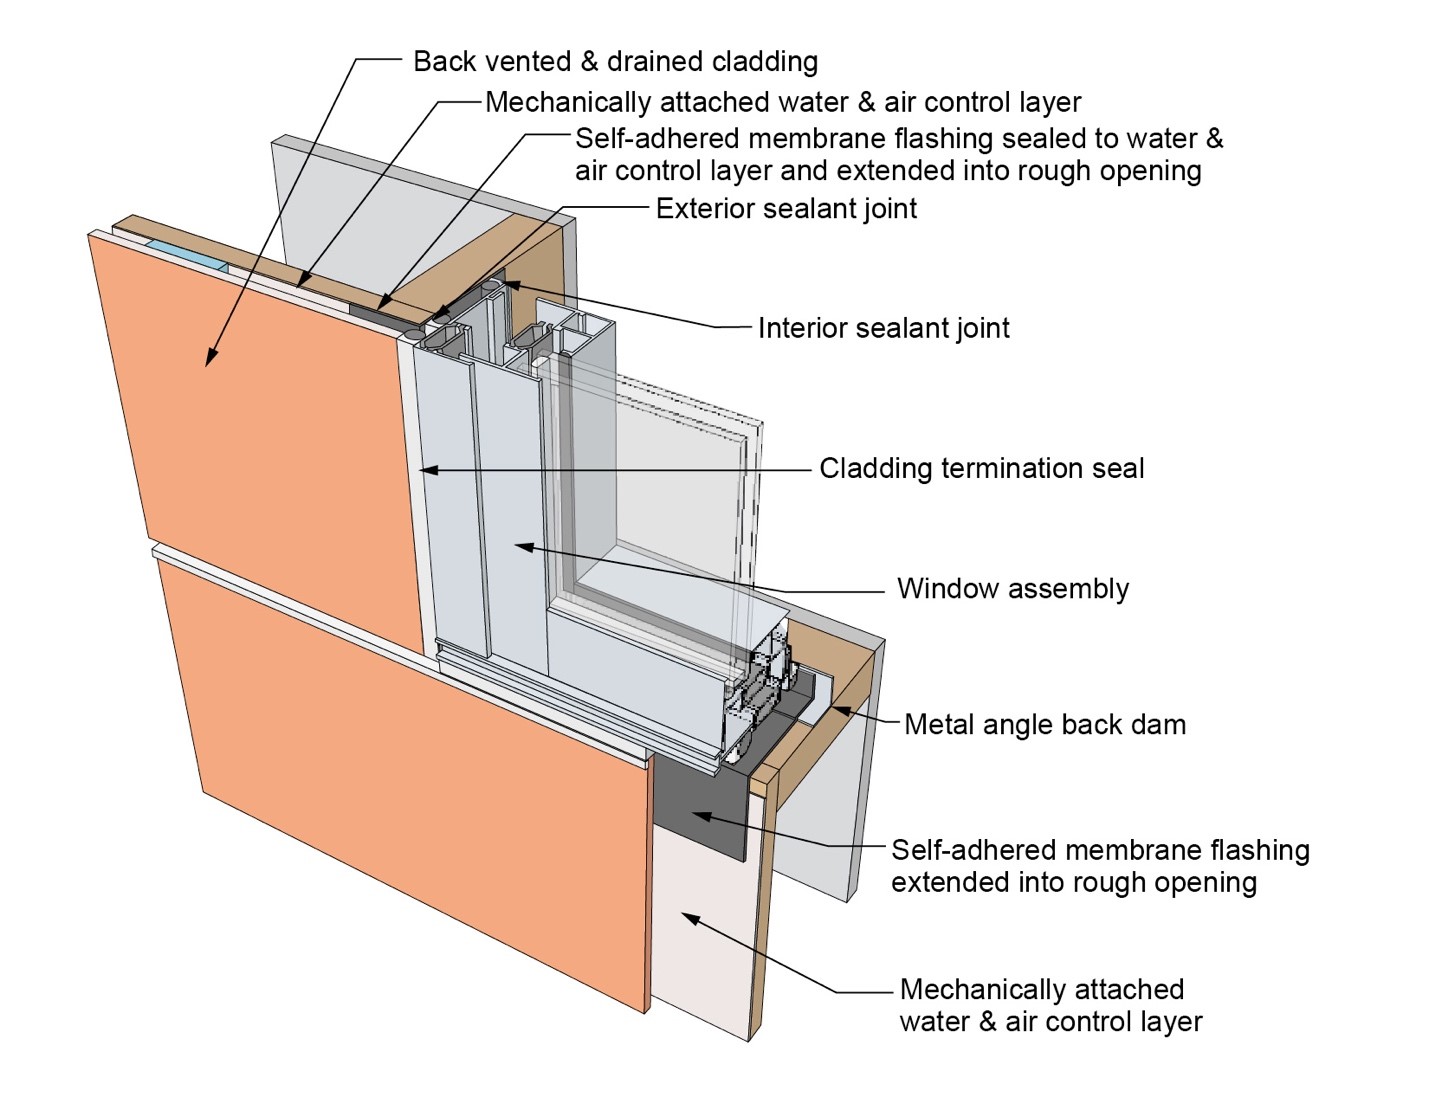
Water intrusion is the primary failure point. Use a layered defense: mechanical flashing first, then sealant, then caulk.
Use Lexel Sealant Strategically
- Apply continuous beads on sides and top of the rough opening.
- Never seal the bottom, as trapped moisture leads to rot and corrosion.
- Reapply every 5 to 7 years if exposed to direct sun.
Flashing Hierarchy
- House Wrap: Fold over sides and bottom; lap top over nailing fin.
- Seal Tape: Stretch over wrap and fin for a flexible, durable barrier.
- J-Channel: Acts as secondary flashing with bent bottom and overhanging top forming drip edges.
- Drip Cap (Optional): Install above exposed windows to deflect wind-driven rain.
Ensure Drainage
- Weep holes in the window sill must stay clear.
- The ½-inch gap at the rough opening bottom allows water to escape if it penetrates.
- Check for air infiltration, as unsealed return ducts create negative pressure that pulls moisture inside.
Use the Right Tools and Materials
Skip the wrong tool, and you risk damage or a failed seal.
Essential Tools
- Grinder with diamond blade for clean steel cuts
- Snips to shape J-channel and notch edges
- Digital plate level to verify perfect alignment
- Rubber mallet to tap pins without damaging metal
- Drill/driver for structural and self-tapping screws
- Pik-a-Mark pencil for high visibility on galvanized steel
Critical Materials
- Lexel sealant for UV and temperature resistance
- Closed-cell spray foam to air seal and insulate
- GRK structural screws for superior hold in wood headers
- Self-tapping screws for metal-to-frame fastening
- Stretchy seal tape for flexible, durable flashing
Avoid Common Installation Mistakes
Even small errors lead to major problems over time.
Skip These Errors
- No pre-drilling in fins causes screws to walk and fins to pull out
- Over-tightening screws warps the frame and breaks the seal
- Bottom plate upside down leads to future warping
- Sealing the bottom rough opening traps water and causes rot
- Ignoring thermal gaps results in expansion cracks
Pro Tip: Always allow ¼ to ½ inch clearance and skip nailing slots to accommodate movement.
Maintain for Long-Term Performance
A well-installed window lasts decades with basic upkeep.
Annual Maintenance Checklist
- Inspect weep holes for clogs
- Check sealant and tape for cracking
- Clean J-channels of debris
- Verify screws are tight but not over-torqued
- Test for air infiltration around the frame
If you feel drafts, check nearby HVAC return ducts. Unsealed ducts create negative pressure that pulls air through seals.
Frequently Asked Questions About Installing Windows in Metal Buildings
What is the best sealant for metal building windows?
Lexel sealant is the top choice for metal building windows. This high-performance acrylic resists UV degradation and extreme temperature shifts. Apply continuous beads on the sides and top of the rough opening, but never seal the bottom, which must remain open for drainage.
How much clearance do I need around a window in a metal building?
Clearance requirements vary by system. Post-frame buildings need a ½-inch gap around all sides for sealing and movement. Mueller 303 windows require ¼-inch clearance per side to prevent binding during temperature shifts. Round-tube structures should match the window flange plus an additional ¼ inch.
Can I install a window in a round-tube metal building?
Yes, you can install a window in a round-tube metal building using the dual buck method. This approach bridges the round 2.5-inch steel posts with a rectangular window frame using two framing layers. Standard square connectors will not fit curved tubing, so custom framing is required.
Why must the bottom of the rough opening remain unsealed?
The bottom must remain unsealed to allow drainage. If water penetrates the outer seal, it needs an escape path. Sealing the bottom traps moisture inside the wall cavity, leading to rot, corrosion, and potential structural damage over time.
What tools do I need to cut metal siding for a window?
A grinder equipped with a diamond blade is essential for cutting steel siding cleanly. You will also need snips for shaping J-channel, a digital plate level for alignment verification, and a Pik-a-Mark pencil for visible markings on galvanized steel surfaces.
How do I prevent water leaks around metal building windows?
Prevent water leaks using a layered defense system. Start with house wrap folded over the sides and bottom, then apply stretchy seal tape over the wrap and nailing fin. Install J-channel with a bent bottom drip edge and an overhanging top drip edge. For exposed walls, add a drip cap above the window to deflect wind-driven rain.
Key Takeaways for Installing Windows in Metal Buildings
Installing a window in a metal building requires matching the method to your structure, managing thermal movement, and building a multi-layered defense against water. For round-tube buildings, use the dual buck method with cured caulk for rigidity. For wood-framed post walls, rely on house wrap, seal tape, and strategic J-channel sequencing. For Mueller panel systems, follow the pin-and-track process with precise H-rib alignment.
Your next step is to identify your building’s framing system and gather the specific tools and materials listed for that method. Take time to verify all measurements and alignments before cutting any metal, and remember that proper sealing protocols matter more than speed. A careful installation delivers a window that looks great, performs flawlessly, and withstands decades of wind, rain, and temperature swings.



