

Installing or replacing an RV window restores energy efficiency, prevents water intrusion, and improves your view on the road. Whether you’re upgrading to double-pane glass, replacing a foggy unit, or cutting a new opening in a van build, proper installation makes all the difference. A single mistake, such as misaligned weep holes or using the wrong sealant, can lead to leaks, mold, or structural rot. This guide walks you through every phase of how to install RV window correctly, using proven methods from industry standards and real-world applications. You’ll learn precise measurement techniques, avoid common DIY pitfalls, and apply waterproof seals that last for years.
Identify Replacement Needs
Before picking up tools, confirm your window actually needs replacement. Not all issues require full removal.
Signs You Need a New Window
- Fog between panes: Indicates broken thermal seal, common in older single-pane units.
- Drafts or water leaks: Suggest failed perimeter sealing or frame deterioration.
- Cracked glass or warped frame: Compromises safety and insulation.
- Upgrading performance: Switching to double-pane, tinted, or larger windows improves comfort and light.
- Siding or wall repair: Replacing damaged fiberglass or metal often requires temporary window removal.
Warranty and Risk Warning
DIY window replacement on a warranty-covered RV may void coverage. Manufacturers often require professional installation with approved sealants. If unsure, consult your dealer or Camping World for warranty-safe service.
Measure the Opening Accurately
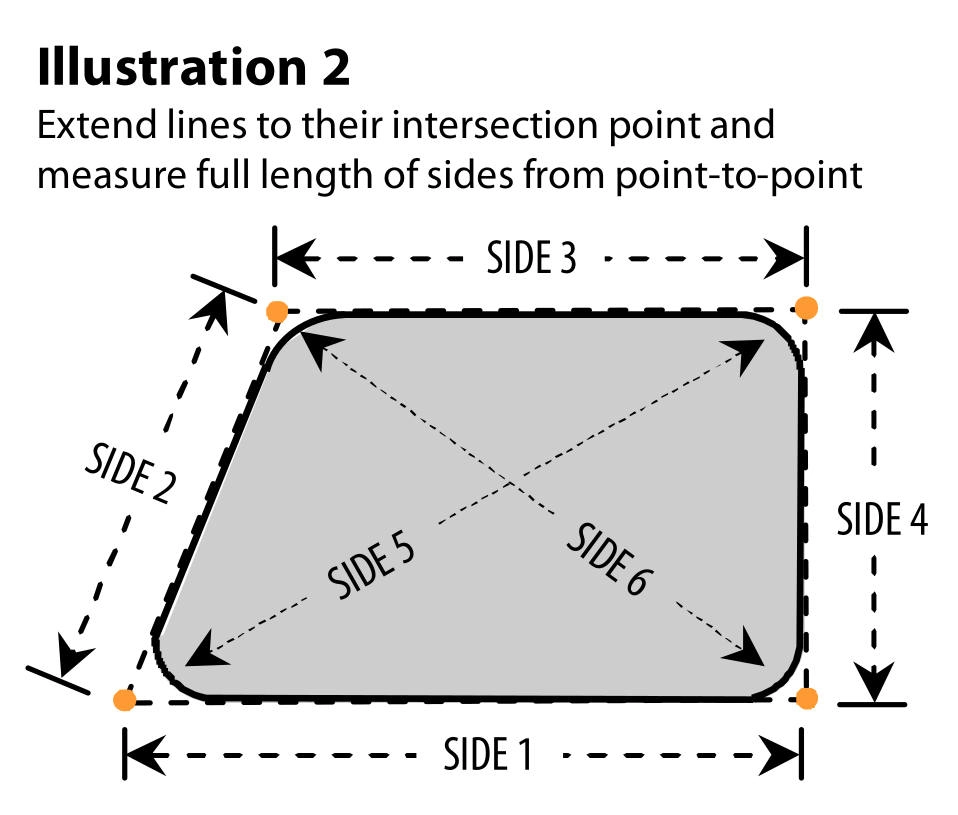
A precise measurement prevents costly returns and installation failures. Even 1/16 inch off can cause fit issues.
Capture Rough Opening Dimensions
Measure the inside edge of the frame where the window sits, not the glass or exterior trim.
- Use a tape measure and T-square.
- Record both width and height at three points (top, middle, bottom) to detect out-of-square conditions.
- A common size is 30 inches wide by 14 7/8 inches tall.
✅ Pro Tip: Check the data tag inside the old window frame for OEM specs before removal.
Determine Wall Thickness
RV walls vary from 1 inch to 2.5 inches thick, but 1.5 inches is standard.
- Insert a ruler into the opening until it hits the outer skin.
- Match this depth to the new window’s frame design.
- Mismatched thickness prevents secure clamping and sealing.
Verify Corner Radius
Most RV windows have rounded corners, often with a 3-inch radius.
- Use a printed radius template (scaled 100%) or a radius gauge.
- Cutting a square hole for a radial window leaves gaps requiring fiberglass repair.
❌ Never assume square corners. Always verify before cutting.
Gather Tools and Materials
Having the right tools ensures a clean, safe, and leak-free install.
Required Tools
- Cordless drill/driver with Phillips bit
- Oscillating multi-tool or jigsaw (for removal and cutting)
- Router with 1.5-inch bit (for factory-style recesses)
- Utility knife and plastic putty knife (to avoid scratches)
- Stud finder (to avoid wiring)
- Level and tape measure
- Spray bottle and clean rags
- Caulking gun and sealant smoothing tool
- Safety goggles and nitrile gloves
Sealants and Adhesives
Choose the correct sealant for long-term waterproofing:
| Type | Use Case | Notes |
|---|---|---|
| Butyl tape | Primary waterproof bond | High adhesion; messy to remove later |
| 5/16″ foam core tape | Factory-style replacement | Pre-sized; excellent memory and flexibility |
| DynaFlex 230 | Cap seal (exterior top half) | Water-cleanable; turns clear when cured |
| Flexible silicone | Top half only | Never seal the bottom; blocks drainage |
| Liquid Nails | Internal wood framing | For custom builds with added support |
Hardware and Supplies
- Self-tapping sheet metal screws (for trim ring)
- Hard rubber shims (for leveling)
- Double-sided foam tape (for repositionable mounting)
- Drain covers (remove before installation)
- Custom aluminum screen (more durable than nylon)
Remove the Old Window
Safety comes first. Glass shards and electrical hazards are real risks.
Step-by-Step Removal
- Remove interior treatments: Take down blinds, valances, or curtains.
- Locate trim ring screws: Often hidden in grooves or under caps.
- Support the window: Have a helper hold it from outside before removing final screws.
- Unscrew and remove trim ring: Start from the bottom to control descent.
- Pry gently with plastic knife: Break butyl seal without scratching walls.
- Never push on glass: Use the inner frame as leverage.
⚠️ Warning: Cutting into walls without checking behind is risky. Use a stud finder to avoid wires for lights or ceiling fixtures.
Prepare the Opening
Clean, solid surfaces ensure a lasting seal.
Scrape and Clean Surfaces
- Remove all old butyl tape, foam, or silicone.
- Wipe both window frame and wall with denatured alcohol or rubbing alcohol.
- Eliminate oils, dust, and residue. Adhesion depends on cleanliness.
Inspect and Repair Structure
- In metal RVs, check staples securing outer skin. Replace rusted ones starting at the bottom.
- Replace missing fiberglass insulation to prevent cold spots and condensation.
- For rot or delamination, repair substrate before installing new window.
Apply the Primary Seal
The inner seal stops water at the source. Two methods dominate: butyl tape or foam core.
Butyl Tape Method
- Apply a continuous bead around the window frame edge.
- Overlap ends slightly to prevent gaps.
- Press firmly to ensure contact.
Foam Core Tape Method (Recommended)
- Use 5/16-inch round hybrid foam tape.
- Apply 1/8 inch inside the window edge.
- At the bottom corner seam, overlap by 3/8 inch to 1/2 inch, then trim flush.
- No trimming needed elsewhere. The tape is pre-sized for 1.5-inch walls.
✅ Advantage: Resists sagging, handles temperature swings, and maintains compression set.
Insert and Clamp the Window
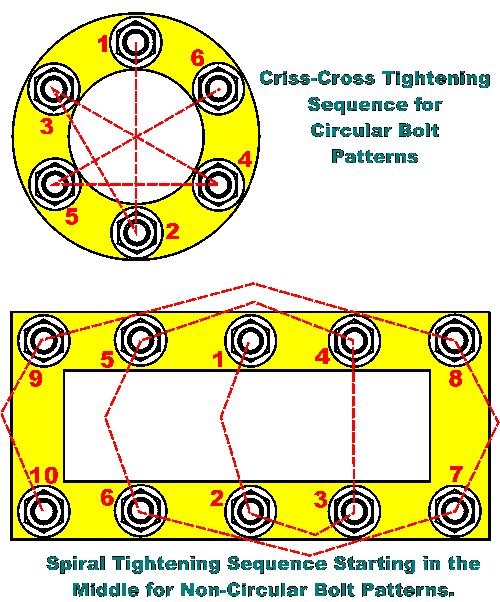
Proper alignment and screw sequence prevent warping and leaks.
Install from Outside
- Insert the window with weep holes facing downward. They must be at the lowest point.
- Guide the interior trim ring into place (fluted side faces in).
- Remove any temporary aluminum spacers first.
Tighten Screws in Star Pattern
Do not tighten one side fully first. Use a cross pattern:
- Upper left, then lower right
- Lower left, then upper right
- Left center, then right center
- Final: Tighten seam screw last (angled to pull frame tight)
🔧 Tip: Tighten gradually. Over-tightening distorts the frame and breaks the seal.
Seal the Exterior (Cap Seal)
This step deflects rain, but only on the top half.
Cap Seal Rules
- Apply only to the top 50 percent of the exterior frame.
- Use DynaFlex 230 or flexible silicone.
- Smooth immediately with a wet finger or tool.
- Keep the bottom unsealed. This allows weep holes to drain moisture.
❌ Never seal the bottom. Trapped water causes rot, mold, and delamination.
Use Painter’s Tape for Clean Lines
- Mask edges around the frame.
- Apply sealant, smooth, then remove tape before it skins over.
Handle Special Installation Types
Not all windows use trim rings. Know your style.
Framed Windows with Trim Ring
- Most common in production RVs.
- Clamped together with screws.
- Follow all steps above.
Frameless (Direct Glaze) Installations
Used in van conversions or custom builds.
- Cut opening 1/8 inch larger than trim ring inner dimension.
- Install internal wood backing with Liquid Nails and screws.
- Add double-sided foam tape; activate with water spray before pressing window in.
- Secure interior frame, pulling seam tight last.
Cut-in Van/Truck Windows
For box trucks or ambulances.
- Use trim ring as template.
- Cut hole 1/8 inch larger than traced line.
- For curved corners: laminate wood blocks and cut 90-degree triangles to fit.
- Seal with butyl tape. Gaskets alone are not enough.
- Snap split trim ring in place; secure with self-tapping screws in star pattern.
Ensure Proper Drainage

Weep holes are non-negotiable for long-term integrity.
Position Weep Holes Correctly
- Located at the bottom of the frame.
- Must sit at the lowest point of the installation.
- Remove plastic or rubber plugs before inserting window.
Why They Matter
- Allow moisture that bypasses the outer seal to escape.
- Prevent hydrostatic pressure buildup inside wall cavity.
- Blocked weep holes equal trapped water, which leads to rot, mold, and structural failure.
✅ Test: After installation, pour water near the frame and check for drainage.
Prevent Common Installation Errors
Avoid these mistakes. They are costly and preventable.
Ignoring Corner Radius
- Cutting a square hole for a 3-inch radius window leaves exposed gaps.
- Fix: Use a fiberglass repair kit if a mistake occurs.
Forcing a Tight Fit
- Do not hammer or pry a window into place.
- If it will not fit, recheck measurements. Forcing cracks glass or bends frames.
Using Rigid Sealants
- RV walls flex on the road.
- Rigid caulks crack. Use only flexible sealants such as butyl, foam, DynaFlex, or RV-grade silicone.
Skipping Insulation
- Removing an old window often displaces wall insulation.
- Replace with pink fiberglass batts to prevent condensation and cold spots.
Allow Cure Time and Test
Rushing this stage risks leaks.
Wait 24 Hours Before Exposure
- Sealants need time to cure.
- Avoid rain, washing, or pressure testing until fully set.
- DynaFlex 230 changes from white to clear as a visual cure indicator.
Perform Final Checks
- Open and close sliding windows. Ensure no binding.
- Feel for drafts around the frame.
- Conduct a water test: spray exterior with hose and check inside for leaks.
- Reinstall blinds and screens.
✅ Blind Tip: For roller blinds, center the fabric between end caps. Use a helper for wide units.
Choose Reliable Brands and Kits
Use trusted suppliers for best results.
Recommended Vendors
- Peninsula Glass / Motion Windows: Custom dual-pane, tempered units with free radius templates.
- Seal Design / Air Excel Kit: Includes foam tape, DynaFlex 230, and tools. Available at WWCDesignLLC.com.
- RecPro: For large custom windows. Requires exact rough opening specs.
- Ruckro: Durable RV window options.
- Camping World: Professional installation and sealant advice. Ideal for warranty protection.
Frequently Asked Questions About RV Window Installation
How long does it take to install an RV window?
Most standard replacements take 2 to 4 hours, including removal, prep, and sealing. Custom cut-in installations may take longer depending on wall material and complexity.
Can I install an RV window myself without voiding the warranty?
DIY installation may void the component warranty on newer RVs. Check your owner documentation first. If your RV is out of warranty or the window is not covered, self-installation is a viable option.
What is the best sealant for RV windows?
Butyl tape and 5/16-inch foam core tape work best for the primary waterproof seal. For the exterior cap seal, DynaFlex 230 or flexible RV-grade silicone are top choices. Never use rigid caulk.
Where do weep holes go on an RV window?
Weep holes belong at the bottom of the frame, positioned at the lowest point of the installation. They drain moisture that bypasses the outer seal and must remain uncovered.
Do I need to replace insulation when removing an RV window?
Yes. Old windows often displace or compress wall insulation. Replacing it with pink fiberglass batts prevents cold spots and condensation inside the wall cavity.
What happens if I seal the bottom of the window?
Sealing the bottom traps moisture inside the wall. This leads to rot, mold, and eventual delamination of the sidewall. Always leave the bottom unsealed so weep holes can drain properly.
Final Takeaways for Installing Your RV Window
Precision, the right materials, and attention to drainage make all the difference when learning how to install RV window units. Measure twice, use flexible sealants, and never seal the bottom half of the exterior frame. Always position weep holes at the lowest point and verify corner radius before cutting. Your next step: gather your tools, order the correct window and trim ring together, and set aside a full day for a clean, weather-tight installation that will protect your RV for years to come.



