
Your Ring Doorbell needs to come down—whether you’re moving, upgrading, or troubleshooting a malfunction. Knowing exactly how to remove Ring Doorbell from base prevents costly damage to your device or wall. This guide covers every model type and installation method, so you’ll complete the removal safely in under 10 minutes. No guesswork required: we’ll show you exactly where to apply pressure, which wires to disconnect, and how to avoid common pitfalls that break plastic tabs or strip security screws.
Most homeowners waste time yanking at the device or using improper tools, risking shattered faceplates or electrical hazards. The truth? Ring designed these units for quick removal—if you know the model-specific techniques. By the end of this guide, you’ll confidently detach any Ring Doorbell while preserving wall integrity and keeping all components organized for reinstallation. Let’s get your doorbell safely off the wall.
Identify Your Ring Model Before Starting
Battery vs Wired Models
Battery-powered models require faceplate removal before accessing mounting hardware. These include Ring Doorbell (2nd Generation), Ring Doorbell 3, 3 Plus, and 4. They feature a visible security screw at the bottom edge and removable faceplates. Wired models connect directly to household wiring and include Ring Doorbell Wired, Pro, Pro 2, and Elite. Wired units either mount straight to the wall (Wired, Pro, Pro 2) or use proprietary brackets (Elite). Confusing these types leads to stripped screws or accidental wire contact—so verification is non-negotiable.
Quick Visual Check
Examine your doorbell’s bottom edge for one tiny security screw. If present, you own a battery model. No visible screw means you’re dealing with a wired unit. This 10-second check prevents critical mistakes: battery models need faceplate removal first, while wired units skip this step entirely. Elite owners should note their model lacks a removable faceplate and uses Power over Ethernet (PoE), making professional removal advisable.
Power Down Safely for Your Model Type

Wired Models: Kill the Power
- Locate your electrical panel—typically in garages, basements, or utility closets
- Switch off the doorbell breaker (if unlabeled, turn off the main power for 5 minutes)
- Verify power is dead by pressing the doorbell button—no chime confirms safety
Critical warning: Never skip this step. Even low-voltage wiring can deliver painful shocks or damage circuitry if mishandled. If unsure about your breaker, cut main power—it’s safer than risking electrocution.
Battery Models: Remove the Pack
- Tilt the faceplate upward at 45 degrees to expose the battery compartment
- Press the silver lever inside the compartment
- Catch the battery as it slides out the bottom (replacements cost $30+)
Pro tip: Store the battery in a plastic bag away from metal objects. Lithium batteries can short-circuit if contacts touch keys or coins.
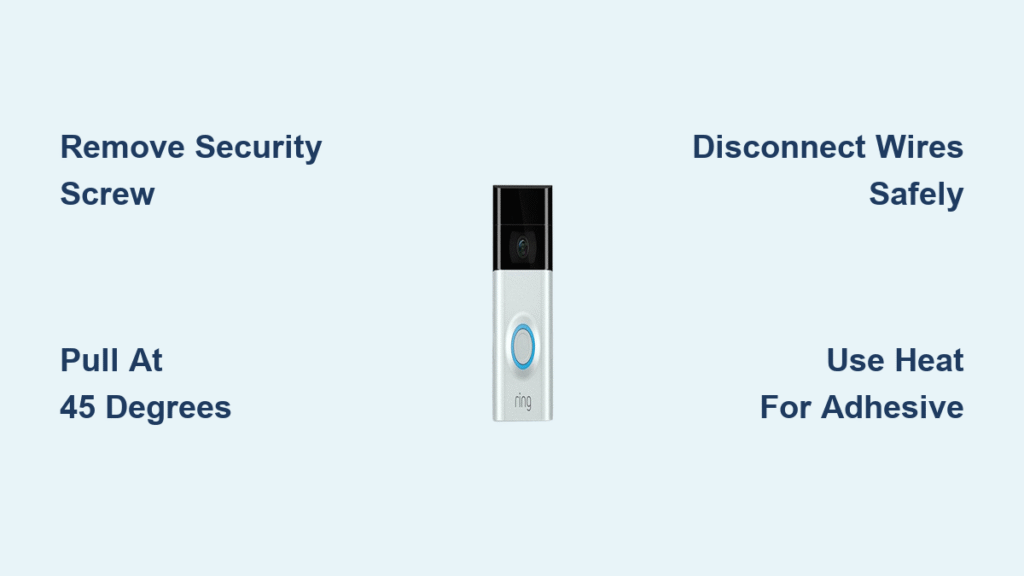
Remove Faceplate Correctly Without Breaking Tabs
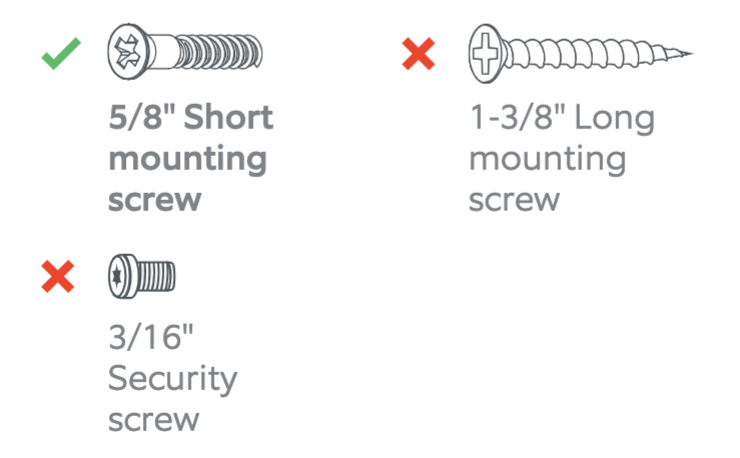
Battery Models: Security Screw Method
Never lose this screw—it’s proprietary and tiny.
- Insert the star-shaped Torx bit from your Ring screwdriver into the bottom security screw
- Turn counterclockwise slowly until the screw drops into your palm
- Grip the bottom edge firmly with fingers under the faceplate
- Pull upward at 45 degrees—not straight out—until plastic tabs release
Warning: Jerking the faceplate straight off cracks internal mounting tabs. Apply steady pressure for 5 seconds if stuck; check for hidden secondary screws first.
Wired Models: No Faceplate Needed
Wired models (except Elite) have faceplates that wrap around edges but don’t fully cover the unit. Skip security screw steps—instead, press firmly on both sides of the faceplate until plastic tabs click free. Elite owners proceed directly to wall detachment since faceplates are non-removable.
Detach from Wall Mount Without Damaging Hardware
Direct Mount Models
Most Ring units (Pro, Pro 2, Wired, and battery models 2-4) attach via four Phillips-head screws—two per side.
- Use the Phillips bit on your Ring screwdriver
- Remove all screws completely—don’t leave any partially in the wall
- Pull the unit straight out—wired models will still have connected wires
Visual cue: If wires dangle from the back, you’ve got a wired model. Don’t panic—they’ll detach next.
Bracket Mount Systems
Ring Doorbell Elite and some 2nd Gen units use proprietary brackets.
- Remove four corner screws securing the rectangular bracket to the wall
- Slide the unit upward at 45 degrees—it clicks free from bracket pins
- Set the bracket aside for reinstallation
Elite alert: Due to PoE connections, consider hiring an electrician. Forcing removal can damage Ethernet ports.
Disconnect Electrical Wires Safely (Wired Models Only)
Wire Removal Steps
- Locate two wires connected to terminal screws (front-facing on brackets, rear-facing on direct mounts)
- Loosen each terminal screw with a Phillips screwdriver—turn counterclockwise until loose
- Gently untwist wires if coiled around posts (use needle-nose pliers if stuck)
- Pull wires free without yanking—frayed wires need electrician repair
Safety note: Double-check power is off by touching wires together—no spark means it’s safe. If wires are brittle or cracked, call a professional.
Handle Adhesive Installations Without Wall Damage
Tool-Free Removal Method
Adhesive mounts (like Wasserstein mounts) require finesse, not force.
- Heat the base with a hair dryer for 30 seconds to soften adhesive
- Insert a plastic pry tool at the top corner—never metal (scratches surfaces)
- Work slowly downward while applying steady pressure parallel to the wall
- Wipe residue with rubbing alcohol after removal
Wall-saving tip: If paint lifts, fill gaps with silicone caulk before repainting. Pulling straight out guarantees drywall damage.
Lost Your Ring Screwdriver? Emergency Fixes That Work
Emergency Alternatives
- T6 Torx bit in any screwdriver (exact match for security screws)
- T15 Torx head as direct replacement—available at hardware stores
- Small flathead screwdriver for last-resort use (wrap rubber band around tip for grip)
Free solution: Ring’s customer service mails replacement screwdrivers within 48 hours. Call them before risking stripped screws—improvised tools often cause more damage.
Clean Up After Removal Without Future Headaches
Wall Restoration
- Fill screw holes immediately with silicone caulk to block insects and moisture
- Touch up paint using a small brush for seamless blending
- Inspect for damage—cracks wider than 1/4 inch need drywall patching
Device Storage
- Store screws in a labeled bag taped to the doorbell
- Reattach the faceplate to prevent losing it
- Wrap wires with rubber bands if rewiring later
Pro mistake to avoid: Leaving wall holes unfilled invites pests and water—especially in humid climates.
Troubleshooting Common Removal Nightmares
Stuck Security Screw
Place a wide rubber band between the screwdriver and screw for extra grip. If still stuck, use a screw extractor kit ($5 at hardware stores)—never drill out the screw without proper tools.
Faceplate Won’t Budge
Hidden secondary tabs sometimes lock the faceplate. Apply heat with a hair dryer for 20 seconds to soften plastic, then reattempt the 45-degree pull. Check for a second screw near the top edge you might have missed.
Wire Removal Problems
If wires won’t detach after loosening terminals, twist gently with needle-nose pliers—they’re often twisted around posts. Never cut wires unless replacing the entire unit; label wire colors (typically red/black) for reinstallation.
Model-Specific Quick Reference Guide
| Model | Faceplate Screws | Mount Type | Critical Removal Tip |
|---|---|---|---|
| Ring 2nd-4th Gen | 1 security screw | Bracket | Remove battery first |
| Ring Pro/Pro 2 | None | Direct wall | Pull faceplate sideways |
| Ring Elite | None | Bracket | Professional removal recommended |
| Ring Wired | None | Direct wall | Wires detach from back |
Next Steps After Successful Removal
Reinstallation Planning
Document everything: Take photos of wire connections, note screw hole positions, and label all hardware. Test your new location with painter’s tape before drilling—doorbell height affects motion detection range. Keep original mounting hardware; Ring uses proprietary screw sizes that won’t fit standard hardware.
Account Management
Prevent false alerts by removing the device from your Ring app:
1. Open Ring app → Tap ≡ menu → Select “Devices”
2. Choose your doorbell → Go to “Device Settings” → “General Settings”
3. Tap “Remove Device” and confirm
Time investment: Standard removal takes 10 minutes; add 5 minutes for adhesive mounts or stubborn screws. With the right approach, you’ll avoid emergency calls to electricians or costly replacement parts. Now that your Ring Doorbell is safely off the wall, you’re ready for relocation, repair, or upgrade—confident you preserved both device and wall integrity.


