
That frustrating moment when the doorbell stays silent while your package sits unclaimed on the porch—it’s more than an annoyance, it’s a security gap in your home. When your wired doorbell stops working, you’re left wondering if it’s a simple fix or a major electrical issue. The good news is most wired doorbell failures stem from just four components: the button, chime unit, transformer, or connecting wires. With basic tools and this systematic approach, you can diagnose and fix 90% of problems in under an hour—saving you from unnecessary service calls and keeping your home connected.
Your wired doorbell operates on a simple low-voltage circuit (16-24V AC), making it one of the safest home electrical systems to troubleshoot. Unlike complex appliances, doorbell repairs rarely require specialized skills—just methodical testing of each component. This guide cuts through the confusion with actionable steps that pinpoint exactly why your wired doorbell isn’t working and how to fix it permanently.
Why Your Wired Doorbell Suddenly Stopped Working (Complete Silence)
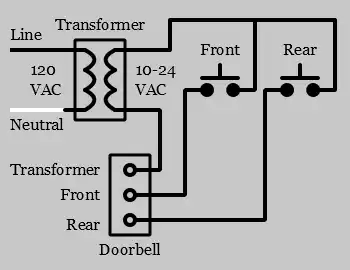
When pressing the button delivers total silence, your first diagnostic step should target power supply issues. Begin by checking your electrical panel for tripped breakers—many homeowners overlook that doorbell transformers connect to standard 120V circuits. Locate your transformer (typically a small 2″x3″ box near your electrical panel, garage, or utility room) and verify it’s outputting 16-24V AC using a multimeter. Readings below 16V indicate transformer failure or circuit issues.
If voltage checks out, move to the doorbell button itself—the culprit in nearly 40% of “wired doorbell not working” cases. With power off, remove the button from the wall and carefully note wire positions before disconnecting. Turn power back on and briefly touch the exposed wires together. If the chime sounds immediately, you’ve identified the problem: a failed button mechanism requiring replacement. This $5-15 fix takes just minutes and solves most complete silence issues.
How to Diagnose Intermittent Doorbell Chime Problems
Buzzing sounds or weak chimes signal insufficient power delivery through your system. Start by measuring voltage at the transformer (should read 16-24V AC), then at the button location. A drop exceeding 2V indicates wiring problems or an undersized transformer—especially common when upgrading to smart doorbell cameras without transformer adjustments.
For traditional mechanical chimes, inspect the striker mechanism for binding or misalignment. Remove the chime cover and press the button manually while watching the solenoid movement. Sticking components often cause inconsistent performance, particularly in older units. Clean any visible corrosion with electrical contact cleaner and ensure the striker moves freely before reassembling. If problems persist, your chime unit may need replacement—especially if you notice burnt components or discoloration inside the unit.
Step-by-Step Button Testing: The 2-Minute Fix Check
Complete button diagnosis in 5 minutes:
1. Turn off power at the circuit breaker
2. Remove mounting screws and pull button away from wall
3. Photograph wire positions before disconnecting
4. Turn power back on and touch wires together briefly
5. If chime sounds, replace the button immediately
During replacement, match terminal colors (typically red and white) and consider upgrading to a weather-resistant model with LED status indication. After installing the new button, apply silicone caulk around the edges to prevent moisture intrusion—the leading cause of premature button failure. This simple weatherproofing extends button life by 2-3 years, especially in rainy climates.
Transformer Voltage Testing: Is Your Power Supply Failing?

Your transformer converts household 120V AC to the 16-24V AC required by doorbell systems. To test it properly:
– Set your multimeter to AC voltage
– Measure across the transformer’s secondary terminals
– Confirm reading between 16-24V with no load
Readings below 16V mean immediate transformer replacement is needed. If installing a Ring, Nest, or similar smart doorbell camera, upgrade to a 30VA transformer regardless of current readings—these devices draw 500mA-1A continuously versus 50mA for traditional systems. Critical safety note: Always turn off the main breaker before working on transformer wiring, as primary connections carry dangerous 120V current.
Finding and Fixing Doorbell Wiring Connection Problems

Loose wire nuts cause 30% of intermittent “wired doorbell not working” issues, particularly behind chime units where vibration gradually loosens connections. With power off, remove your chime unit from its mounting and inspect all wire nut connections. Replace any corroded connectors and tighten firmly using pliers—don’t rely on finger-tightening alone.
For suspected wire breaks, perform continuity testing:
1. Turn off all power completely
2. Disconnect components at both ends
3. Set multimeter to continuity mode
4. Test end-to-end from button to chime to transformer
5. Infinite resistance indicates a wire break needing repair
Common failure points include connections behind outdoor buttons (where moisture causes corrosion) and staple penetrations in attic wiring runs. When repairing, apply dielectric grease to outdoor connections to prevent future moisture damage.
Smart Doorbell Compatibility Fixes: Stop the Buzzing
Buzzing mechanical chimes after smart doorbell installation almost always indicate missing components. Smart cameras like Ring or Nest require:
– 30VA transformer minimum (upgrade even if existing works)
– Chime connector device installed at chime location
– Bypass resistor for mechanical chimes
Don’t skip these critical steps:
1. Verify transformer output meets 30VA requirement
2. Install manufacturer-provided chime connector
3. Add bypass resistor if using mechanical chime
4. Confirm strong WiFi signal at door location
Most buzzing issues resolve with proper chime connector installation—a $10 part that regulates power flow between the camera and chime unit. Without it, your mechanical chime receives inconsistent power causing that annoying buzz.
When to Call an Electrician vs. DIY Doorbell Repairs
DIY confidently when:
– Replacing buttons (low-voltage, safe)
– Swapping chime units (simple wiring)
– Tightening visible connections
– Replacing accessible transformers
Call a professional electrician for:
– Transformer primary wiring (120V connections)
– Running new wires through finished walls
– Service panel modifications
– Hidden wiring troubleshooting
Consider cost-effectiveness: A $20 transformer replacement takes an experienced DIYer 20 minutes but costs $150-300 with professional service. However, if you’re uncomfortable working with household electrical systems, the safety risks outweigh potential savings—particularly when dealing with transformer primary connections.
Monthly Maintenance to Prevent Future Doorbell Failures
Prevent “wired doorbell not working” emergencies with these quick checks:
– Monthly: Press button firmly while listening for crisp sound
– Quarterly: Inspect visible wire connections for corrosion
– Annually: Test transformer voltage and apply dielectric grease
– Every 7 years: Replace outdoor button assembly proactively
During annual inspections, verify all mounting screws are tight—vibration gradually loosens connections over time. For homes in humid climates, add weatherproofing around outdoor button wiring using self-fusing silicone tape, which creates a waterproof seal without residue.
Key Takeaway: Most “wired doorbell not working” issues trace back to four simple components. Start with the button bypass test—it solves 40% of problems instantly. If that fails, check transformer voltage with a $10 multimeter—these two tests diagnose 80% of failures without unnecessary part replacements. For smart doorbell installations, always upgrade to a 30VA transformer and install the required chime connector to prevent buzzing. With regular maintenance and this systematic approach, you’ll keep your doorbell ringing reliably for years to come.


