
Is your video doorbell constantly disconnecting, showing low battery warnings, or failing to chime properly? Before you blame the device, check your doorbell transformer—the most common culprit behind weak doorbell performance. Installing the right doorbell transformer is surprisingly straightforward and could save you from replacing perfectly good doorbell equipment. This comprehensive guide walks you through each critical step to properly install doorbell transformer systems that deliver reliable power to both traditional chimes and modern video doorbells.
Most homeowners don’t realize their standard 16V transformer can’t handle the power demands of today’s video doorbells, which typically require 24V. A tri-volt transformer solves this problem permanently by providing multiple voltage options in one compact unit. Whether you’re upgrading to a Ring, Nest, or other smart doorbell, or simply troubleshooting an intermittent chime, correctly installing your doorbell transformer ensures consistent performance. By the end of this guide, you’ll know exactly how to select, wire, and verify your new transformer installation.
Tri-Volt Transformer Selection and Identification
Why Standard Transformers Fail Video Doorbells
Your existing doorbell transformer likely outputs only 16V, which works fine for basic mechanical chimes but falls short for power-hungry video doorbells. When you attempt to install doorbell transformer systems designed for traditional setups with modern video doorbells, you’ll experience frequent disconnections, poor video quality, and constant low-power alerts. The tri-volt transformer solves this by offering 8V, 16V, and 24V outputs from a single unit—eliminating the need for multiple transformers or future replacements when upgrading your system.
Voltage Requirements by Device Type:
– 8V output: Basic buzzers and vintage chime systems
– 16V output: Traditional doorbell chimes and single-button systems
– 24V output: Video doorbells, intercoms, and multi-device setups
Finding Your Transformer’s Hidden Location
Your existing transformer hides in predictable spots—usually within 10 feet of your doorbell chime. Check these common locations before attempting to install doorbell transformer replacements:
- Near your electrical panel in the basement or utility room
- Attached to ceiling joists above finished ceilings
- Mounted on wall studs in garages or closets
- Inside wall cavities adjacent to your doorbell chime
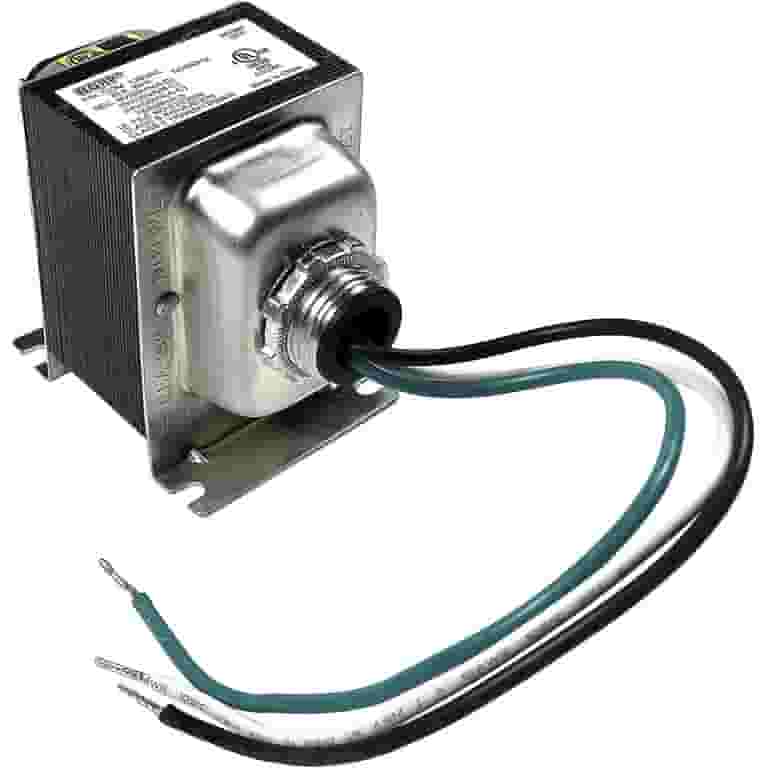
Look for a small rectangular metal box (typically 2″x3″) with two thick wires entering from your home’s electrical system and two thin wires running toward your doorbell components. Take a photo of the current wiring configuration before disconnecting anything—this reference will prove invaluable during your new installation.
Critical Safety Preparations Before Installation
Power Disconnection Protocol
Before you attempt to install doorbell transformer components, you must cut power at the source. Head to your electrical panel and switch off the circuit controlling your doorbell system. If you’re unsure which breaker controls the circuit, turn off the main power to be safe. Then, use a non-contact voltage tester on both the thick primary wires and thin secondary wires to confirm all power is disconnected. Never skip this step—while doorbell circuits operate at low voltage after the transformer, the input side carries dangerous household current.
Essential Tools for Successful Installation
Gather these items before starting your doorbell transformer installation:
- Wire strippers (for 16-22 gauge wires)
- Phillips and flathead screwdrivers
- Electrical tape or wire nuts (included with most transformers)
- Non-contact voltage tester (critical for safety)
- Flashlight or headlamp (transformers often hide in dark spaces)
Pro Tip: Keep your phone flashlight on standby—transformers frequently nestle in poorly lit corners where visibility is limited during installation.
Removing Your Existing Transformer
Safe Disconnection Process
Follow these steps to safely remove your old transformer before you install doorbell transformer replacements:
- Verify power is off with your voltage tester at both wire sets
- Document wire connections with photos or notes (which wire goes where)
- Loosen terminal screws and carefully remove all wires
- Unscrew mounting hardware securing the transformer to its surface
Critical Warning: If you encounter soldered connections instead of screw terminals, cut the wires cleanly 1-2 inches from the transformer and strip ½ inch of fresh insulation for your new connections. Never attempt to desolder electrical components without proper training.
Installing Your New Tri-Volt Transformer
Optimal Mounting Locations and Methods
Your new transformer installation requires strategic placement for both safety and functionality:
- Surface mounting: Secure directly to wall studs using included hardware
- Junction box mounting: Attach to existing electrical boxes near your wiring source
- Electrical panel mounting: Only recommended for experienced installers
Choose locations within 10 feet of both your electrical source and doorbell chime to minimize voltage drop. Ensure at least 6 inches of clearance around the transformer for proper ventilation—overheating is the primary cause of premature failure.
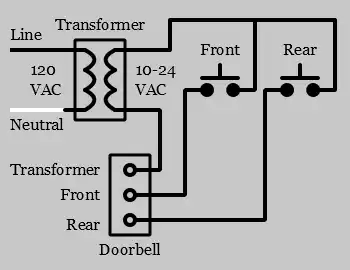
Correct Wiring Connections
Primary (high-voltage) connections:
– Connect black (hot) wire to transformer’s input terminal
– Connect white (neutral) wire to transformer’s neutral terminal
– Secure green or bare copper ground wire to grounding screw
Secondary (low-voltage) connections:
– Connect one chime wire to your selected voltage terminal (8V, 16V, or 24V)
– Connect the other chime wire to the COM (common) terminal
Professional Technique: Wrap wires clockwise around terminal screws before tightening—this prevents them from slipping out when you secure the connection.
Verifying Your Doorbell Transformer Installation

System Power-Up and Testing
Follow this verification sequence after you install doorbell transformer components:
- Restore power at the circuit breaker
- Listen for a faint hum from the transformer (indicates proper operation)
- Press doorbell button to test chime functionality
- Check video doorbell features (Wi-Fi connection, video quality, night vision)
Troubleshooting Checklist:
– No sound? Verify tight connections and correct voltage selection
– Weak chime? Increase voltage setting (16V→24V) if compatible with your chime
– Intermittent operation? Check for loose wire nuts or corroded contacts
Multi-Device System Configuration
Supporting Video Doorbells and Traditional Chimes
When connecting both a video doorbell and mechanical chime, follow these steps:
- Calculate total power requirements (add both devices’ wattage)
- Use the 24V terminal to accommodate higher power demands
- Connect both devices in parallel to the same transformer terminals
Capacity Warning: Most tri-volt transformers handle up to 30VA—sufficient for standard video doorbell plus chime combinations but insufficient for multiple high-draw devices.
Smart Home Integration Wiring
Modern smart home setups may require connecting multiple devices to your single transformer:
- Video doorbell (typically 24V)
- Mechanical chime (typically 16V)
- Strobe light (typically 8V)
- Intercom system (typically 24V)
The tri-volt design allows you to connect each device to its specific voltage terminal while sharing the common ground—eliminating the need for multiple transformers and complex wiring.
Maintenance and Long-Term Reliability
Preventative Care Routine
Monthly checks:
– Inspect for loose wire connections
– Feel for excessive heat (slight warmth is normal; hot is dangerous)
– Verify doorbell responds consistently
Annual maintenance:
– Turn off power and clean terminals with electrical contact cleaner
– Tighten all connection screws
– Replace any corroded wire nuts
Pro Tip: Take “as-built” photos after your install doorbell transformer project and store them with your home maintenance records—future repairs will go much smoother with this documentation.
Common Installation Mistakes to Avoid
Voltage Selection Errors
Critical mismatch scenarios:
– Using 8V for video doorbells: Causes constant power failures and rebooting
– Applying 24V to basic chimes: Overloads coils, causing premature burnout
– Exceeding transformer capacity: Results in overheating and system shutdowns
Solution: Always match transformer output to your doorbell’s specific voltage requirements as listed in the manufacturer’s specifications.
Connection Failures
Most frequent wiring errors:
– Loose terminal connections: Causes intermittent operation or complete failure
– Incorrect voltage terminal: Leads to underpowered or damaged devices
– Missing ground connection: Creates safety hazards and electrical noise
Verification Technique: Use a multimeter to confirm 22-24V at your video doorbell terminals after installation—this simple check prevents 90% of power-related issues.
Final Installation Verification
Before considering your install doorbell transformer project complete, verify these critical points:
- [ ] All high-voltage connections properly insulated with wire nuts
- [ ] Transformer securely mounted with no strain on wires
- [ ] Correct voltage terminal selected for your doorbell type
- [ ] Both doorbell button and chime respond consistently
- [ ] No unusual buzzing, overheating, or burning smells
- [ ] Documentation updated with photos of final wiring
Your properly installed tri-volt transformer will deliver years of reliable service while providing flexibility for future upgrades. Unlike single-voltage models that force you to replace the entire unit when upgrading your doorbell system, this versatile solution grows with your needs—from basic chimes today to multi-camera smart home setups tomorrow. The small investment in time and materials pays dividends every time your doorbell chimes clearly or your video feed connects instantly, eliminating the frustration of power-related failures that plague so many smart home installations.


