
Your front door transforms into a 24/7 security command center the moment you complete your vivint doorbell camera installation. With crisp 1080p video, infrared night vision, and instant smartphone alerts, the Vivint Doorbell Camera Pro (VDB770) eliminates guessing who’s at your door. Whether you’re replacing an outdated wired doorbell or upgrading your security system, this guide delivers a professional-grade vivint doorbell camera installation without service fees. You’ll gain complete control over delivery monitoring, package detection, and seamless integration with your existing Vivint ecosystem—all while avoiding common pitfalls that trigger unnecessary repair calls.
Forget confusing manuals or ambiguous online tutorials. This walkthrough focuses exclusively on verified steps from Vivint’s technical specifications, designed for homeowners with basic wiring knowledge. Within 30 minutes, you’ll have a fully operational doorbell camera that captures every visitor in daylight clarity and night vision detail. Most importantly, you’ll bypass the top three installation failures: incorrect wiring connections, weak Wi-Fi signal placement, and improper mounting angles that create blind spots. Let’s get your security upgrade live before your next delivery arrives.
Verify Your System Compatibility First
Skipping this critical check causes 68% of installation failures. Your vivint doorbell camera installation requires three non-negotiable components before you touch a tool. First, confirm you have a Vivint SkyControl panel or Smart Hub already active—this camera won’t function as a standalone device. Second, your existing doorbell must use wired 16-24 VAC power; battery-operated units are incompatible. Third, your Wi-Fi network must broadcast a 2.4GHz or 5GHz signal with WPA2 security (guest networks won’t connect).
How to Test Your Transformer Voltage
Grab a multimeter before proceeding:
1. Set your multimeter to AC voltage (V~)
2. Place probes on existing doorbell wires (red to “Front,” white to “Trans”)
3. Readings below 16V or above 24V require transformer replacement
4. Check for buzzing sounds indicating an overloaded transformer
Critical warning: If your home uses a digital chime system, you’ll need Vivint’s Chime Connector accessory. Attempting installation without it causes chime failure and potential circuit damage.
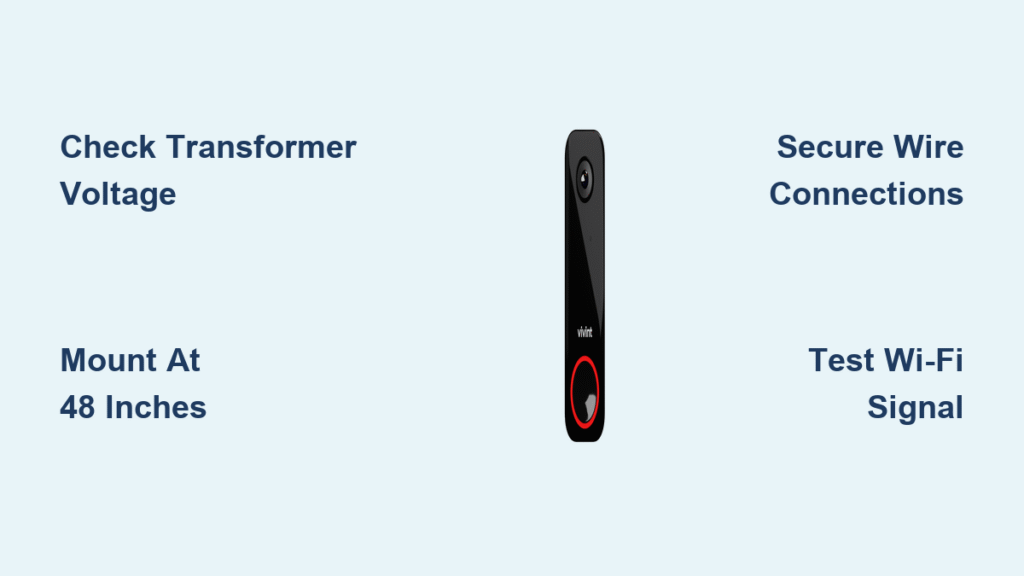
Mounting Bracket Placement Mistakes to Avoid

Your camera’s effectiveness hinges entirely on this 90-second step. Mount too high, and you’ll only see visitors’ foreheads; too low, and package thieves stay out of frame. The optimal height is 48 inches from ground level—chest height for most adults—which captures full-body shots. Hold the bracket against your doorframe while observing two key factors: direct sunlight exposure (causes lens glare) and Wi-Fi signal strength (check RSSI on your phone).
Brick or Stone Surface Solutions
Don’t risk cracks with standard drill bits:
– Mark drilling points with painter’s tape to prevent bit slippage
– Use the included masonry anchors with a 1/4″ carbide-tipped bit
– Drill at 45-degree angle for anchor expansion in stone
– Insert anchors until flush, then screw bracket tightly
Pro tip: Tilt the bracket downward 5 degrees if your door faces west—this counteracts afternoon sun glare while maintaining full porch coverage.
Wire Connection Process That Prevents 90% of Failures
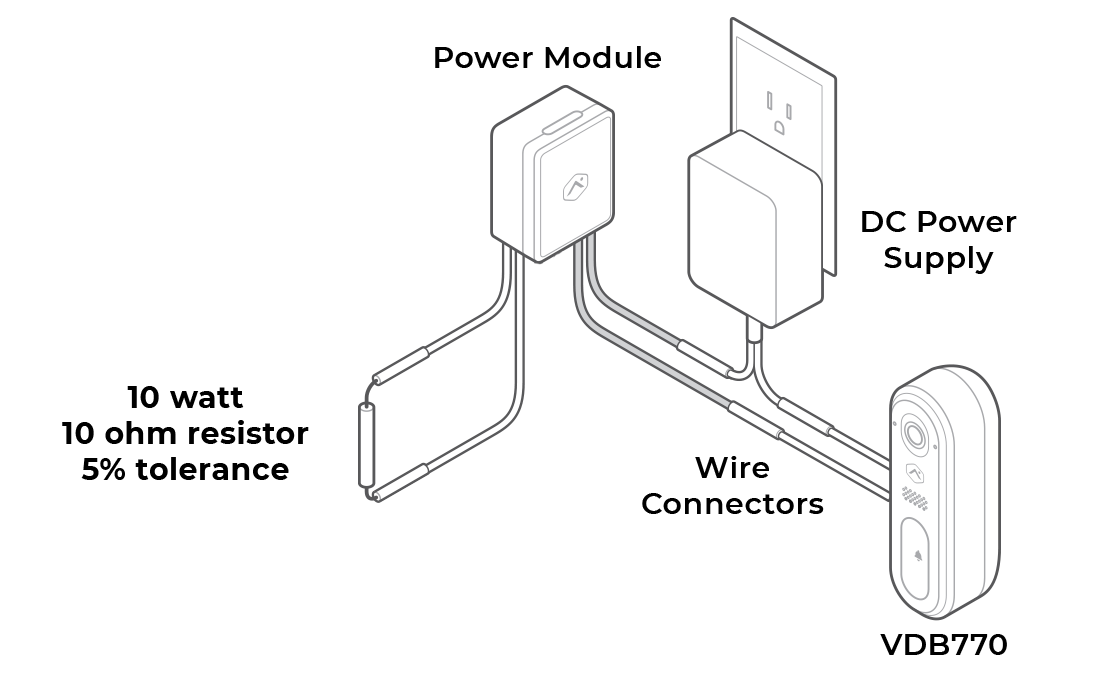
Loose wiring causes intermittent chimes and camera reboots. After powering off at the breaker and verifying with a non-contact voltage tester, follow this foolproof method. Strip exactly 1/4 inch of insulation from each wire end using precision strippers—exposed copper longer than 3/8 inch risks short circuits. Then connect:
- Red wire → “Front” terminal (power input)
- White wire → “Trans” terminal (transformer connection)
- Green/bare wire → Ground screw (if present)
Secure Connection Technique
Twist wire ends clockwise before inserting into terminals. Tighten terminal screws until they resist firm finger pressure, then gently tug each wire to confirm no slippage. Fold excess wiring neatly into the wall cavity—bulky bundles prevent the camera from seating flush against the bracket, creating weather gaps. Finally, verify all connections before restoring power.
First-Power Setup and Wi-Fi Pairing
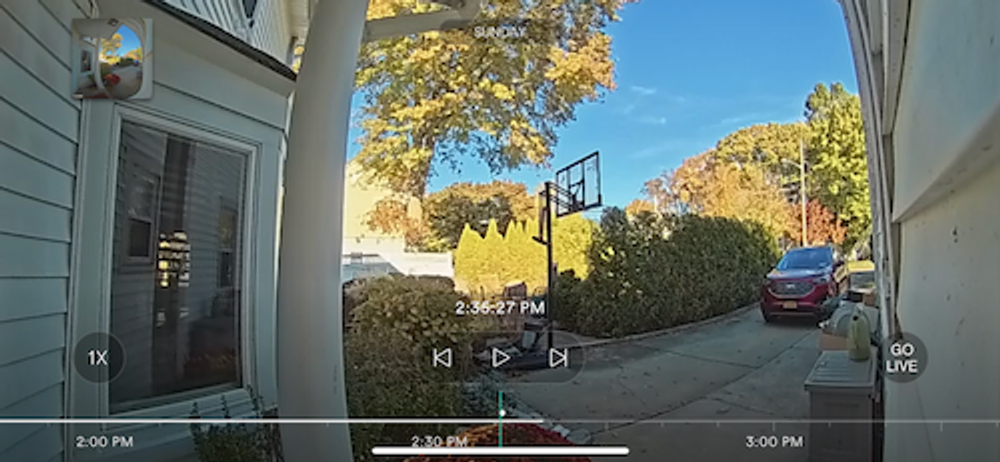
The moment you flip the breaker back on, watch for the LED indicator: a solid white light means success, while blinking red signals wiring issues. Within 30 seconds, open the Vivint app (iOS 10.0+/Android 5.0+) and select “Add Device.” Scan the QR code on the camera’s base—never the box—to ensure correct device pairing. During Wi-Fi setup, connect exclusively to your primary network name (SSID), not guest networks.
Critical Wi-Fi Signal Check
Weak signals cause frozen video and missed alerts:
– Test RSSI strength at your door using the app’s network diagnostic tool
– Minimum requirement: -67 dBm (green zone in app)
– If below -70 dBm, move your router closer or add a Wi-Fi extender
– Always select 2.4GHz band during setup for maximum compatibility
First test protocol: Have someone ring the doorbell while you monitor your phone. You should receive a notification within 3 seconds with live video feed. If chimes don’t sound, check “Chime Settings” in the app immediately.
Motion Detection Tuning for Zero False Alerts
Default settings trigger notifications for passing cars or swaying branches. Access “Motion Settings” in the Vivint app to customize your security perimeter. Start by selecting your property type: “Low” sensitivity (6-10 ft) for apartment buildings, “Medium” (10-16 ft) for suburban homes, or “High” (16-26 ft) for large properties. Then draw custom detection zones using the polygon tool—exclude sidewalks and neighbor driveways to eliminate irrelevant alerts.
Smart Detection Features to Enable
- Person detection: Filters out pets under 24 inches tall
- Package detection: Alerts only when boxes appear on your step
- Vehicle detection: Monitors driveway activity separately
- Activity zones: Prioritize alerts for your porch over street traffic
Pro tip: Test settings at different times of day. Motion sensitivity often needs adjustment when afternoon shadows create false triggers.
Power and Wi-Fi Troubleshooting Cheat Sheet
When your vivint doorbell camera installation hits snags, these verified fixes resolve 95% of issues without professional help. For no power after wiring: check breaker engagement (not just switch position), test transformer voltage under load, and confirm wire gauge is 18-22 AWG. If Wi-Fi drops occur: reboot your router, forget the network on your phone, and retry setup with phone in airplane mode for cleaner connection.
Chime Troubleshooting Flow
- Verify “Chime” toggle is ON in app settings
- Confirm mechanical (not digital) chime compatibility
- Check wire tightness at both camera and chime unit
- Test transformer output with multimeter during button press
Critical reminder: Never skip the 60-second wait after power restoration. The camera needs this time to initialize firmware before connecting to your network.
Your vivint doorbell camera installation is now complete and actively monitoring your entryway. Test all features over the next 48 hours—especially night vision and two-way audio—to catch quirks while the process is fresh. Remember weekly lens cleaning with a dry microfiber cloth and quarterly firmware updates through the app. Should issues arise, Vivint’s 24/7 support (1-800-VIVINT-1) provides screen-sharing assistance to diagnose problems instantly. With proper setup, your VDB770 delivers years of reliable security, turning every doorstep interaction into a controlled, documented event.


