
That annoying silence when someone presses your doorbell button—no chime, no signal, just confusion. Doorbell chime wiring issues affect nearly 70% of homes at some point, yet most homeowners avoid fixing them thinking it’s too complex. The truth? With the right approach, you can diagnose wiring problems or install a complete doorbell system in under 90 minutes using basic tools. This guide cuts through the confusion with exact wiring sequences, voltage specifications, and troubleshooting techniques that actually work.
Whether your chime suddenly went silent or you’re upgrading to a video doorbell system, you’ll discover precisely which wires connect where, how to test connections safely, and what to do when standard solutions fail. No more guessing about TRANS versus FRONT terminals or wondering why your new doorbell won’t power up—this is the practical wiring knowledge you need right now.
Identifying Your Doorbell Chime Wiring Components at a Glance
Every functional doorbell system relies on four critical components working in harmony. Understanding these parts is your first step to successful wiring.
Essential Hardware You’ll See Behind the Wall
Your doorbell button isn’t just a simple switch—it’s the circuit trigger mounted 40-48 inches above ground. When pressed, it completes the electrical connection between your chime and transformer. Look for two terminal screws on the back plate where 18-AWG wires attach.
The indoor chime unit contains three labeled connection points you must identify correctly:
– TRANS: Where transformer power enters the system
– FRONT: Dedicated connection for your primary doorbell button
– REAR: Secondary connection for back door or additional buttons
The transformer reduces dangerous 120V household current to safe 16-24V AC power. It typically mounts within 5 feet of your electrical panel inside a junction box—find it by tracing wires from your chime unit.
Pro Tip: Before disconnecting anything, take a photo of your existing wiring setup. This visual reference prevents confusion during reassembly.
Why 16-24V is Critical for Proper Doorbell Chime Wiring

Mismatched voltage causes more doorbell failures than any other single issue. Getting this right determines whether your system works reliably or enters frustrating “Event Response mode.”
Standard Voltage Requirements You Must Verify
Your transformer must output between 16-24V AC at 50-60Hz frequency. Anything below 16V triggers unreliable operation where the chime works intermittently or not at all. Maximum load capacity matters too—30VA for dual chimes, 40VA for video doorbells.
Critical Checkpoint: Before purchasing any new components, read the label on your existing transformer. A 16V chime requires a 16V transformer—no exceptions. This single compatibility rule solves 80% of “mysterious” doorbell failures.
How to Test Your Transformer Voltage
- Turn off the doorbell circuit breaker
- Disconnect transformer wires from chime unit
- Restore power and set multimeter to AC voltage
- Touch probes to transformer output wires
- Verify reading between 16-24V
If your reading falls outside this range, replace the transformer immediately—it’s the most common root cause of wiring problems.
Wiring a Single Doorbell Button to Your Chime in 3 Steps
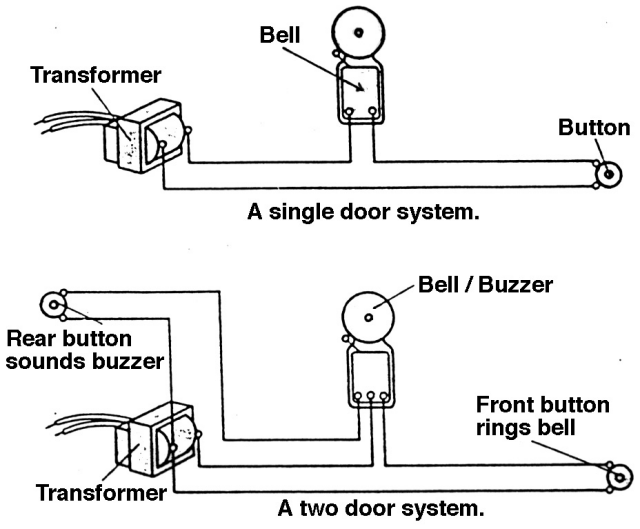
The simplest doorbell setup connects one button to one chime. Follow this exact sequence to avoid common mistakes that cause silent failures.
Step-by-Step Single Button Connection Process
- Connect Transformer to Chime: Run 18-AWG wire from transformer to chime’s TRANS terminal
- Link Chime to Button: Attach second wire from chime’s FRONT terminal to doorbell button
- Complete the Circuit: Connect wire from button back to transformer’s second terminal
Visual Confirmation: After power restoration, pressing the button should produce an immediate, clear chime sound. If silent, check for loose connections at all three points—90% of single-button failures stem from one loose terminal screw.
Dual Doorbell Button Wiring for Front and Back Entries
Homes with multiple entry points need separate wiring for each button while sharing the same chime unit. This configuration lets you distinguish between front and back door visitors.
How to Wire Two Buttons to One Chime Unit
- Connect front door button wire to chime’s FRONT terminal
- Attach back door button wire to chime’s REAR terminal
- Share the same TRANS terminal connection for both buttons
Key Difference: Each button triggers a distinct chime pattern (typically “ding-dong” for front, “ding” for back). If both buttons produce identical sounds, you’ve connected both to the same terminal—a common installation error.
Troubleshooting Tip: If one button works but the other doesn’t, swap their wires at the chime unit. If the problem follows the wire, you’ve found your faulty connection point.
Installing Dual Chimes for Whole-House Coverage
Large homes require sound coverage in multiple locations. Proper parallel wiring ensures both chimes activate simultaneously from a single button press.
Parallel Wiring Method That Prevents Synchronization Issues
- Split transformer wire to feed both chimes’ TRANS terminals
- Connect button wire to both chimes’ FRONT terminals
- Maintain consistent 18-AWG wire gauge throughout
Synchronization Check: Both chimes should sound within half a second of each other. If one chime lags significantly, inspect wire connections for looseness—vibrations from the chime mechanism often work screws loose over time.
Pro Mistake to Avoid: Never daisy-chain chimes (connecting one chime to another). This series configuration causes voltage drop that weakens the second chime’s sound.
Safety-First Doorbell Wiring Protocol You Must Follow
Electrical safety can’t be compromised, even with low-voltage systems. One overlooked step risks shock or fire hazards.
Critical Power-Down Procedure Before Touching Wires
- Step 1: Switch off the correct circuit breaker at your main electrical panel
- Step 2: Test wires with a voltage tester to confirm zero power
- Step 3: Keep breaker off until all connections are complete and secured
Essential Tool Checklist:
– Insulated screwdrivers (never use metal-handled tools)
– Non-contact voltage tester
– Wire strippers specifically for 18-AWG gauge
– Electrical tape for all connections
– Properly sized wire nuts
Warning: If your home has aluminum wiring, stop immediately and contact a licensed electrician. Aluminum requires special connectors to prevent fire hazards—standard copper connections create dangerous oxidation.
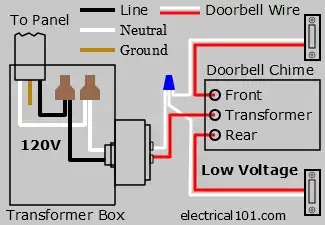
Transformer Installation Steps That Prevent Voltage Drop
The transformer is your system’s power foundation. Incorrect installation causes weak chimes and intermittent failures that frustrate homeowners for months.
Correct Transformer Mounting Sequence
- Select location within 5 feet of electrical panel or existing junction box
- Remove junction box cover and feed transformer wires through opening
- Connect black wire to live (hot) house wire with wire nut
- Attach white wire to neutral house wire
- Secure green or bare wire to ground wire
- Wrap all connections with electrical tape
- Replace junction box cover before restoring power
Critical Check: After installation, verify voltage output at the chime unit—not just at the transformer. Long wire runs cause voltage drop that weakens your chime’s performance.
Chime Terminal Connections That Eliminate Silent Failures
Loose connections at the chime unit cause more “mystery” failures than any other single issue. Proper terminal attachment solves most silent doorbell problems.
Exact Terminal Wiring Sequence for Reliable Operation
- Thread labeled wires through chime housing openings
- Match wire labels precisely to terminal names (TRANS, FRONT, REAR)
- Tighten terminal screws firmly until wire cannot be pulled free
- Mount chime to wall using manufacturer’s template
- Test all functions before attaching decorative cover
Visual Cue: Look for corrosion or discoloration on terminal screws—this indicates poor connections that need immediate attention. Clean with electrical contact cleaner before reattaching wires.
Diagnosing Common Doorbell Wiring Failures in Minutes
Most doorbell problems stem from three specific wiring issues. Target these first before replacing components unnecessarily.
Why Your Doorbell Won’t Chime: Top 3 Causes
Transformer Voltage Below 16V: Test output with multimeter—replace transformer if below 16V AC
Loose Terminal Connections: Check all screws at chime unit and button—re-tighten until wire is secure
Button Mechanism Failure: Press button while listening for faint “click”—no sound indicates internal failure
Continuous Ringing Emergency Fix
This dangerous condition indicates an immediate short circuit:
1. Turn off doorbell breaker immediately
2. Inspect button wiring for touching strands
3. Check button mechanism for sticking in “pressed” position
4. Separate all wire strands at button terminals
Pro Tip: Apply dielectric grease to outdoor connections annually to prevent moisture-related shorts—the #1 cause of intermittent failures in humid climates.
Monthly Maintenance That Prevents Doorbell Emergencies
Preventative care takes just two minutes monthly but saves hours of troubleshooting later. These simple checks catch problems before they leave you with a silent doorbell.
Essential Doorbell Wiring Care Routine
- Monthly: Press all buttons to verify proper operation and sound quality
- Seasonal: Check outdoor button for weather damage and secure mounting
- Annual: Test transformer voltage output and tighten all terminal screws
- Biannual: Clean chime components with dry cloth to remove dust buildup
Performance Boost: Replace aging transformers every 7-10 years—even if working, they gradually lose voltage regulation that causes intermittent failures.
Your doorbell system should now operate reliably with clear, consistent chimes. Remember that proper doorbell chime wiring depends on three non-negotiable elements: matching voltage specifications, secure terminal connections, and appropriate 18-AWG wiring throughout. Test your system monthly and address minor issues immediately—this prevents the frustration of discovering a silent doorbell when you actually need it. For complex installations or aluminum wiring situations, always consult a licensed electrician to ensure safety and code compliance.


