
You’ve unboxed your ecobee Smart Doorbell Camera, excited to upgrade your home security, but that wiring diagram suddenly feels intimidating. Don’t let electrical connections deter you—most homeowners successfully complete this ecobee doorbell installation in under an hour with basic tools. This guide cuts through the confusion with precise, actionable steps tailored to your specific wired model, whether you’re replacing an old doorbell or integrating with your existing ecobee ecosystem. You’ll learn exactly how to verify compatibility, avoid dangerous mistakes, and troubleshoot issues before calling a professional.
That flickering LED light or intermittent chime after installation? It usually traces back to overlooked power requirements or loose wire connections. By following this detailed roadmap, you’ll bypass the most common pitfalls that turn a simple upgrade into a frustrating ordeal. We’ve distilled years of installer insights into this no-fluff guide, so you can enjoy crisp video feeds, reliable motion alerts, and seamless smart home integration right from day one of your ecobee doorbell installation.
Verify Your Doorbell System Compatibility First

Skip this critical step, and your ecobee doorbell installation will fail before you mount the camera. Your existing doorbell must deliver 16-24 volts AC from a functioning transformer—anything lower causes boot loops or “low power” errors. Use a multimeter to test voltage at the doorbell wires after turning off power at the breaker. If readings fall below 16V, you’ll need professional transformer replacement (available through ecobee’s service team for $150.50+).
Why Your Chime System Matters More Than You Think
Most homes require an active internal chime for proper operation, but older mechanical chimes often lack the necessary power draw. Check if your chime sounds when pressing the button—if it’s silent or weak, the included Chime Adapter is mandatory. This small device bridges compatibility gaps by simulating the electrical load older systems need. Skip it, and you’ll get video alerts but no physical chime activation—a critical oversight during ecobee doorbell installation.
Optimal Mounting Height and Angle Hacks
Position the camera 48-52 inches above ground level for ideal face capture, but avoid direct sunlight exposure that washes out video. The included wedge accessory provides 15° downward tilt—essential for covering porch steps. If your doorway has obstructions (like pillars or overhangs), purchase ecobee’s corner mount plate ($24.99) to shift the viewing angle 30° without rewiring.
Gather These Exact Tools Before Starting
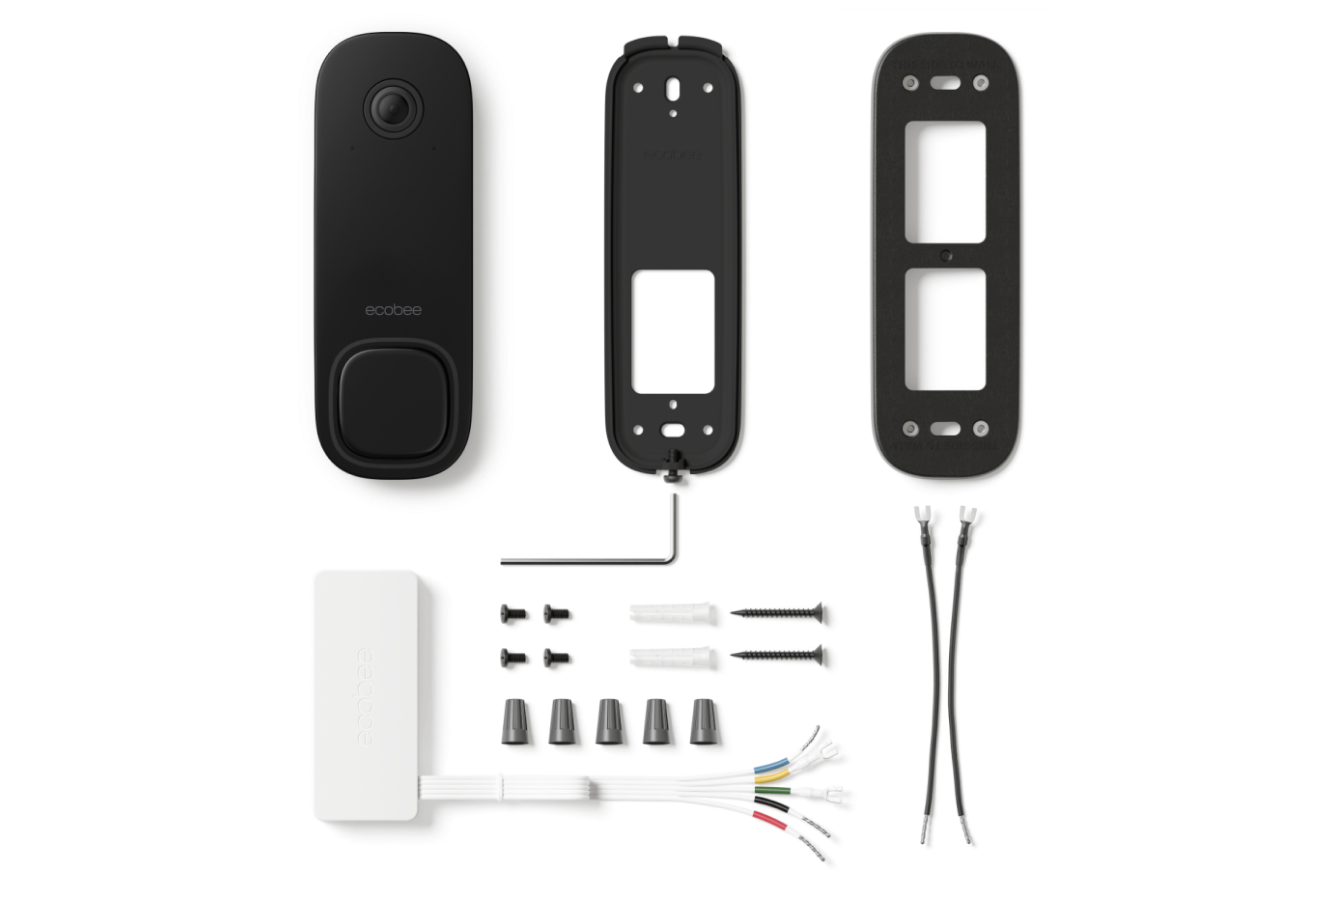
Your ecobee installation kit includes every specialized component, but standard tools determine success. Using the wrong drill bit cracks masonry or strips screw holes—guaranteeing callbacks. For wood/vinyl siding, you’ll need a 5/64″ drill bit; brick/concrete demands a ¼” masonry bit. Never substitute with larger bits—that creates loose anchor points causing camera wobble in wind.
Critical Safety Gear You Can’t Skip
- Non-contact voltage tester: Confirms power is OFF before touching wires (prevents 120V shocks)
- Needle-nose pliers with wire cutter: Strips insulation without nicking copper strands
- Phillips #2 screwdriver: Prevents cam-out during backplate mounting
- Work gloves: Protects hands from sharp wall debris during drilling
Remove Your Old Doorbell Without Losing Wires
Time-Saving Tip: Complete this in 8 minutes if you photograph wiring before disconnecting. Most systems use two wires (typically red and white), but color coding isn’t standardized—always note which terminal connects to which wire. If wires retract into the wall, stop immediately; use pliers to gently pull them 2 inches clear.
Avoid the #1 Wiring Mistake
Never cut existing wires shorter than 3 inches. Short wires prevent secure connections to the ecobee terminals, causing intermittent operation. If your wires are stubby, use the included 6-inch extenders—twist connections clockwise and seal with wire nuts (provided in kit). Forcing wires risks internal shorts that trip breakers.
Mount the ecobee Backplate Like a Pro

Hold the backplate against your wall with the wedge slot facing downward—this directs water runoff away from electronics. Mark screw holes with painter’s tape to prevent drill bit slippage on smooth surfaces. For brick installation:
1. Drill 1¼” deep pilot holes with masonry bit
2. Tap anchors flush with a rubber mallet
3. Insert long screws until just tight—over-tightening cracks plastic plates
Warning: If the plate wobbles after mounting, remove and fill old holes with spackle. Re-drilling ½ inch away creates weak anchor points.
Connect Wires for Rock-Solid Power

ecobee’s terminals accept 18-22 gauge wire—strip exactly ¼” of insulation using the pliers’ gauge notch. Insert bare copper straight into terminals until it bottoms out, then tighten screws to 0.5 in-lb torque (snug but not crushing). For low-voltage systems under 18V:
– Connect both wires to either terminal (polarity doesn’t matter)
– Bypass the Chime Adapter only if using a digital chime (like Ring Chime Pro)
Visual Cue: After power restoration, the status LED should glow solid blue within 60 seconds. No light? Check wire tension—loose connections cause 90% of “dead doorbell” issues.
Complete Digital Setup in 7 Minutes
Critical Wi-Fi Requirement: Your router must broadcast a 2.4GHz network—the ecobee doorbell ignores 5GHz bands. If your router is dual-band but hides 2.4GHz, enable “Smart Connect” in router settings. During app setup:
1. Scan QR code on camera backplate
2. Select 2.4GHz network (not “5G” or “5GHz” options)
3. Draw motion zones only over your porch area to avoid sidewalk false alerts
Pro Tip: Test motion detection by walking through zones at night—IR illumination reveals blind spots better than daylight.
Fix These 4 Issues During ecobee Doorbell Installation
“Chime Works but No Video Feed”
This indicates reversed power polarity. Turn off breaker, swap wires at doorbell terminals, then restore power. If unresolved, check Chime Adapter connections inside your chime box—loose adapter wires kill video while allowing chime operation.
“Intermittent Power Loss in Winter”
Cold temperatures expose weak transformers. Test voltage during cold snaps—if below 18V, schedule ecobee’s professional transformer upgrade. DIY replacements risk fire hazards from mismatched specs.
“False Motion Alerts from Trees”
Adjust sensitivity to “Low” in app settings, then redraw detection zones to exclude swaying branches. For persistent issues, enable “Person Detection Only” under Advanced Settings—ignores animals and shadows.
“Poor Night Vision Quality”
Clean the lens with microfiber cloth (smudges scatter IR light). If images remain grainy, reposition the wedge to tilt the camera 5° steeper—this focuses IR illumination on faces instead of ground level.
When Professional Installation Saves You Headaches
Book ecobee-certified technicians if your voltage tests show under 16V, or if you lack existing doorbell wiring. Their $150.50 service (book via 1-833-647-2456) includes:
– Transformer replacement with UL-listed 16V/30VA model
– Chime system diagnostics and adapter installation
– 90-day workmanship warranty
– Live app walkthrough showing notification customization
Real User Insight: “Moises installed my doorbell in 35 minutes—he spotted my corroded wires I’d missed, preventing future shorts.” (Lisa S., verified buyer)
Monthly Maintenance That Prevents Failures
Skip these, and weather exposure will degrade performance within 6 months:
– Lens cleaning: Wipe weekly with alcohol prep pad during pollen season
– Wire inspection: Check terminal screws for corrosion quarterly (looseness causes arcing)
– Motion recalibration: Redraw zones after landscaping changes—overgrown bushes trigger false alerts
Update the ecobee app monthly for security patches; firmware updates install automatically overnight when connected to Wi-Fi.
Final Takeaway: Your ecobee doorbell installation succeeds when you verify power compatibility first, use the exact drill bits specified, and connect wires with proper tension. For most standard setups, this 45-minute DIY process delivers crystal-clear video and reliable alerts. If voltage issues arise or wiring seems complex, ecobee’s professional service ($150.50 with 90-day warranty) guarantees seamless integration with your smart home. Within hours of completing your ecobee doorbell installation, you’ll gain peace of mind from real-time package alerts, live thermostat viewing, and end-to-end encrypted security—all from your front porch. Ready to test your setup? Press the doorbell button now and watch your phone light up with a notification.


