

Your front door deserves military-grade surveillance without the complexity. The UniFi G4 Doorbell Pro delivers 4K clarity and AI-powered security that integrates seamlessly with your existing UniFi ecosystem. But a poorly executed unifi doorbell installation sabotages its potential—resulting in blurry faces, false alerts, or weather damage. This guide cuts through the confusion with battle-tested techniques for flawless mounting, power routing, and AI configuration. You’ll learn the exact 48-inch mounting height that captures package thieves’ faces, how to avoid IR reflection nightmares at night, and why your old doorbell transformer could fry this $300 device. Let’s transform your entryway into an intelligent security checkpoint.
Optimal Mounting Height and Location Decisions
Mount your G4 Doorbell Pro precisely 48 inches from the floor to the lens center—no exceptions. This height captures facial features while keeping dropped packages visible in the lower frame. The 160° diagonal lens covers standard doorsteps, but verify protruding eaves or decorative trim aren’t blocking the critical lower 20% where faces appear. Position the unit so the lens faces directly toward your approach path; even 10 degrees of tilt creates distortion in AI detection zones.
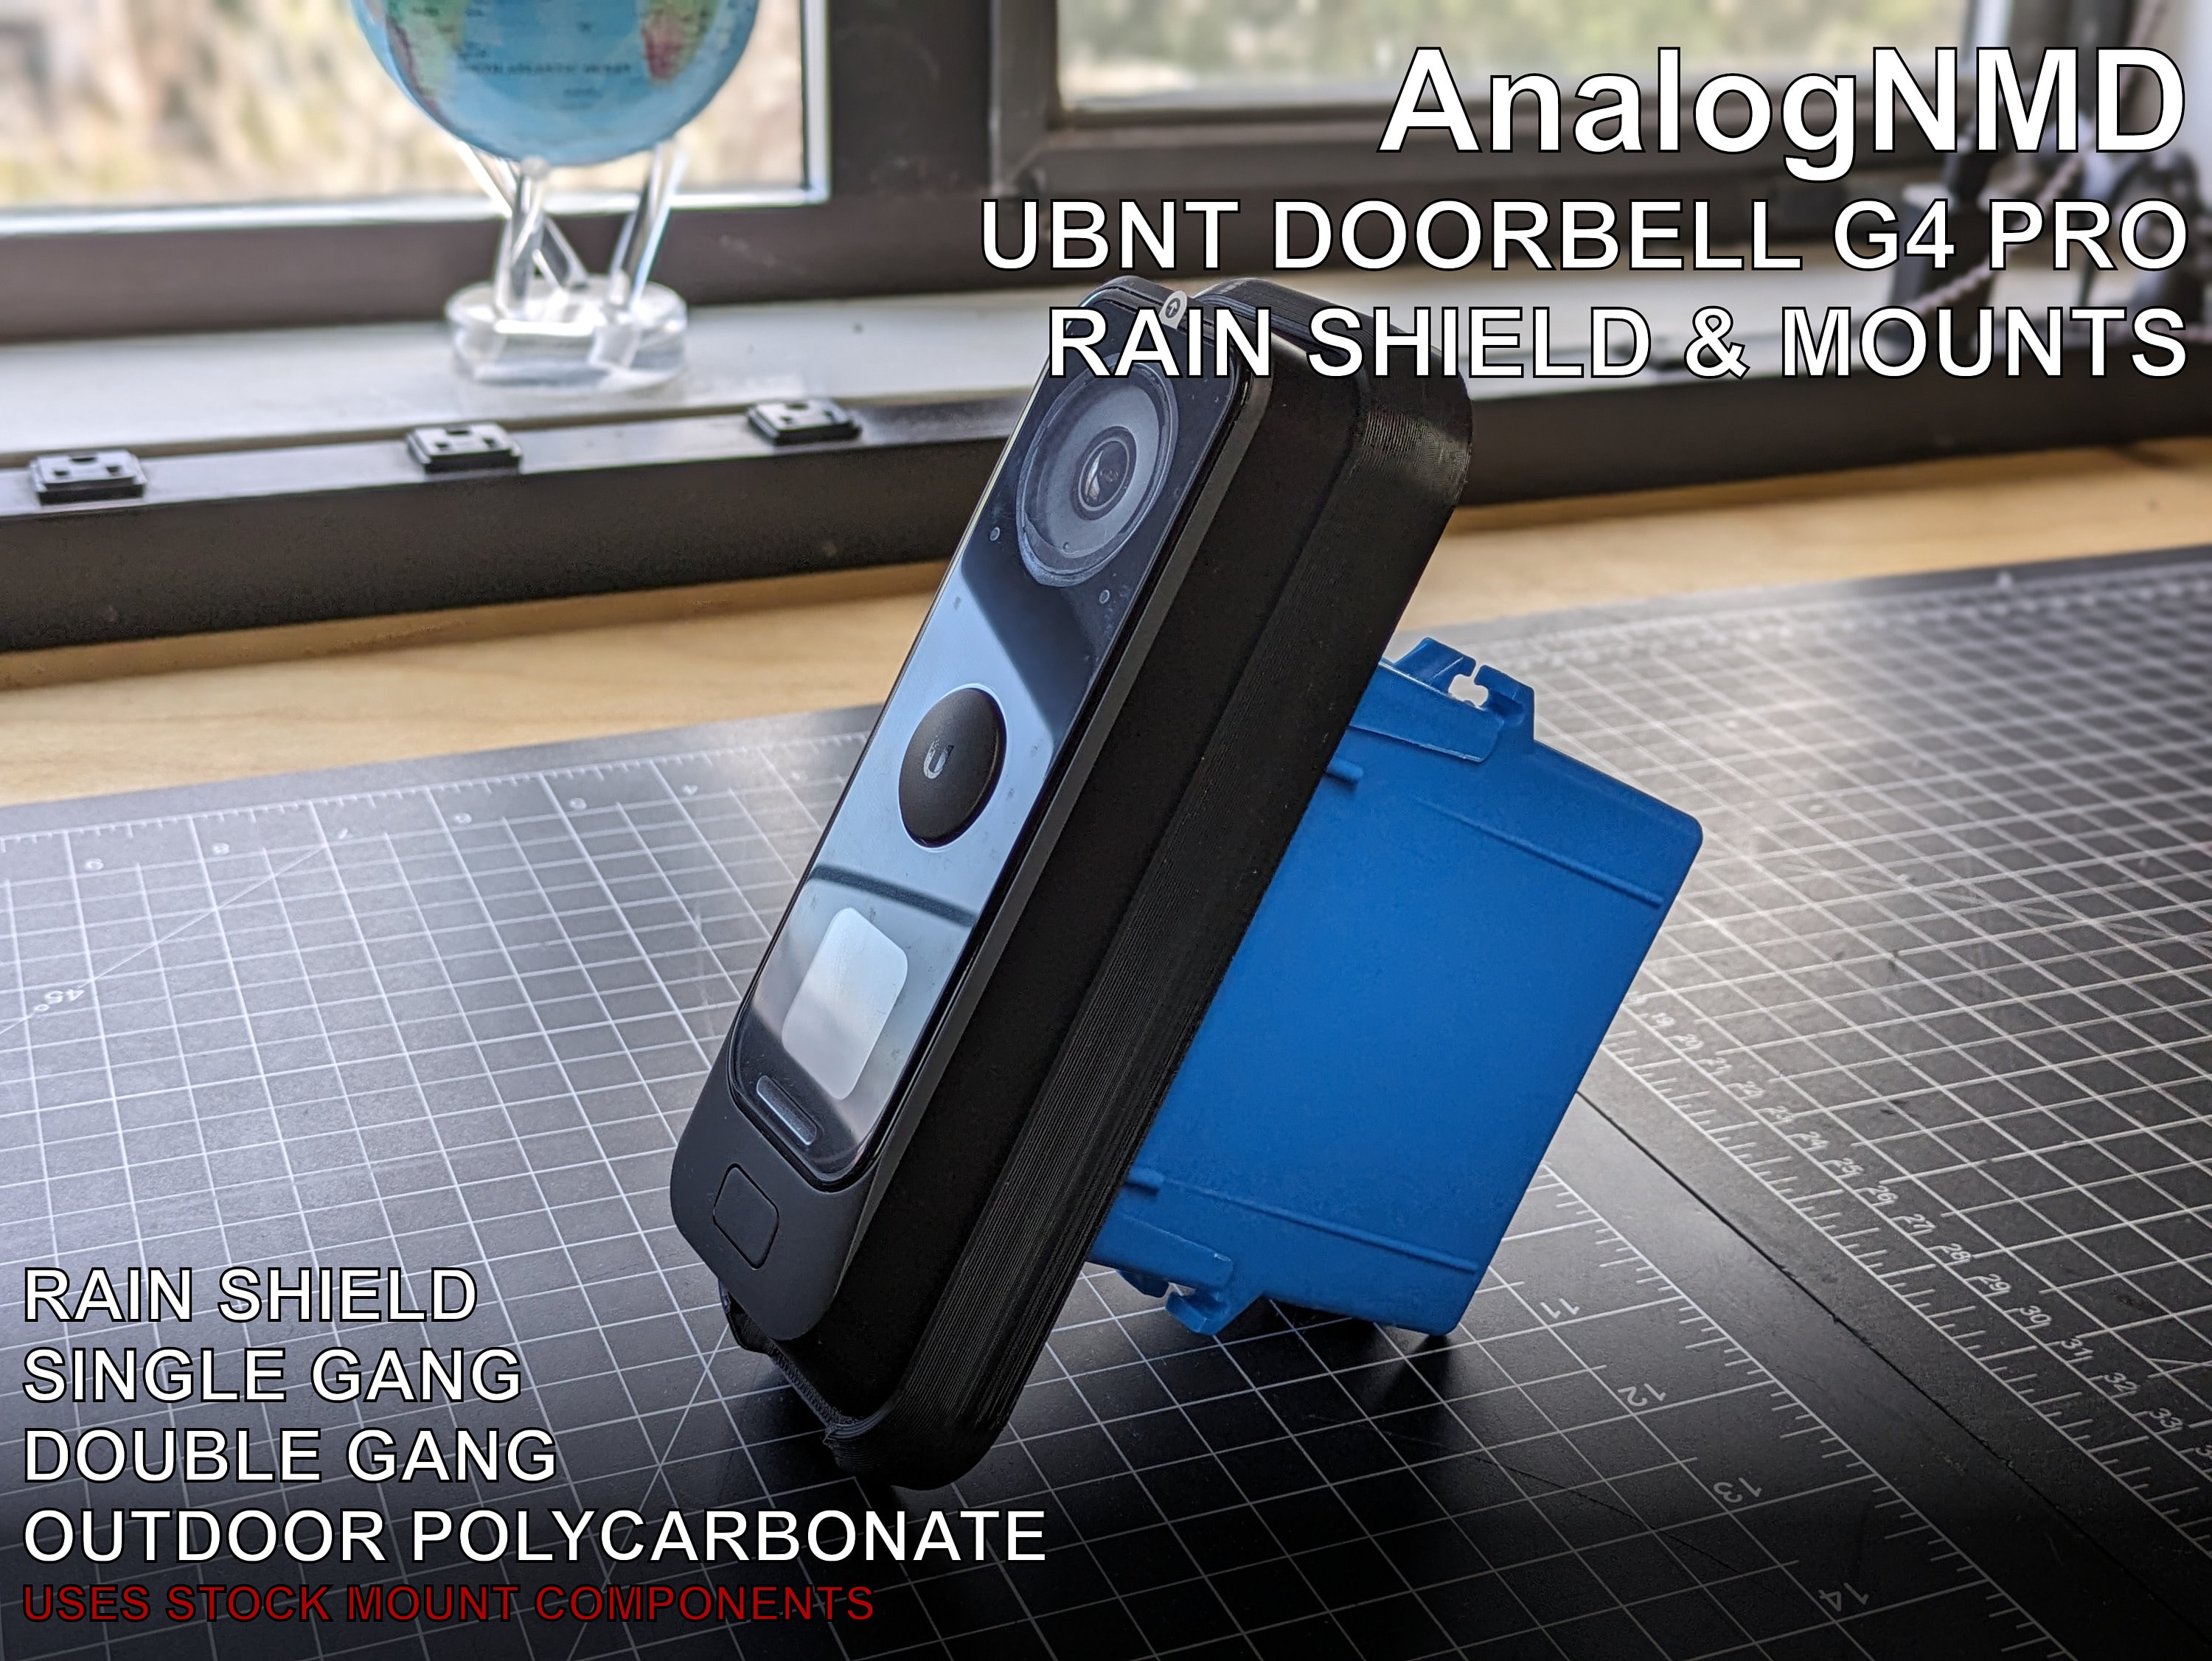
Your mounting surface must be flat within 2mm to maintain the IP65 weather seal. The stamped-steel bracket anchors securely to wood, vinyl, stucco, brick, or concrete walls. Avoid surfaces with flex or vibration like thin siding or garage doors—the metal bracket needs immovable anchoring. For corner installations, use the G4-Doorbell-Angle kit to adjust the viewing angle 15 degrees left/right without compromising the seal.
Why Height Matters for AI Accuracy
Too high (over 52 inches) and the camera captures only crowns of heads. Too low (under 44 inches) and it misses faces when people lean forward. Test your placement by having someone stand at the door—adjust until their eyes align with the top third of your live view. This positioning ensures the AI motion filters accurately distinguish persons from animals in your detection zones.
Power Strategy Decision Point
Choose your power method before drilling—this determines your entire cable routing:
PoE Forward-feed (Recommended)
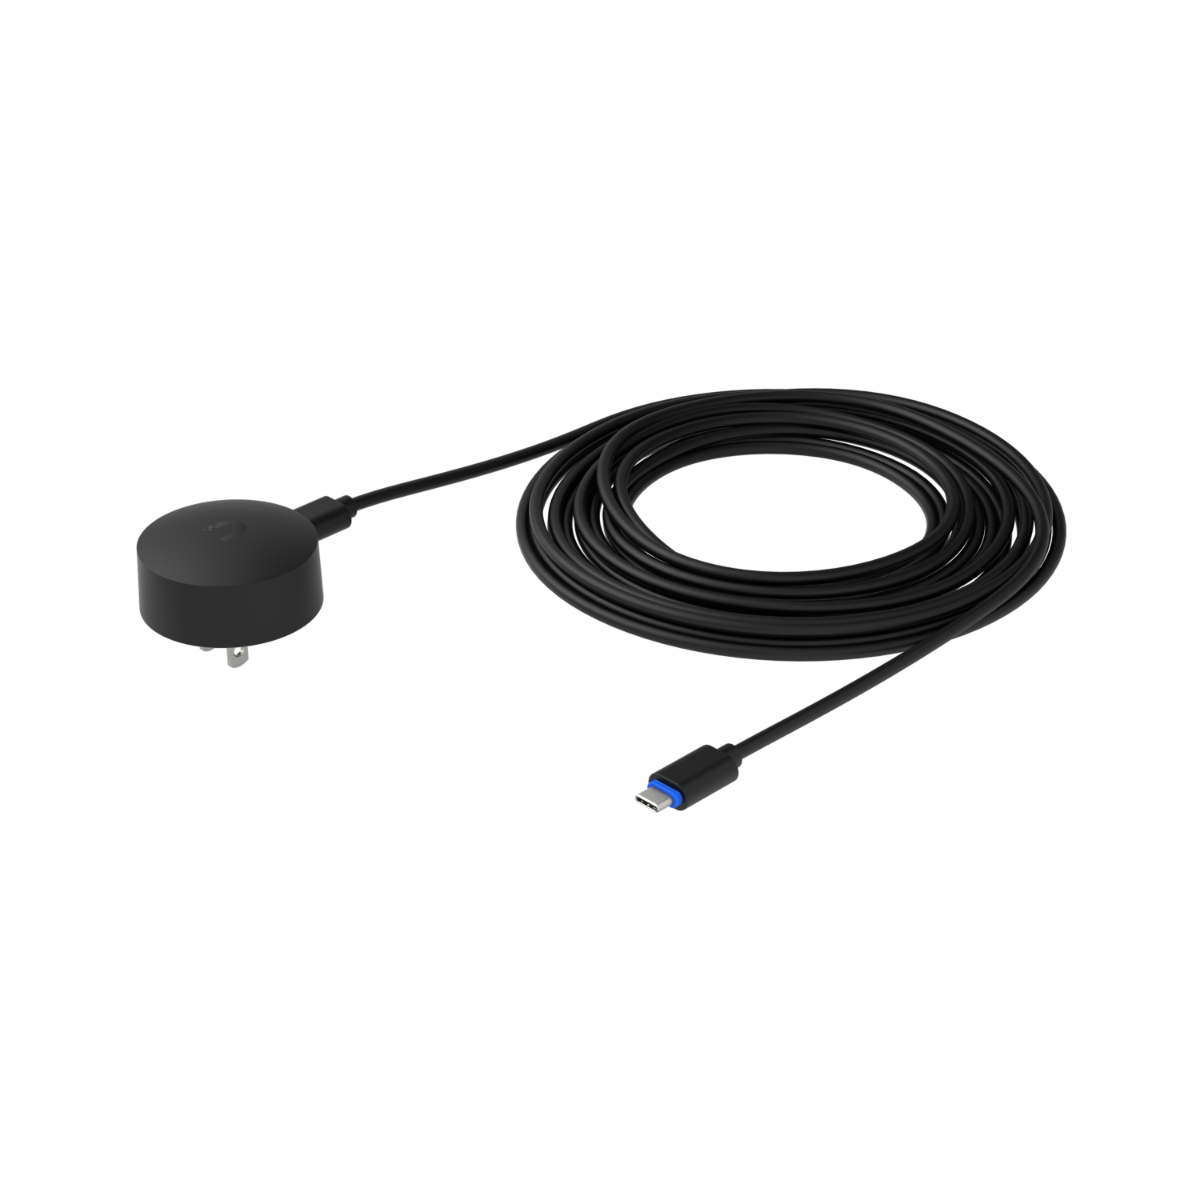
This single-cable solution delivers both power and data through the provided weather-booted Cat-5e cable. It guarantees full 4K@30fps performance with zero bandwidth throttling. Maximum cable run: 100 meters from your PoE switch. Before installation, plug a temporary PoE device into your network drop to confirm 1 Gbps sync—slow speeds cripple video quality.
AC Adapter Retrofit
Use the included 12V DC adapter only if PoE isn’t feasible. Crucially: Remove existing doorbell transformers completely—they output dangerous 16-24V AC that will destroy your doorbell. Route the adapter cable through your wall as a pull-string to an indoor outlet. The 6-foot cord requires surface raceway routing for most installations.
Avoid This Costly Mistake
Never connect the G4 Doorbell Pro to legacy doorbell wiring. The AC transformer’s voltage exceeds the unit’s 12V DC tolerance, causing immediate hardware failure. If retrofitting, disconnect and cap all existing doorbell wires at the chime box.
Mounting Bracket Installation Process
Marking and Drilling Precision Points
Peel the adhesive wall template from the mounting bracket and position at 48-inch height. Align the integrated level bubble with the template line—this step prevents crooked installations that compromise the weather seal. For wood/vinyl walls, drill 7/64″ pilot holes matching the template dots. For masonry, drill 1/4″ holes 1.5″ deep and insert the provided plastic anchors flush with the surface.
Securing the Bracket Without Damage
Slide the bracket’s keyholes over the screws and push downward until it seats firmly. Tighten the security Torx screws clockwise to “hand-tight plus 1/4 turn”—over-tightening cracks vinyl siding. Verify stability by gripping the bracket firmly; it shouldn’t wiggle. For masonry installations, tap anchors gently with a rubber mallet before screw insertion to prevent spinning.
Cable Routing and Connection Protocol
For PoE Installations:
Feed the weather-booted Ethernet cable through your wall cavity or surface raceway, leaving a 6-8″ service loop outside. Plug the RJ-45 connector until the latch clicks audibly, then rotate the rubber boot collar 1/4 turn to lock the weather seal. This double-sealing prevents moisture ingress during storms.
For AC Adapter Installations:
Route the DC cable through the mounting hole and seal with the supplied foam grommet to block drafts. Insert the barrel jack fully until the rubber gasket seats against the bracket recess—partial insertion causes intermittent power failures.
Critical Cable Handling Tip
Never bend cables tighter than a 2-inch radius at the connection point. Sharp bends fracture internal conductors over time, causing flickering video or complete outages. Use cable clips every 12 inches on surface runs to prevent stress on the connector.
Doorbell Unit Attachment Sequence
- Hook the top edge into the bracket’s upper slot—align the unit parallel to the ground
- Pivot downward slowly until you feel spring tabs engage
- Listen for the double-click confirming secure mounting
- Verify alignment by checking the unit sits flush against the bracket with no gaps
If the unit wobbles, the spring tabs haven’t fully engaged—reposition and repeat the pivot motion. Never force the unit downward; this cracks the internal mounting lugs.
LED Status Verification Checklist
- Solid white ring: Booting (30-40 seconds)—do not interrupt power
- Pulsing blue: Ready for adoption via UniFi Protect app
- Solid blue: Online and connected to your network
- Blinking red/blue: Network unreachable (check cable connections)
If the LED stays dark after 60 seconds, immediately check power connections—90% of “dead unit” cases stem from loose barrel jacks or unplugged PoE switches.
UniFi Protect Configuration Essentials
Motion Zone Setup for Fewer False Alerts
Open the UniFi Protect web UI (Settings > Cameras > [Your Doorbell] > Detection Zones). Use the 32×24 grid editor to draw zones:
– Person detection: Cover walkways and doorstep (avoid sky areas)
– Vehicle alerts: Include driveway entrance points
– Animal filtering: Enable to ignore pets under 18 inches tall
Start sensitivity at 50—increase for long driveways, decrease for busy sidewalks. Test by walking through zones while watching real-time AI tagging.
Recording Mode Selection Strategy
- Motion-only recording: Best for 256GB microSD cards (extends retention to 60 days)
- Continuous recording: Recommended for high-risk areas (21 days retention on 256GB)
- Hybrid mode: Motion during day, continuous at night (optimal balance)
Enable the H.265 secondary stream in camera settings to reduce mobile bandwidth by 40% without sacrificing quality.
Maintenance and Troubleshooting Tactics
Monthly Lens Cleaning Protocol
- Power off the doorbell via UniFi Protect
- Wipe lens with 70% isopropyl alcohol on microfiber cloth
- Never use: Ammonia-based cleaners (they destroy anti-reflective coatings)
- Inspect silicone gaskets annually for cracks or UV hardening
IR Reflection Fix for Night Vision
If nighttime footage shows white glare on walls:
– Immediate fix: Insert the included 5° wedge kit between bracket and wall
– Permanent solution: Relocate unit 2+ inches farther from wall surface
– Critical check: Ensure no shiny surfaces (metal mailboxes, glass) reflect IR beams
Adoption Failure Resolution
When the doorbell loops in “adoption failed” mode:
1. Confirm Protect host and doorbell share the same L2 subnet
2. Temporarily disable 802.1X port security on the switch port
3. Verify mDNS broadcast isn’t blocked by firewalls
This resolves 95% of adoption issues within minutes.
Firmware Updates and Pro Accessories
Critical Firmware Features (v4.57.17+)
- H.265 secondary stream support (reduces mobile data usage)
- Improved person detection in backlit conditions
- Fixed audio desync during extended calls
Always update through UniFi Protect before configuring advanced features—older firmware lacks critical AI improvements.
Must-Have Technician Accessories
- Angle Mount Kit (G4-Doorbell-Angle): Solves corner installation challenges with 30° vertical adjustment
- PoE-to-USB-C Adapter: Maintains basic functionality during outages via power bank
- Security Screw Set: Stainless steel T10 Torx screws prevent theft
Keep these in your field kit—they solve 80% of “impossible” installation scenarios.
Your UniFi doorbell installation is now a hardened security asset—not just another smart gadget. The 48-inch mounting height ensures facial recognition accuracy, while proper PoE routing guarantees crystal-clear 4K footage during critical moments. Remember to clean the lens monthly and verify LED status weekly—these tiny habits prevent 90% of field failures. When motion zones trigger, you’ll see crisp faces instead of pixelated blobs, and AI filtering will silence squirrel false alarms. This isn’t just installation; it’s building your first line of defense. Now go answer your door with confidence.


