
Your ADT doorbell chime suddenly stops responding, leaving you unaware of visitors at your door. This silent failure affects countless homeowners who rely on their doorbell system for security and convenience. While ADT systems are generally reliable, chime malfunctions can occur due to various electrical and mechanical issues that often have straightforward solutions. Before scheduling a service call or assuming your entire system needs replacement, you can diagnose and address most common problems yourself with basic tools and some systematic troubleshooting.
This guide provides practical steps for restoring your doorbell chime functionality, focusing on the most frequent failure points across doorbell systems. While specific ADT model details may vary, these universal troubleshooting principles apply to most wired doorbell chime systems.
Immediate Power Verification Steps
Start with the most fundamental requirement—your chime needs consistent electrical power to function. Many “broken” chimes simply experience temporary power disruptions that you can resolve in minutes.
Check your circuit breaker immediately: Locate your home’s electrical panel and identify any breakers labeled “doorbell,” “chime,” or similar terminology. If you find a tripped breaker, switch it fully to the OFF position before returning it to ON. Allow 60 seconds for the system to reset completely before testing the doorbell button again.
Test the doorbell button functionality: Press and hold your exterior doorbell button for 3-5 seconds while listening closely for any response from the chime unit. Even a faint buzzing or clicking sound indicates that power is reaching the chime mechanism but isn’t sufficient to produce a clear audible signal.
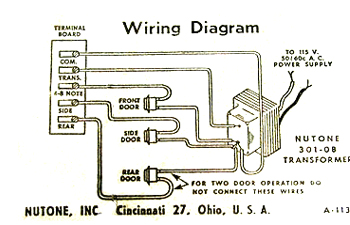
Inspect the transformer connections: Your doorbell transformer—typically a small rectangular component mounted near your electrical panel—provides the necessary low-voltage power. Carefully examine all wire connections at the transformer for looseness or signs of damage. Gently tug on each wire to verify secure attachment to the terminals.
Understanding Common Chime Failure Patterns
Recognizing why chimes fail helps you efficiently target your diagnostic efforts without unnecessary component replacement.
Power Delivery Problems
- Loose wiring connections at any point in the circuit (transformer, chime unit, or button)
- Transformer output issues resulting in insufficient voltage for proper operation
- Electrical interruptions from tripped breakers or damaged wiring
- Corrosion buildup on wire terminals preventing proper electrical conductivity
Mechanical Component Failures
- Stuck plungers or strikers caused by dust accumulation or lack of lubrication
- Worn internal springs that fail to return components to their resting position
- Physical damage to chime bars that prevents proper vibration and sound production
- Misaligned internal mechanisms that disrupt the striking action
System Integration Challenges
- Voltage mismatches between components that cause inconsistent performance
- Compatibility issues when integrating newer components with existing systems
- Environmental factors like extreme temperatures affecting electronic components
Effective Diagnostic Approach
Follow this systematic process to identify your specific failure point without unnecessary part replacement.
Listen for Critical Audio Cues
Complete silence when pressing the button typically indicates a total power interruption or severe mechanical failure. A single weak “ding” suggests partial power delivery or a partially obstructed mechanism. Continuous buzzing sounds often point to a stuck plunger or transformer problems. Intermittent operation usually indicates loose connections that make and break contact unpredictably.
Conduct Visual System Inspection
- Remove the chime cover by gently pulling or unscrewing the decorative housing
- Examine all wire connections for security and signs of corrosion or damage
- Check for visible debris inside the chime mechanism that might obstruct moving parts
- Verify plunger movement by gently pressing the plungers with your finger (with power off)
Test Button Circuit Integrity
With the power disconnected at the breaker, carefully disconnect the wires from the doorbell button. Briefly touch these two wires together while someone presses the button. If the chime sounds during this test, your doorbell button requires replacement. If no sound occurs, the problem lies elsewhere in the system.
Resolving Power Supply Issues
Power-related problems account for the majority of chime malfunctions and often offer the quickest solutions.
Transformer Testing and Replacement
Important safety note: Always turn off power at the circuit breaker before working on electrical components.
- Locate your transformer (commonly found in basements, garages, or utility closets)
- Test transformer output using a multimeter set to AC voltage
- Verify proper voltage (most systems require 16-24 volts AC)
- Replace if necessary with a compatible transformer matching your system requirements
- Restore power and test the doorbell system thoroughly
Wire Connection Restoration
Address common connection problems with these steps: Remove damaged insulation using proper wire strippers to expose fresh conductor, clean corroded terminals with fine-grit sandpaper or electrical contact cleaner, secure connections by twisting wires together clockwise before applying wire nuts, and verify continuity throughout the circuit using a multimeter.
Clearing Stuck Chime Mechanisms

Dust accumulation and lack of maintenance frequently cause mechanical components to stick, especially in older installations.
Basic Cleaning Procedure
- Disconnect power at the breaker for safety
- Remove the chime housing carefully to access internal components
- Use compressed air to dislodge dust from moving parts and chime bars
- Apply minimal lubrication with a single drop of light machine oil on pivot points only
- Manually test movement of all plungers and strikers to ensure free operation
- Restore power and verify proper chime function
Advanced Cleaning for Severe Cases
For systems with significant buildup: Document component positions with photographs before disassembly, clean metal parts using electrical contact cleaner (never water-based solutions), replace visibly worn springs that have lost tension, and reassemble carefully following your reference photos to maintain proper alignment.
Replacing the Chime Unit
When troubleshooting fails to restore function, replacement becomes the most reliable solution for persistent problems.
Selecting a Compatible Replacement
Ensure your new chime unit matches: Voltage requirements (confirm your transformer output), physical dimensions (measure your existing mounting space), sound preferences (traditional or electronic tones), and integration capabilities (if connecting to smart home systems).
Professional-Quality Installation
- Confirm power is off using a non-contact voltage tester
- Remove the old chime by disconnecting wires and unscrewing mounting hardware
- Transfer wiring to the new unit following color-coded connections
- Secure the new chime in place using appropriate mounting hardware
- Conduct comprehensive testing from all doorbell buttons before final reassembly
Professional tip: Photograph your existing wiring configuration before disconnecting anything—this visual reference prevents connection errors during reinstallation.
Preventing Future Chime Failures
Implement these simple maintenance practices to significantly reduce the likelihood of recurring problems.
Monthly Maintenance Routine
- Test doorbell operation from all installed buttons
- Listen for unusual sounds that might indicate developing problems
- Check visible connections for security and corrosion signs
- Clean accessible components with compressed air to prevent dust buildup
Seasonal Protection Measures
Winter: Inspect outdoor components for ice damage and ensure snow doesn’t cover buttons. Spring: Clear debris from button housings after seasonal storms. Summer: Check for insect nests inside chime mechanisms that can cause obstructions. Fall: Verify leaves and debris aren’t blocking button activation.
Knowing When to Seek Professional Help
Some situations require expert intervention to prevent safety hazards or warranty complications.
Recognizing Electrical Hazards
Contact a professional immediately if you notice burning odors from electrical components, visible arcing or sparks during testing, repeated circuit breaker trips when activating the doorbell, or melted wire insulation indicating dangerous overheating.
Complex System Integration Issues
When troubleshooting fails to resolve problems with multi-zone chime systems, smart home integration conflicts, or advanced security system interfaces, professional assistance becomes cost-effective compared to prolonged DIY efforts.
Final Troubleshooting Summary
For complete silence: Verify power at the transformer → test doorbell button circuit → inspect all wiring connections. When experiencing weak or intermittent sound: Clean chime mechanism thoroughly → check for loose connections → test transformer output voltage. Address continuous buzzing by cleaning stuck plungers → testing transformer temperature → checking for button malfunctions. Resolve intermittent operation by tightening all wire connections → replacing corroded terminals → considering chime unit replacement.
Regular maintenance prevents most chime failures, but when problems occur, systematic troubleshooting usually identifies the solution quickly. Start with the simplest potential causes—power supply and connections—before progressing to component replacement. By following these steps, you’ll restore reliable doorbell functionality and maintain your home’s security awareness without unnecessary service costs. Remember that consistent monthly checks catch developing issues early, preventing complete system failures when you need your doorbell most.


