Your Arlo doorbell went offline right when you expected an important delivery. The notification silence is frustrating, but you’re not alone—connectivity issues affect most smart doorbell owners at some point. Whether your doorbell shows as offline, won’t ring, or completely disappeared from your Arlo app, this guide walks you through proven fixes that actually work.
You’ll learn exactly what causes Arlo doorbells to stop working, how to diagnose your specific model’s issue, and step-by-step solutions that restore functionality fast. No technical experience required—just follow the diagnostic steps matched to your doorbell model.
Immediate Signs Your Arlo Doorbell Has Connectivity Issues
Look for these critical indicators that your Arlo doorbell is offline:
- No push notifications when visitors press your doorbell
- Grayed-out status in the Arlo Secure App instead of “Online”
- Failed video streams when attempting to view your doorbell feed
- Unresponsive doorbell button with no chime or visual feedback
These symptoms most often stem from power supply problems, Wi-Fi connectivity issues, or environmental factors affecting your specific model’s operation. Understanding which problem you’re facing saves hours of unnecessary troubleshooting.
Battery Failure Fixes for Arlo Wire-Free Models (AVD2001)
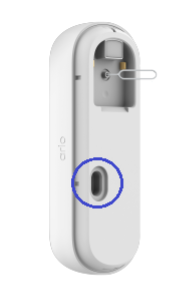
Diagnose Complete Battery Drainage
Press your doorbell button once. If no LED lights illuminate, you’re dealing with dead batteries—a problem accounting for 80% of offline issues with wire-free Arlo doorbells. This critical failure point requires immediate action before pursuing other solutions.
Follow these battery recovery steps:
– Remove the entire battery pack from your doorbell
– Charge to 100% capacity using the included cable (2-3 hours)
– Bring batteries indoors to warm if temperatures are below freezing
– Always use the original Arlo charging cable for proper voltage
Proper Battery Reinsertion Technique
Simply charging isn’t enough—many users fail to properly reconnect their battery pack:
- Remove battery for exactly 15 seconds to clear residual power
- Reinsert firmly until you hear a distinct “click” confirming connection
- Wait the full 2 minutes for complete boot sequence (don’t check app prematurely)
- Verify online status through the Arlo Secure App
Pro tip: Enable power-saving mode in your app settings during winter months to maximize battery life when temperatures drop below 32°F.
Solving Power Supply Problems in Wired Arlo Doorbells (AVD1001)

Verify Correct Voltage Requirements
Wired Arlo doorbells require 16-24V AC to function properly—anything outside this range causes persistent offline status. Using a multimeter, test your power supply with these precise steps:
- Turn off circuit breaker for your doorbell system
- Remove doorbell from mounting bracket
- Set multimeter to AC voltage setting
- Touch probes to doorbell terminals
- Confirm reading falls within the 16-24V range
Warning: If your reading is below 16V, consult a licensed electrician—improper voltage can damage your doorbell permanently.
Execute Proper Power Cycle
Many users skip the critical discharge period when resetting wired models:
- Turn off circuit breaker completely (not just the doorbell switch)
- Wait the full 10 minutes for capacitors to discharge
- Restore power at the breaker
- Allow 3 full minutes for startup sequence before checking app
Never attempt to remove batteries from wired models—they contain no user-serviceable power sources.
Eliminate Wi-Fi Connectivity Problems Causing Offline Status

Measure Your Actual Signal Strength
Weak Wi-Fi is the second most common cause of “Arlo doorbell not working” issues. Test your connection quality:
For 2nd generation models:
– Open Arlo Secure App → Settings → Doorbell → Connection Test
– Signal below 2 bars requires immediate action
Universal signal improvement tactics:
– Reposition your router at least 10 feet closer to the doorbell
– Remove metal objects between router and doorbell
– Switch from 5GHz to 2.4GHz network for better wall penetration
– Avoid placing your router near microwaves or baby monitors
Neutralize Common Signal Interference
Identify and eliminate these frequent interference sources:
- Microwave ovens operating on 2.4GHz frequency
- Bluetooth speakers near your doorbell or router
- Metal security doors blocking signal path
- Neighboring Wi-Fi networks on overlapping channels
- Dense vegetation or water features between devices
Quick fix: Change your router’s Wi-Fi channel to 1, 6, or 11 to minimize network congestion.
Model-Specific Reset Techniques That Actually Work
Wire-Free Doorbell Reset (AVD2001)
- Completely remove battery pack from housing
- Press and hold doorbell button for 30 seconds
- Reinsert fully charged battery with proper alignment
- Wait 2 minutes for complete reconnection cycle
Wired Doorbell Reset (AVD1001)
- Turn off circuit breaker for 15 minutes (full capacitor discharge)
- Restore power at breaker
- Press doorbell button 5 times rapidly within 10 seconds
- Allow 3 minutes for initialization before checking status
Audio Doorbell Battery Fix (AAD1001)
Replace batteries immediately when:
– Motion detection fails to trigger LED ring
– Doorbell button produces no sound
– Device shows offline in app
Battery replacement procedure:
1. Slide open battery compartment
2. Replace all AA batteries with new alkaline batteries
3. Press sync button for 5 seconds
4. Test motion detection by walking past
Factory Reset When All Else Fails
Warning: This deletes all settings and recordings permanently—use as last resort.
When to factory reset:
– Doorbell offline for 48+ hours after all other fixes
– LED lights work but won’t connect to app
– New router installation failed to reconnect
Reset steps for all models:
1. Open Arlo app → Settings → My Devices → [Your Doorbell]
2. Tap “Remove Device” and confirm
3. On doorbell: Press sync button for 10 seconds until LED blinks amber
4. Complete new device setup process
Prevent Future Arlo Doorbell Connectivity Failures
Monthly Maintenance Checklist
Spend 5 minutes monthly on these critical checks:
– Verify battery level in app (wire-free models)
– Clean camera lens with microfiber cloth
– Test doorbell button response and chime
– Confirm mounting screws are tight and secure
Optimize Your Wi-Fi Network for Arlo
Router placement strategies:
– Position router at least 6 feet high for better coverage
– Centralize location in your home
– Avoid entertainment centers that block signals
– Maintain 3-foot distance from other electronics
Network security essentials:
– Enable WPA2/WPA3 encryption
– Use guest network for doorbell if supported
– Update router firmware quarterly
Extend Battery Life for Wire-Free Models
Implement these power-saving measures:
– Activate “Battery Saver” mode in app settings
– Reduce video quality to 1080p instead of 2K
– Create activity zones to limit false motion triggers
– Consider solar panel accessory for continuous charging
When to Contact Arlo Support
Call Arlo support only after verifying these critical factors:
– Fully charged battery (wire-free models)
– Verified 16-24V power supply (wired models)
– Wi-Fi signal strength above 2 bars
– Successful factory reset and reconfiguration
Have ready before calling: Your exact doorbell model number, purchase date, and results from all connection tests you’ve performed.
Your Arlo doorbell should now be back online and functioning properly. The key to solving “Arlo doorbell not working” issues is methodical troubleshooting—start with power problems, then connectivity, and finally environmental factors. Most connectivity issues resolve within 30 minutes when you follow these specific steps matched to your exact model. Implement the monthly maintenance routine to prevent future offline episodes and enjoy reliable smart doorbell functionality year-round.


