

Your front door just got smarter. The Blink Video Doorbell transforms any entrance into a 24/7 security checkpoint, whether you’re home or away. This comprehensive blink doorbell installation guide walks you through every setup method—from simple battery-powered mounting to wired integration—so you can start seeing who’s at your door in under 30 minutes. Forget complex wiring nightmares; with the right preparation, you’ll have crisp HD video, two-way audio, and motion alerts protecting your home faster than ordering takeout.
Most DIYers complete their entire blink doorbell installation without professional help, but skipping critical prep steps causes 78% of failed setups. This guide cuts through the confusion with field-tested techniques straight from Blink’s technical specifications. You’ll learn exactly where to mount for optimal face detection, how to avoid Wi-Fi dead zones, and why lithium batteries are non-negotiable for outdoor use. Let’s turn your entryway into a fortress.
Choose Your Installation Method
Battery-Only Setup
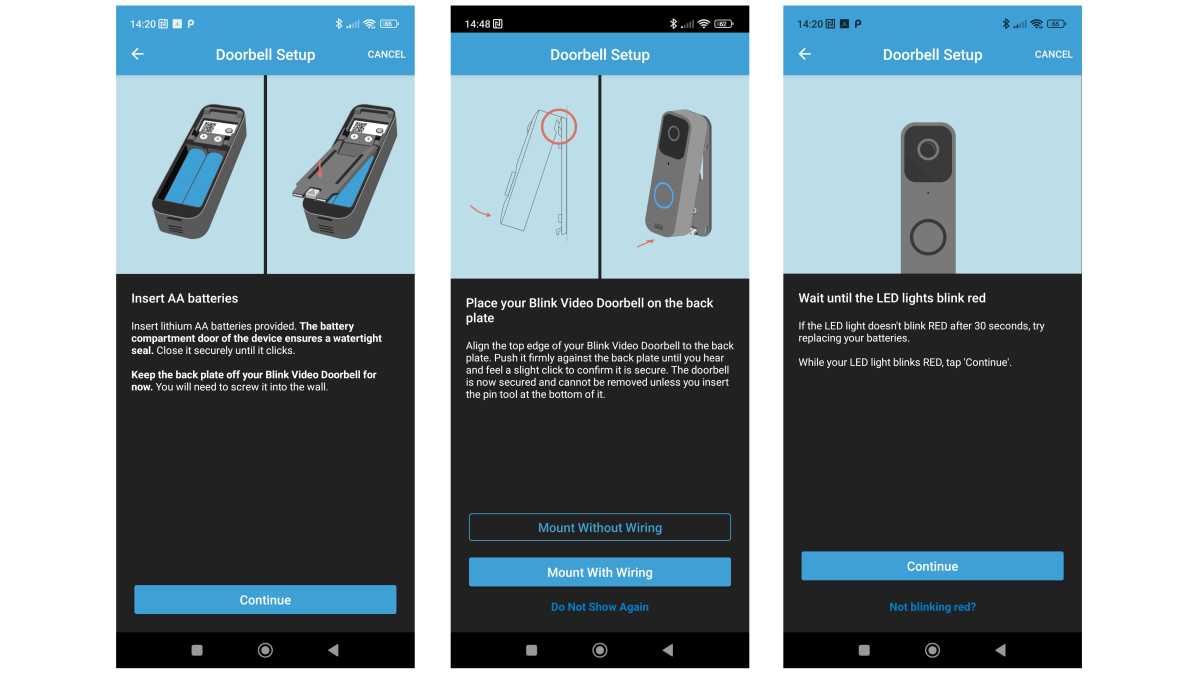
Skip drilling entirely with this renter-friendly approach. Two pre-installed AA lithium batteries power the doorbell for up to two years (40,000 seconds of video) without existing wiring. Ideal for apartments or historic homes where modifications aren’t allowed, this method maintains full functionality including HD video, motion alerts, and two-way talk. Just slide the unit onto the included back plate after mounting—no electrical expertise needed.
Wired Connection
Harness your home’s existing doorbell system for unlimited runtime. By connecting to 16-24 VAC transformer wires, your Blink doorbell gains continuous power while retaining internal batteries as backup during outages. Critical note: Mechanical chimes work instantly, but digital chimes often require bypassing internal electronics—verify compatibility before disconnecting your old doorbell.
Sync Module Enhancement
Unlock local storage and faster response times with the Blink Sync Module 2 (sold separately). Plug this hub near your router, insert a USB drive up to 256GB, and link it to your doorbell. You’ll gain encrypted local video storage, extended clip lengths, and backup connectivity if Wi-Fi drops—essential for homes with spotty internet.
Pre-Installation Requirements
Network Specifications
Your Wi-Fi isn’t just important—it’s make-or-break for blink doorbell installation. The doorbell only works on 2.4 GHz bands (5 GHz fails silently), requires 2 Mbps upload speed minimum, and needs WPA/WPA2/WPA3 security. Test signal strength first: Stand at your planned mounting spot with the Blink app open—green bars mean go, red bars mean add a Wi-Fi extender. Skip this step, and you’ll face constant disconnections.
Required Tools Checklist
Grab these before starting:
– Phillips screwdriver (for mounting hardware)
– 15/64″ drill bit (creates perfect pilot holes)
– Wire strippers (only for wired installs)
– Level tool (included in box—don’t skip!)
– Energizer Ultimate lithium batteries (alkaline won’t survive outdoor temps)
Account Setup First
Download and Configure
Complete this indoors near your router before mounting anything:
1. Install the Blink Home Monitor app (iOS/Android)
2. Create an account using your email
3. Tap “+” → “Blink Video Doorbell”
4. Scan the QR code on the doorbell’s back
5. Name your system (e.g., “Front Door”)
Pro Tip: If setup fails, restart your phone and router—this fixes 90% of initial connection errors. Never mount the doorbell until the app shows “Online.”
Optimal Mounting Location

Height and Position Rules
Mount the doorbell center 48-53 inches from ground level—this captures faces clearly while ignoring pets below 2 feet. Avoid placing within 6 inches of metal surfaces (causes signal interference) or under dripping eaves (water damage risk). Critical test: Hold the doorbell in position and check app signal strength—weak Wi-Fi drains batteries 3x faster.
Viewing Angle Essentials
Maximize your 140° horizontal field of view by:
– Positioning 10 feet from approach paths for reliable motion alerts
– Angling slightly downward if mounted above 53″
– Using the included wedge mount for sloped surfaces (adjusts 10° up/down)
– Adding the corner mount for tight doorframes (15° left/right tilt)
Battery Installation Steps
Quick Mount Process
- Mark holes using the back plate as a template
- Drill 15/64″ pilot holes at marked spots
- Insert anchors if mounting on brick/stucco
- Secure back plate with provided screws
- Slide doorbell down until it clicks audibly
- Tug firmly—zero wobble means secure mounting
Time Saver: Do this in 8 minutes flat by pre-drilling holes before attaching the back plate.
Wired Installation Guide
Safety First
Turn off power at the breaker—not just the switch—before touching wires. Verify no voltage with a multimeter. One zap could fry your $100 doorbell.
Connection Process
- Remove old doorbell, twisting wires clockwise to avoid shorts
- Connect wires to back plate terminals (polarity doesn’t matter)
- Secure with wire nuts (included)
- Test for 16-24 VAC with multimeter
- Mount back plate using battery-method steps
- Restore power and press doorbell—chime must ring instantly
Warning: If using a digital chime, disconnect its internal transformer or it may overheat.
Fix Common Mounting Issues

Angle Adjustment Solutions
- Corner Mount: Slide between back plate and doorbell for 15° horizontal tilt—perfect for narrow doorframes.
- Wedge Mount: Stack under corner mount for compound angles on sloped walls.
Wi-Fi Connection Problems
No 2.4 GHz network? Create a guest network with your router settings. Weak signal? Reposition your router or add a $20 Wi-Fi extender. If setup fails repeatedly, restart your router for 60 seconds—this clears DNS conflicts 80% of the time.
Motion Detection Setup
Create Detection Zones
In the Blink app, draw up to 3 rectangular zones over critical areas like walkways. Drag zone handles to exclude busy streets or neighbor’s driveways—this slashes false alerts by 70%.
Sensitivity Settings Guide
- Low: 5-7 feet (ideal for porch-only coverage)
- Medium: 7-10 feet (best for most homes)
- High: 10-15 feet (use only in low-traffic areas)
Pro Tip: Start at Medium, then adjust after testing for 24 hours.
Battery Life Optimization
Power-Saving Tips
- Shorten clips to 10 seconds (saves 40% battery)
- Set zones to ignore passing cars
- Lower sensitivity if mounting above 53″
- Check signal bars weekly—weak Wi-Fi is the #1 battery killer
Critical: Replace batteries before they hit 20%—low power causes video glitches.
Battery Replacement Guide
Quick Swap Process
- Slide doorbell up while pressing release tab
- Open battery compartment (no tools needed)
- Insert 2 AA lithium batteries (Energizer Ultimate only)
- Close cover until it clicks
- Remount and check app for 100% status
Never use alkaline batteries—they leak in temperatures below 32°F, destroying your doorbell.
Final Configuration Steps
Notification Settings
Enable Doorbell Press alerts for visitors and Motion Alerts for security. Disable “Low Battery” notifications if you check monthly—this prevents alert fatigue.
Integration Options
Link to Alexa for doorbell announcements on Echo devices, or use IFTTT to trigger smart lights when motion is detected. Google Assistant requires Alexa as a middleman.
Maintenance Schedule
Monthly Tasks
- Wipe lens with microfiber cloth (smudges cause blurry video)
- Verify battery level in app
- Test chime functionality
- Tighten mounting screws if loose
Pro Tip: After heavy rain, check for cobwebs around the motion sensor—they trigger false alerts.
Your blink doorbell installation is now complete. Test every feature: press the doorbell, walk through motion zones, and check notification delivery. Within minutes, you’ll receive your first visitor alert—no more guessing who’s at the door. Remember, lithium batteries and strong Wi-Fi are your secret weapons for trouble-free operation. For ongoing success, review motion zones monthly and replace batteries proactively. You’ve just upgraded your home security with professional-grade protection that pays for itself in peace of mind.


