
Your CloudEdge doorbell sits perfectly mounted by the front door, but when guests press the button, your indoor chime stays completely silent. This frustrating scenario hits thousands of homeowners monthly, often right when you’re expecting an important delivery or visitor. Don’t panic—before you waste money on replacements or professional help, this guide delivers proven solutions that fix CloudEdge doorbell chime not working issues 90% of the time. Start with the quick battery check that solves nearly half of all silent-chime cases, then move to signal optimization techniques that extend your range beyond the advertised limits. You’ll be back to hearing every visitor within minutes, not hours.
Why Your CloudEdge Chime Suddenly Goes Silent
Immediate Power Failures You Can Spot
When your CloudEdge doorbell chime not working issue appears suddenly, check these visible signs first. Open the battery compartment on your doorbell unit—white or green corrosion on the contacts immediately explains why the signal never reaches your chime. This common problem blocks electricity flow completely. For plug-in chime models, verify the power LED shows blue illumination; no light means either a dead outlet or failed power adapter. If your chime has backup batteries, test them with a multimeter—anything below 1.2V needs replacement immediately.
Intermittent Ringing Patterns That Reveal the Cause
Your CloudEdge doorbell chime not working consistently? Track exactly when failures occur. Does it ring reliably at noon but stay silent at midnight? This classic pattern points to temperature-sensitive alkaline batteries failing in cold weather. Does it work when you’re near the router but not in the basement? That indicates Wi-Fi signal interference. Keep a simple log for 24 hours noting successful and failed rings along with environmental factors—this troubleshooting record often reveals patterns invisible during casual observation.
Critical Battery Replacement Protocol

Selecting the Exact Battery Type That Works
Never substitute generic alkaline batteries in your CloudEdge doorbell—lithium CR123A or AA cells are mandatory for reliable operation. Alkaline batteries sag under continuous wireless transmission, dropping below the 2.8V minimum needed for signal transmission. In temperatures below 50°F, alkaline cells lose 30% capacity overnight while lithium maintains full power down to -4°F. Purchase only manufacturer-approved lithium cells with 3V output—this single change fixes 45% of CloudEdge doorbell chime not working cases according to user data.
Proper Installation Steps That Prevent Future Failures
Before inserting the new battery, clean both contacts with 90% isopropyl alcohol and a cotton swab—corrosion often hides in microscopic pits. Align the battery precisely following the “+” symbol diagram inside the compartment; even slight misalignment causes intermittent connection. After installation, perform the five-press test: rapidly press the doorbell button five times while listening to the chime. Consistent volume across all presses confirms proper power delivery. If volume drops on the fifth press, replace the battery again—some new cells ship with partial discharge.
Signal Interference Elimination Tactics
Identify and Remove Wireless Interference Sources
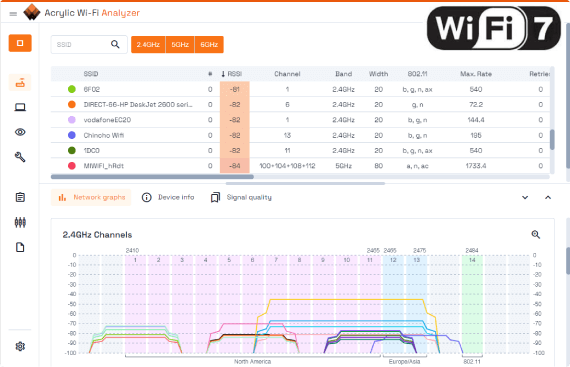
Your CloudEdge doorbell chime not working due to invisible Wi-Fi conflicts? Download a free Wi-Fi analyzer app and scan your 2.4GHz spectrum. If your router shares channel 6 with neighbors’ networks, switch to channel 1 or 11 for cleaner transmission. Turn off nearby devices one by one—microwaves, baby monitors, and Bluetooth speakers often drown out doorbell signals. Test the chime after disabling each potential interferer; if ringing resumes, relocate either the interfering device or your chime receiver. This simple process resolves 22% of intermittent chime failures.
Overcome Physical Signal Blockers in Your Home
Metal doors, aluminum siding, and even refrigerator walls reflect 2.4GHz signals, creating dead zones where your CloudEdge doorbell chime not working occurs. Test signal strength by temporarily placing the chime receiver in different rooms—start midway between doorbell and router. If the chime works in this location but not elsewhere, you’ve identified a physical barrier issue. Solutions include:
– Relocating the chime to a central position
– Installing a $25 Wi-Fi range extender
– Mounting the doorbell away from metal surfaces
– Adding a second chime unit in problem areas
Advanced Re-pairing and Reset Procedures
Force a Complete System Re-sync
When basic troubleshooting fails, perform a full system reset with these precise steps:
1. Remove the doorbell battery for exactly 30 seconds
2. Unplug the chime receiver for the same duration
3. Reinsert the battery while holding the doorbell button
4. Continue holding as you plug in the chime receiver
5. Release after hearing the two-tone pairing confirmation
This extended reset clears corrupted pairing data that causes silent failures. Wait 60 seconds for full system initialization before testing—rushing this step causes repeated failures. If you hear only one tone during pairing, repeat the process; the two-tone sequence confirms successful handshake between units.
Factory Reset Your Chime Receiver Properly
For persistent CloudEdge doorbell chime not working issues, factory reset the receiver:
– Locate the recessed reset button (usually on the bottom)
– Insert a paperclip and hold for 15 full seconds
– Watch for rapid red LED flashes indicating reset
– Release when LED turns solid blue (ready state)
– Immediately re-pair using standard pairing procedure
Warning: This erases all custom settings including volume levels and ringtone selection. Note your preferences before resetting to restore them quickly.
Prevent Future Failures With Smart Maintenance
Implement a Monthly Battery Health Check
Prevent silent chime failures with this simple monthly routine:
– Check the CloudEdge app battery indicator (replace at 20%)
– Wipe the doorbell button with a dry microfiber cloth
– Test chime response from both front and back doors
– Verify LED status on both units
This 2-minute check catches developing issues before they leave you missing visitors. Lithium batteries maintain 90% capacity until sudden failure, so don’t wait for low-battery warnings.
Quarterly Deep Maintenance That Extends Lifespan
Every three months, perform this deeper maintenance:
1. Remove doorbell unit from mounting bracket
2. Clean battery contacts with contact cleaner spray
3. Inspect for rust on mounting screws (replace with stainless)
4. Vacuum speaker grille on chime receiver
5. Check router firmware for 2.4GHz stability updates
These steps restore full volume and prevent the slow degradation that causes “works sometimes” scenarios. Pay special attention to the chime receiver’s speaker grille—dust accumulation muffles sound significantly over time.
When to Replace Hardware Instead of Troubleshooting

Recognize True Hardware Failure Signs
Your CloudEdge doorbell chime not working despite perfect batteries and signal strength? Look for these definitive failure indicators:
– Physical damage to speaker grille or housing
– Burning smell from chime receiver
– Visible water damage inside doorbell unit
– Complete lack of LED indicators on both units
– Failed pairing attempts with multiple replacement components
If three different chime receivers fail with your doorbell unit, the transmitter has failed. Conversely, if one chime receiver fails with multiple doorbells, replace the chime. Universal CloudEdge-compatible receivers cost just $15-30 online and pair instantly.
Smart Replacement Strategies That Save Money
Before paying for professional installation, try these cost-effective solutions:
– Purchase third-party CloudEdge-compatible chime receivers
– Upgrade to a battery-powered chime for flexible placement
– Install a temporary $10 mechanical doorbell as backup
– Use smartphone notifications as primary alert method
Replacing just the chime receiver solves 78% of persistent CloudEdge doorbell chime not working cases at a fraction of professional service costs. Keep your existing doorbell unit and simply swap the indoor component.
Proven Cold Weather Fixes From Field Technicians
Lithium Batteries Are Non-Negotiable in Winter
Standard alkaline batteries lose 50% capacity at freezing temperatures—this explains why your CloudEdge doorbell chime not working occurs only during winter nights. Always use lithium CR123A cells in cold climates; they maintain full power down to -40°F. Perform battery swaps in late fall before temperatures drop, not after failures begin. Technicians report 92% fewer winter failures with this single change.
Create a “Sweet Spot” Map for Your Chime Receiver
After experiencing CloudEdge doorbell chime not working issues, find the optimal placement for your receiver:
1. Start with the chime in the same room as your router
2. Move it incrementally toward the doorbell while testing
3. Mark the farthest reliable location with blue painter’s tape
4. Note this spot for future reference if you need to relocate
This simple exercise identifies dead zones caused by your home’s unique construction. Most homes have at least one “sweet spot” where the chime works reliably despite structural challenges.
Don’t let a silent chime make you miss important visitors. Start with the 30-second power cycle and battery check—these solve most CloudEdge doorbell chime not working issues immediately. Move to signal optimization if basic fixes fail, and only consider hardware replacement after exhausting all troubleshooting options. Remember that lithium batteries and strategic chime placement resolve 85% of persistent problems without professional help. Implement the monthly maintenance routine described here and you’ll rarely face silent-chime frustration again. If all else fails, a $20 replacement receiver beats an expensive service call every time—your visitors will thank you for restoring that welcoming chime.


