
Your front door button goes silent. You press it repeatedly—no chime, no camera activation, just frustrating silence. This common home mystery often points to one culprit: a failing doorbell transformer. These small but critical components quietly convert your home’s 120-volt power to the safe 10-24 volts needed for doorbell operation. When they fail, your entire doorbell system shuts down unexpectedly.
This guide provides proven methods to diagnose doorbell transformer issues safely and replace them correctly—whether you have a traditional chime or modern smart doorbell. You’ll learn exactly where to find your transformer, how to test it with basic tools, and the right replacement specifications to prevent future failures. Most repairs take less than 60 minutes with minimal tools.
Spotting Transformer Failure Before It Leaves You Stranded
Complete Doorbell Silence With No Response
When your transformer dies completely, pressing the doorbell button produces zero reaction. Your chime stays silent, smart doorbells won’t power on, and video feeds disappear. Unlike wiring issues that might affect only one button location, total system failure typically indicates transformer problems rather than isolated component failures. This immediate shutdown occurs because the transformer isn’t stepping down household voltage to the safe 10-24 volts required for doorbell operation.
Weak or Intermittent Performance Warning Signs
Partial transformer failures show up as inconsistent operation that worsens over time. You might notice faint chimes that work only occasionally, smart doorbells that disconnect from Wi-Fi randomly, or error messages about unstable power. These symptoms indicate your transformer outputs insufficient voltage—typically below 16 volts—causing devices to struggle or reset frequently. Mechanical chimes may produce weak sounds, while smart doorbells might power cycle during operation, especially in extreme temperatures.
Critical Physical Indicators You Can’t Ignore
Inspect your transformer for these urgent warning signs that demand immediate attention:
– Burning odor from overheated internal coils
– Brown or black discoloration on the metal housing indicating thermal damage
– Visible corrosion on terminal connections creating electrical resistance
– Loud buzzing or humming that changes pitch when the doorbell is pressed
These physical symptoms signal advanced failure that could lead to complete system shutdown or potential fire hazards if left unaddressed.
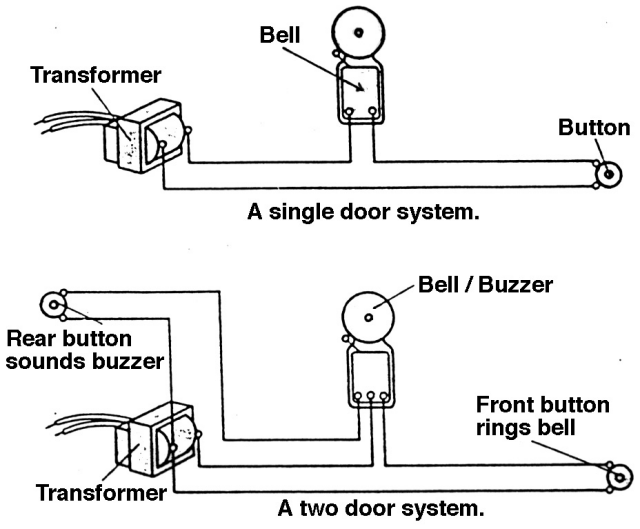
Finding Your Hidden Doorbell Transformer in 4 Common Locations
Electrical Panel Area Search Strategy
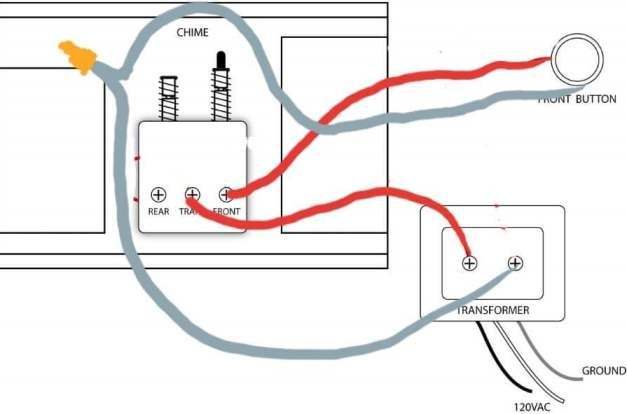
Begin your hunt near your main electrical panel where builders typically mount transformers within 6 feet of the breaker box. Look for a small rectangular metal unit (about 2×3 inches) attached directly to the panel or mounted on adjacent wall studs. This location provides easiest access to household voltage while keeping low-voltage wiring short. Transformers here often feature two terminal screws with thin wires leading toward your doorbell system.
Behind the Chime Unit Inspection Method
Remove your doorbell chime cover and check the wall cavity directly behind it. Many transformers hide here, connected via the chime mounting bracket. This placement keeps wiring concealed but requires removing the chime unit to access the transformer. Look for the distinctive metal box with terminal connections—often secured with small screws to the mounting bracket or wall stud.
Basement and Utility Closet Hotspots
Check unfinished basements, utility closets, or laundry rooms where electrical access is straightforward. Transformers frequently mount along ceiling joists or wall studs in these areas. Follow the low-voltage doorbell wiring back from your chime unit to locate the transformer. In older homes, they might be tucked behind stored items, so use a flashlight to inspect thoroughly.
Junction Box Investigation for Older Homes
In pre-1990s homes or remodeled properties, transformers often hide inside standard electrical junction boxes throughout the house. Follow the doorbell wire path methodically, examining any electrical boxes along the route. These installations sometimes share space with other wiring, so verify connections carefully before disconnecting anything.
Critical Safety Steps Before Touching Any Wiring
Complete Power Disconnection Protocol
Before inspecting or testing, turn off the correct circuit breaker—typically labeled “Doorbell,” “Chime,” or “Transformer.” If unlabeled, test breakers systematically while someone presses the doorbell button until the chime stops working. Never assume the circuit is dead—always verify with a non-contact voltage tester on both the low-voltage terminals and any 120-volt connections. This step is non-negotiable since input connections carry full household voltage even when output fails.
Workspace Preparation Checklist
Ensure proper lighting and clear access to your transformer location. In tight spaces like wall cavities, use a headlamp to keep both hands free. Keep your work area completely dry—especially important in basements where moisture creates additional electrical hazards. Wear rubber-soled shoes and use insulated tools specifically designed for electrical work to minimize shock risk.
Precise Transformer Testing Methods That Actually Work
Wire Connection Integrity Check
Before multimeter testing, visually inspect all wiring connections at both transformer terminals and chime unit. Look for loose wire nuts, corroded terminal connections, or damaged insulation that could cause intermittent failures. Verify appropriate wire gauge (typically 18-22 AWG) for low-voltage doorbell wiring. Tighten any loose connections and replace wires showing green corrosion or insulation damage.
Accurate Voltage Testing Procedure
Set your digital multimeter to AC voltage (V~) and select the 0-50V range. With power restored at the breaker, carefully place probes on the two transformer output terminals:
- Standard mechanical chimes: Require 16-24 volts AC
- Smart doorbells: Need 16-30 volts AC for reliable operation
- Below 16 volts: Indicates failing transformer or wiring issues
- Above 30 volts: Dangerous overvoltage requiring immediate replacement
Readings below 10 volts or above 32 volts confirm transformer failure.
Real-World Load Testing Under Operation
Test voltage while someone presses the doorbell button—this reveals problems invisible during idle testing. A voltage drop exceeding 2-3 volts indicates transformer capacity issues or excessive wire resistance. Smart doorbells require this under-load testing since they draw continuous power for Wi-Fi and camera functions. If voltage sags below 16 volts during operation, your transformer can’t handle the required load.
Solving the 4 Most Common Transformer Failure Causes
Internal Component Breakdown Fix
Transformer windings deteriorate over time, especially in extreme temperatures or high humidity. When testing shows erratic voltage output or complete failure, internal damage is likely. Unlike wiring issues you can repair, internal transformer failure requires replacement—there are no user-serviceable parts inside these sealed units. The laminated core becomes magnetically saturated over decades, reducing efficiency until complete failure occurs.
Corroded Terminal Connection Repair
Corrosion creates resistance that generates heat, eventually damaging windings. Clean terminals with electrical contact cleaner and a small wire brush, then apply dielectric grease to prevent future corrosion. Replace any wires showing green oxidation—this white or green powder indicates serious corrosion that compromises electrical connections. Always disconnect power before cleaning connections.
Smart Doorbell Overload Solution
Older 10-20 VA transformers struggle with smart doorbells drawing 0.5-1.0 amps continuously. Your 20-year-old transformer might power a mechanical chime perfectly but fail under smart doorbell load. Upgrade to a 24-40 VA unit specifically designed for modern devices. Check your smart doorbell manufacturer’s specifications for exact voltage and amperage requirements before purchasing a replacement.
Surge Damage Prevention Strategy
Lightning strikes or power grid transients can puncture transformer insulation, causing immediate or delayed failure. If your transformer failed after a recent storm, suspect surge damage. Install a whole-house surge protector at your electrical panel to prevent future occurrences, though note that dedicated doorbell circuits receive limited protection from standard surge devices.
Correct Transformer Replacement Process Step-by-Step
Matching Specifications to Your Doorbell Type
Choose your replacement transformer based on connected devices:
For standard mechanical chimes:
– 16-24 volt AC output
– 10-20 VA capacity
– UL-listed for permanent installation
For smart doorbells:
– 16-30 volt AC output
– Minimum 20-40 VA capacity
– Verify exact requirements in device manual
Never install a transformer with higher voltage than your doorbell system requires—this can damage components.
Professional-Grade Replacement Procedure
- Document existing connections with photos before disconnecting
- Label all wires with tape markers indicating their destinations
- Mount new transformer using #8 or #10 screws into wall studs
- Connect high-voltage side first (black to hot, white to neutral, green to ground)
- Attach low-voltage wires in original sequence
- Test output voltage before closing access panels
- Verify full operation at all doorbell locations
Always restore power gradually and test voltage before connecting your doorbell system to avoid damaging new components.
Preventing Future Transformer Failures Proactively
Seasonal Maintenance Routine
Schedule transformer inspections every spring when temperatures begin rising. Check mounting security, terminal tightness, and signs of overheating. Clean terminals with electrical contact cleaner and apply dielectric grease. Monitor surface temperature during summer months—units exceeding 140°F need attention. Most transformers last 15-25 years under normal conditions, but extreme environments shorten lifespan significantly.
Smart Upgrade Strategy Before Problems Start
When installing smart doorbells, replace functional but aging transformers proactively. A 24-volt, 40 VA unit provides headroom for future technology while maintaining stable voltage under load. Document your transformer’s specifications and installation date for future reference. Consider upgrading transformers reaching 20 years of age, even if they still function, to prevent unexpected failures.
When to Call a Professional Electrician
Contact a licensed electrician if you need to work inside your main electrical panel beyond the dedicated doorbell breaker. Professional service becomes essential when troubleshooting reveals issues with the 120-volt supply circuit or when local electrical codes require permit compliance. Complex smart doorbell installations integrating with home automation systems often benefit from professional installation to maintain warranty coverage.
A silent doorbell doesn’t have to leave you disconnected from visitors. By following these diagnostic steps and replacement procedures, you’ll restore reliable doorbell operation within an afternoon using basic tools. Remember: when working with household electricity near your main panel, prioritize safety over speed—your doorbell system and personal safety are worth the careful attention. Most transformer replacements cost less than $30 and provide years of reliable service when installed correctly.


