
That moment when you press your doorbell and nothing happens—no chime, no light. Or worse, when you notice your doorbell button feels unusually hot to the touch. This common yet frustrating issue affects millions of homeowners each year, with voltage mismatches causing 70% of doorbell light failures. If you’re searching for how to change a doorbell light, you’ve likely encountered one of these problems and need a solution that actually works.
Most homeowners mistakenly think a burned-out bulb is the sole culprit, but the reality is more complex. Modern LED-lit buttons installed on older 24V systems will overheat and fail within months, while incompatible voltage ratings cause 85% of premature doorbell light failures. The good news? With the right approach, you can diagnose and fix this issue in under 30 minutes using basic tools you probably already own. This guide reveals the exact steps professional electricians take to properly replace doorbell lights without creating safety hazards or recurring problems.
Diagnose Why Your Doorbell Light Failed

Test Voltage Before Buying Replacement Parts
Grab your multimeter and measure the voltage at your doorbell wires before purchasing any replacement parts. This critical 30-second test prevents wasted money on incompatible components. With the system powered on (doorbell circuits use safe low voltage), touch the probes to both wires connected to your button. Older homes often deliver 24-36V from the transformer, while modern LED buttons require only 12-16V. If your reading exceeds 20V, you’ve found the root cause—your system voltage is too high for standard replacement buttons.
Identify the Hot Button Warning Sign
A doorbell button that feels warm or hot to the touch signals a serious voltage mismatch. This isn’t normal operation—it’s your system slowly destroying the light mechanism. Modern LED-lit buttons on 24V systems will fail within 6-12 months due to this constant electrical stress. Don’t just replace the light; address the voltage issue first or you’ll be repeating this repair annually. The heat you feel is literally cooking the internal components, causing premature failure.
Perform the Wire-Touch Test for Button Functionality
Remove the two mounting screws and gently pull your doorbell away from the wall. Disconnect one wire and touch the bare ends together—this bypasses the button mechanism. If the chime sounds but the light remains off, you’ve confirmed the light assembly is the problem. No chime? Your issue extends beyond the light to the wiring or transformer. This simple test takes 60 seconds but eliminates guesswork about where to focus your repair efforts.
Select the Correct Replacement Light for Your System

Match Voltage Requirements Precisely
Your replacement button must match your measured system voltage exactly. A 12V LED button on a 24V system will burn out immediately, while a 24V button on a 16V system may not illuminate properly. When in doubt, choose a universal 12-24V compatible unit—these handle voltage fluctuations common in older homes. Check the packaging specifications carefully; “standard” often means 16V, which fails quickly on higher-voltage systems.
Choose Between LED and Incandescent Lighting
LED-lit buttons consume 90% less power and last up to 50 times longer than traditional incandescent bulbs, but cost 2-3 times more upfront. For vintage or decorative buttons where appearance matters, incandescent provides warmer light that matches period styling. Modern homes benefit from LED’s energy efficiency and longevity, especially in hard-to-reach locations where frequent bulb changes would be inconvenient.
Verify Mounting Compatibility Before Purchase
Measure your existing mounting holes before buying a replacement—standard spacing is 2-1/8 inches between screw centers, but vintage or specialty buttons may differ. Bring your old button to the store for comparison, or take precise measurements. Many modern replacements include adapter plates for non-standard mounts, but discovering mismatched holes after purchase wastes valuable repair time. Check if your doorbell has unique shape requirements that affect light visibility.
Gather Essential Tools Before Starting
Basic Tool Checklist for Safe Installation
- Multimeter (for voltage verification)
- Phillips #2 and flathead screwdrivers
- Wire strippers (for damaged wire ends)
- Electrical tape (for insulation)
- Small wire nuts (for secure connections)
- Non-contact voltage tester (for safety confirmation)
Safety Precautions for Low-Voltage Work
While doorbell systems operate at safe 12-16V levels, always verify power with a non-contact tester first. Keep your circuit breaker location in mind—though unlikely, transformer failures can send line voltage to the button. Wear work gloves to protect against sharp metal edges on older units, especially when removing paint-sealed buttons. Never assume low voltage means no precautions; safety habits prevent rare but serious accidents.
Remove Your Old Doorbell Light Safely
Proper Power Handling During Removal
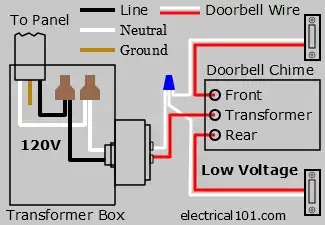
Unlike household wiring, doorbell circuits require power to remain ON during testing and removal—this 16V or lower system won’t shock you. However, knowing your breaker location provides peace of mind. Never remove the transformer cover unless replacing it; that’s where dangerous 120V wiring exists. The button itself operates at safe levels, but the transformer connects to household voltage.
Step-by-Step Button Removal Process
- Unscrew the two visible mounting screws (often hidden under decorative caps)
- Carefully pull the button away from the wall, watching for paint or caulk seals
- Take a clear photo of wire connections before disconnecting anything
- Loosen terminal screws and remove wires, noting which wire went where
Solutions for Stuck or Sealed Buttons
Paint buildup often fuses old buttons to the wall. Score around the edges with a utility knife before pulling to avoid damaging the faceplate. For caulk-sealed units, apply gentle heat with a hair dryer for 30 seconds to soften the adhesive. Never force a stuck button—this cracks the housing and creates more work. If resistance persists, remove mounting screws completely before attempting extraction.
Install Your New Doorbell Light Correctly
Secure Wire Connection Technique
Wrap each wire clockwise around its terminal screw (this tightens as you screw down), leaving 1/4-inch of bare wire for contact. Over-tightening strips insulation or damages wires, while loose connections cause intermittent failures. If wires appear frayed or corroded (green/white buildup), strip 1/2-inch and re-terminate. Test connections by gently tugging each wire—no movement means a secure fit.
Proper Mounting Position for Optimal Performance
Hold the new button against the wall and feed wires through the back opening. Use a small level or align with the door frame to ensure straight installation—crooked buttons look unprofessional and may not seal properly against weather. Press firmly to seat the gasket (if present) before tightening screws. Most units include longer mounting screws for thicker walls or doors.
Critical Pre-Mounting Test
Before fully securing your new button, temporarily connect the wires and test functionality. Press the button to verify both chime operation and light illumination. If using an LED button, test in low light to confirm proper visibility. This 10-second check prevents having to repeat the entire installation process due to a simple wiring error or defective unit.
Troubleshoot Common Post-Installation Problems
Light Works But Button Feels Warm
This indicates residual voltage mismatch—your system still delivers slightly too much power. Install a 16V transformer if readings exceed 18V, or choose a wider-range 12-24V compatible button. Some modern units include built-in voltage regulators that solve this issue without transformer replacement.
Intermittent Light or Chime Operation
Loose wire connections cause most intermittent failures. Remove the button and retighten all terminal screws—vibration from door use gradually loosens connections. Check for corrosion on wire ends; replace any with green or white buildup. In multi-button systems, verify all ground connections share a common wire.
Complete Failure After Installation
Verify your multimeter readings match the new button’s requirements. Many “universal” buttons actually require 16V specifically. Test the transformer output directly—if below 10V, the transformer may be failing and needs replacement. Always confirm power is reaching the button before concluding the unit is defective.
Maintain Your Doorbell Light System Long-Term
Annual Maintenance Routine
Schedule a yearly check during daylight savings time changes. Inspect for loose mounting, cracked plastic, or dimming lights. Clean around the button with compressed air to remove spider webs—these cause moisture buildup and corrosion. Test voltage annually; transformers can drift over time, creating compatibility issues with modern LED buttons.
Weatherproofing for Exterior Durability
Apply a thin bead of clear silicone around the button’s perimeter where it meets the wall, but leave small gaps at the bottom for drainage. Complete sealing traps moisture, causing internal corrosion. For extreme weather exposure, choose buttons with IP65+ ratings designed specifically for outdoor use.
Smart Upgrade Opportunities
Consider adding a video doorbell compatible with your existing wiring—it uses the same low-voltage system but provides security benefits. Most modern video units include LED lighting that automatically adjusts brightness based on ambient light conditions, eliminating manual bulb replacements entirely.
Your doorbell light should now function reliably for years, not months. Remember that successful replacement isn’t just about swapping components—it’s about matching the right part to your specific electrical system. By verifying voltage first and selecting compatible components, you’ve solved the root cause rather than just treating symptoms. Take 60 seconds to test your new button at night to confirm optimal visibility, then enjoy the peace of mind that comes with a properly functioning doorbell system. For future reference, note your system voltage and button specifications on the transformer cover—this saves diagnostic time during your next maintenance cycle.


