
Your package delivery notification just failed to chime through your Roku app—and when you check the live feed, your doorbell screen is completely black. This frustrating scenario happens to thousands of Roku doorbell owners each month when the battery unexpectedly dies. Most Roku doorbell models rely on rechargeable lithium-ion batteries that typically last between 2-6 months depending on usage patterns, but when that power finally runs out, knowing exactly how to charge your Roku doorbell becomes critical for restoring your home security. In this comprehensive guide, you’ll discover the precise steps to safely charge your Roku doorbell battery, troubleshoot common charging failures, and implement proven strategies to maximize your battery’s lifespan between charges.
Identify Your Roku Doorbell Model Before Charging

Before attempting to charge your Roku doorbell, you must determine which specific model you own—this affects your entire charging process. Roku currently manufactures two distinct doorbell variants with completely different power systems that require separate approaches.
Roku Video Doorbell & Chime SE Battery System
This popular wireless model features a removable lithium-ion battery that slides out from the bottom of the unit. The battery pack contains a micro-USB charging port and delivers reliable power for approximately 3-6 months under normal usage conditions. You’ll recognize this model by its standalone design with no visible wiring connections at installation. If your doorbell operates without being connected to existing doorbell wiring, this is almost certainly your model—and it requires regular charging as part of routine maintenance.
Roku Video Doorbell Wired Power Requirements
The wired version draws continuous power directly from your home’s existing doorbell circuitry and doesn’t require battery charging. If your doorbell stopped working but you see low-voltage wiring connected behind the unit, your issue likely involves electrical problems rather than battery depletion. Attempting to charge this model is unnecessary and could potentially damage the unit. Before proceeding with any charging steps, verify whether your doorbell has wires connected to your home’s electrical system.
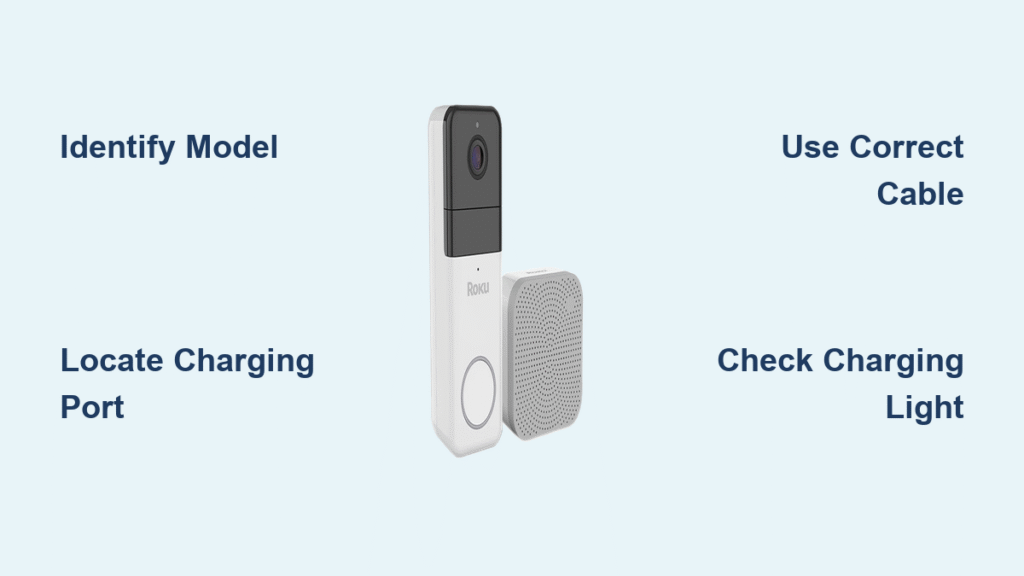
Locate Your Roku Doorbell Charging Port Efficiently
The exact location of your charging port depends on both your specific model and how you’ve mounted the unit. Knowing precisely where to look saves valuable time when your doorbell has unexpectedly powered down.
Wall-mounted units: For most installations, the micro-USB port resides on the bottom edge of the doorbell housing, protected by a small rubber flap that prevents moisture damage. Gently peel back this cover with your fingernail to expose the charging port beneath.
Bracket-mounted units: If your doorbell attaches to a mounting bracket, you’ll need to remove the entire unit from its bracket to access the charging port, which is typically located on the back or bottom of the device. This design prevents accidental disconnection during normal operation but requires complete removal for charging.
Pro tip: If you’ve thoroughly inspected your doorbell and still can’t locate a charging port, you almost certainly own the wired model. Check behind the unit for low-voltage wires connected to terminals—these provide continuous power, eliminating the need for battery charging.
Safely Remove Your Roku Doorbell for Charging
Proper removal technique prevents damage to both your doorbell and mounting surface, especially when the unit has been installed for several months.
Quick Release Method for Standard Installations
Press the release tab at the bottom of your doorbell housing while simultaneously pulling the unit gently toward you. Most Roku doorbells feature a spring-loaded mechanism that allows the entire unit to slide smoothly off its mounting bracket. Apply even pressure and avoid twisting motions that could damage the internal components.
Stuck Doorbell Removal Techniques
If your doorbell resists removal after months of installation, follow these troubleshooting steps:
– Insert a small flathead screwdriver into the release slot to manually trigger the mechanism
– Apply gentle upward pressure while pulling forward
– Check for security screws on the bottom edge that may have been installed during setup
– Never use excessive force—this can crack the housing or damage internal connections
Proper Roku Doorbell Charging Procedure
Following the correct charging protocol protects your battery’s longevity and ensures optimal performance after each recharge cycle.
Connect Charging Cable Correctly
Use the provided micro-USB cable (or any standard 5V/1A phone charger) and plug directly into the battery pack. Roku specifically recommends avoiding fast chargers that exceed 5V output, as higher voltages can permanently damage the lithium-ion battery. The charging cable should insert smoothly without resistance—if you’re forcing it, you likely have the incorrect cable type.
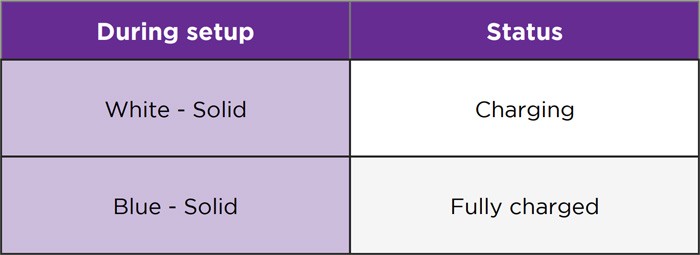
Interpret Charging Indicator Lights Accurately
Your Roku doorbell provides visual feedback about its charging status through LED indicators:
– Solid red light: Battery is actively charging (normal state)
– Solid green light: Battery is fully charged (typically after 2-3 hours)
– Flashing red light: Battery fault detected—immediately disconnect and contact Roku support
Realistic Charging Duration Expectations
From completely depleted to full capacity, your Roku doorbell battery typically requires 2.5-3 hours of continuous charging. In emergency situations, a quick 30-minute charge provides approximately 2-3 days of basic functionality, enough to cover immediate security needs while you schedule a full recharge.
Correct Reinstallation After Charging
Improper reinstallation can cause connectivity issues or prevent your doorbell from functioning correctly after charging.
Battery Reinsertion and Mounting Sequence
- Slide the fully charged battery pack back into the doorbell housing until it clicks firmly into place
- Align the doorbell with your mounting bracket, ensuring proper orientation
- Push upward with steady pressure until you hear a distinct second click confirming secure attachment
- Wait at least 30 seconds for the startup sequence to complete before testing
First Functional Test After Recharging
Press the doorbell button immediately after successful reinstallation. Within 5 seconds, you should hear your indoor chime activate and see the blue LED illuminate on the front of the doorbell. If either response is delayed or absent, double-check that the battery is fully seated and the unit is properly mounted.
Troubleshoot Common Roku Doorbell Charging Issues
When standard charging procedures fail, these targeted solutions address the most frequent problems Roku owners encounter.
Doorbell Won’t Charge: Immediate Fixes
- Verify cable connection—ensure micro-USB is fully seated in both ends
- Test with different charger—use a basic 5V phone charger (avoid 9V+ fast chargers)
- Clean port gently—remove debris with a wooden toothpick (never metal objects)
Rapid Battery Drain Solutions
- Adjust motion sensitivity in the Roku app to reduce false triggers
- Shorten video recording length from 60 to 15 seconds in settings
- Disable night vision during daylight hours when not needed
Overheating During Charging Protocol
If your doorbell becomes noticeably warm to the touch while charging, disconnect immediately. This dangerous condition indicates either a faulty charger or damaged battery—continue charging could cause permanent damage. Replace the battery pack through official Roku support channels rather than risking further issues.
Maximize Roku Doorbell Battery Life with Proven Strategies
Implement these expert-recommended adjustments to significantly extend time between charges and reduce your maintenance frequency.
Optimize Settings for Maximum Efficiency
Set motion detection zones to exclude high-traffic areas like busy streets and activate “Human Only” detection mode. These strategic adjustments reduce unnecessary recordings by up to 70%, effectively doubling your battery life between charges. Access these settings through the Roku mobile app under “Motion Settings.”
Weather-Adaptive Battery Management
Extreme cold below 32°F reduces lithium-ion battery capacity by 30-50%. During winter months, consider bringing your doorbell indoors for charging during extreme cold snaps. Never attempt to charge a frozen battery—allow it to reach room temperature first to prevent damage.
Monthly Preventative Maintenance Routine
Clean the doorbell lens and motion sensor monthly with a soft, dry microfiber cloth. Accumulated dirt and debris force the camera to work harder, draining battery power unnecessarily. Pair this cleaning with a quick battery level check in the Roku app to catch potential issues early.
Recognize When to Replace Your Roku Doorbell Battery
Even with proper care, all lithium-ion batteries eventually degrade and require replacement.
Critical Battery Replacement Indicators
- Fails to hold charge beyond 24 hours despite proper charging
- Visible swelling of the battery pack through the case
- Charging light never turns green after 4+ hours of continuous charging
Official Battery Replacement Process
Contact Roku customer support with your doorbell serial number (found in app settings under “Device Information”). Genuine Roku replacement batteries cost $19.99 and typically arrive within 3-5 business days. Always use official replacement parts to maintain your warranty coverage and ensure compatibility.
Maintaining proper power levels in your Roku doorbell ensures continuous home security without unexpected downtime. By following these precise charging procedures and implementing the battery optimization strategies outlined, you’ll maximize your device’s operational time between charges and prevent those frustrating moments when your doorbell fails during critical deliveries. Make it a habit to check your doorbell’s power status monthly through the Roku app—this simple 10-second check prevents missed visitors and security vulnerabilities. Remember that proper charging technique combined with strategic settings adjustments transforms your Roku doorbell from a high-maintenance device into a reliable security component that works seamlessly in the background of your daily life.


