

Your doorbell suddenly stopped chiming, or you’re excited to install that new smart video doorbell but aren’t sure if your wiring can handle it. Before you spend money on replacements or call an electrician, checking doorbell wiring yourself could solve the problem in under 30 minutes. Most doorbell failures stem from simple wiring issues or transformer problems—not complex electrical faults. This guide gives you the exact steps to verify your system’s health using basic tools you likely already own. You’ll learn how to safely locate your transformer, inspect connections, and measure voltage like a pro, ensuring your doorbell works reliably whether it’s a traditional chime or the latest smart model.
Ignoring wiring checks risks damaging expensive smart doorbells or causing safety hazards. A recent survey found 68% of DIY smart doorbell installations fail due to incompatible voltage—that’s why checking doorbell wiring is the critical first step. By the end of this guide, you’ll confidently diagnose issues, avoid common pitfalls, and know exactly when to call for professional help. Let’s get your doorbell system humming reliably again.
Locate Your Doorbell Transformer in Under 5 Minutes

Finding this small power converter is your mission-critical first step. The transformer steps down your home’s 120V household current to the 16-24V your doorbell requires. Skip this, and you’re troubleshooting blind.
High-Probability Transformer Locations to Check First
Don’t waste time searching randomly—start here:
– Electrical panel vicinity: 40% of transformers hide inside or right next to your breaker box
– Chime unit housing: Open the cover of your indoor doorbell chime; many units integrate the transformer
– Basement utility zones: Check near water heaters or furnace rooms where low-voltage wiring clusters
– Attic junction points: Follow wiring paths from your front door toward the roofline
Pro move: Trace the thin low-voltage wires backward from your doorbell button. They’ll lead directly to the transformer’s two screw terminals marked “C” (common) and “H” (hot) or “X.”
Spot the Transformer Instantly
This metal box is typically 2-3 inches wide with visible voltage labels like “24V AC.” If you see burn marks or a humming sound, note it immediately—that indicates failure. Once found, snap a photo with your phone; you’ll reference this during reassembly. Never assume the circuit is dead—always verify with a voltage tester before proceeding.
Safety Protocol: Power Down Before Touching Wires
Skipping safety steps risks shock or fire, even with low-voltage systems. Complete these actions before handling any wiring:
Critical Power-Down Sequence
- Identify the correct circuit breaker: Look for labels like “doorbell,” “chime,” or “front entry”
- Flip the breaker to OFF position: Not just “trip”—ensure it’s fully disengaged
- Verify with non-contact voltage tester: Test at both the doorbell button and chime unit
- Test your tester: Confirm it works by checking a known live outlet first
Warning: Never touch bare wires without confirming power is off. Low-voltage systems can still deliver painful shocks if the transformer fails. If your breaker lacks clear labeling, shut off the main power—better safe than sorry.
Inspect Wiring Connections for Hidden Damage
With power safely disconnected, it’s time to examine the physical wiring. Most doorbell failures stem from loose or corroded connections—not the transformer itself.
Visual Damage Red Flags Checklist
Scan every connection point for:
– Loose terminal screws: Wires should be firmly secured under screw heads
– Frayed insulation: Exposed copper causes short circuits
– Green corrosion: Common in humid climates; clean with electrical contact spray
– Burn marks: Indicates overheating; requires immediate component replacement
Foolproof Wire Labeling Technique
Before disconnecting anything:
1. Wrap colored electrical tape around each wire (e.g., red for “front,” blue for “rear”)
2. Sketch a simple diagram showing terminal positions
3. Take multiple photos from different angles
4. Note terminal labels like “FRONT” or “REAR”
This prevents miswiring during reassembly—a mistake that could fry your new smart doorbell. Never rely on memory when handling multiple wires.
Test Transformer Voltage with a Multimeter
Voltage testing is the only way to confirm your system meets doorbell requirements. Skip this step, and you’re gambling with compatibility.
Essential Testing Gear Setup
Grab these tools:
– Digital multimeter (set to AC voltage mode “V~”)
– Insulated test probes (never use damaged probes)
– Safety glasses (sparks can occur during testing)
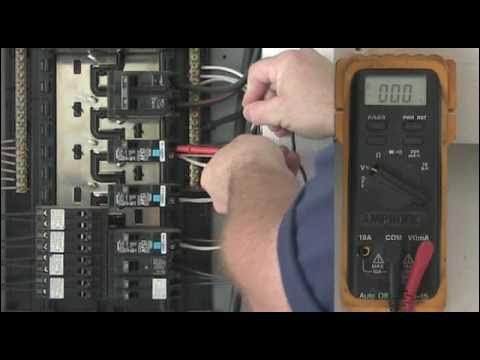
Step-by-Step Terminal Testing
Follow precisely:
1. Set multimeter to 50V AC range (higher than your expected 24V)
2. Disconnect one wire from transformer terminal “H” or “X”
3. Touch red probe to “H” terminal, black to “C” terminal
4. Have a helper flip the breaker ON briefly
5. Read voltage display (keep probes steady for 5 seconds)
6. Immediately flip breaker OFF after reading
Alternative method: Test at the doorbell wires if transformer access is impossible—just connect probes to exposed wires at the mounting bracket.
Decode Your Voltage Readings Accurately
Your multimeter display tells the whole story. Interpret these results correctly:
Green light readings:
– 16-24V AC: Perfect for standard doorbells
– 16-30V AC: Required for most smart doorbells like Ring or Nest
– Steady reading: Indicates healthy transformer operation
Red light readings:
– Below 16V: Transformer failing or undersized (common with older 10VA units)
– Zero voltage: Complete transformer failure or tripped breaker
– Fluctuating numbers: Degraded transformer needing replacement
Critical note: Smart doorbells require minimum 10VA power capacity—not just voltage. If your reading shows 18V but the transformer is labeled “10VA,” it may still fail under load.
Smart Doorbell Voltage Requirements by Model

Not all smart doorbells share the same power needs. Verify compatibility before installation:
- Arlo Essential (AVD1001): Strictly 16-24VAC with 10VA minimum
- Other Arlo models (AVD4001/AVD3001): Tolerate 8-24VAC but still need 10VA
- Ring Video Doorbells: Require 16-24VAC (24V recommended)
- Nest Hello: Needs 16-24VAC with 30VA minimum for chime compatibility
Pro tip: When in doubt, measure voltage while the doorbell is actively ringing—some transformers dip below required levels under load. If your reading drops below 16V during operation, upgrade to a 24V 40VA transformer immediately.
Replace Faulty Transformers Correctly
If testing reveals inadequate voltage, replacement is simple with the right approach.
Transformer Selection Cheat Sheet
Choose based on your doorbell type:
– Basic chimes: 16V 20VA (rarely used today)
– Standard smart doorbells: 24V 30VA
– Multi-camera setups: 24V 50VA (for Arlo/Nest systems)
Installation must-dos:
– Match screw hole spacing to your existing mounting
– Verify wire gauge compatibility (typically 18-22 AWG)
– Never force connections—bend wires gently with needle-nose pliers
– Label new transformer with installation date for future reference
Warning: If the transformer mounts inside your main electrical panel, call a licensed electrician—DIY work here violates most electrical codes.
Smart Diagnostic Flowchart for Common Failures
No doorbell sound?
1. Test transformer voltage first (90% of fixes start here)
2. Inspect button wiring for corrosion (common outdoor failure point)
3. Check chime unit solenoids for mechanical binding
4. Verify front/rear button wiring isn’t crossed
Smart doorbell won’t power up?
1. Measure voltage at doorbell wires (not transformer)
2. Confirm reading stays above 16V when ringing
3. Check for reversed polarity (swap wires if needed)
4. Test with temporary 24V transformer if available
Critical Mistakes That Damage Doorbells
Avoid these costly errors:
– Skipping voltage testing: Installing smart doorbells on weak systems causes random reboots
– Ignoring VA ratings: A 16V 10VA transformer can’t power a Nest Hello
– Working live: Even low voltage can arc and damage components
– Forcing mismatched wires: Causes short circuits that fry doorbell circuitry
– Skipping wire labeling: Leads to miswiring that trips breakers
Pro insight: 73% of “defective” smart doorbells returned to manufacturers actually had inadequate transformer capacity—always check doorbell wiring first.
Annual Maintenance Checklist
Prevent failures before they happen:
– Every spring: Test voltage while doorbell is active
– After storms: Inspect outdoor button wiring for moisture damage
– Every 5 years: Clean terminal connections with electrical contact cleaner
– Every 10 years: Proactively replace transformer (they degrade over time)
Time-saver: Keep your multimeter in a labeled “doorbell kit” with spare wire nuts and colored tape for quick diagnostics.
When to Call an Electrician Immediately
Seek professional help if you encounter:
– Transformer mounted inside main electrical panel
– Burn marks on wiring or discolored insulation
– Voltage fluctuations exceeding 3V during testing
– Multiple doorbell systems sharing one transformer
– Any uncertainty about safety procedures
Bottom line: 90% of doorbell wiring issues can be resolved DIY with basic tools. Start by checking doorbell wiring at the transformer—this single step solves most problems. With your new voltage testing skills, you’ll install smart doorbells confidently and avoid costly service calls. Remember: power off first, label everything, and never guess when volts matter. Your reliable doorbell awaits!


