
Your doorbell suddenly stopped working, or you’re excited to install a new smart doorbell but discovered your existing transformer isn’t compatible. Either way, you need to know how to connect a doorbell transformer correctly—and safely. This common home project can seem intimidating, but with the right guidance, you can complete it yourself without calling an electrician for basic installations.
A doorbell transformer is essential because it converts your home’s standard 120V electrical current down to a safe 16-24V level that won’t damage your doorbell components. Properly connecting this small but crucial device ensures your doorbell functions reliably while meeting electrical safety standards. In this guide, you’ll discover exactly where to find your transformer, what tools you need, and how to make secure connections—plus critical safety steps that many DIYers overlook.
Locate Your Doorbell Transformer in Common Household Areas
Check These Three Primary Locations First
Near your electrical panel – Over 70% of transformers mount within 3 feet of the main breaker box. Look for a small rectangular box (about 2″x3″) with wire connections—often tucked behind other equipment where it’s easily overlooked.
Basement or attic spaces – Follow the thin low-voltage doorbell wire from your chime box. The transformer typically sits where this wire meets your household electrical system, often near junction boxes.
HVAC equipment areas – Many installers place transformers near heating and cooling systems since these locations already have electrical access and are out of sight.
Identify the Transformer Among Similar Electrical Devices
Look for these specific characteristics that distinguish your doorbell transformer from other electrical components:
– Two distinct wire sets: thick household wires (black, white, green) and thin doorbell wires
– Clear voltage labeling: either 16V or 24V prominently marked on the unit
– Multiple terminal screws specifically designed for wire connections
Pro tip: If you’re installing a new system rather than replacing an existing transformer, plan to mount it within 30 feet of your electrical panel for optimal performance and code compliance.
Gather Your Essential Transformer Installation Tools
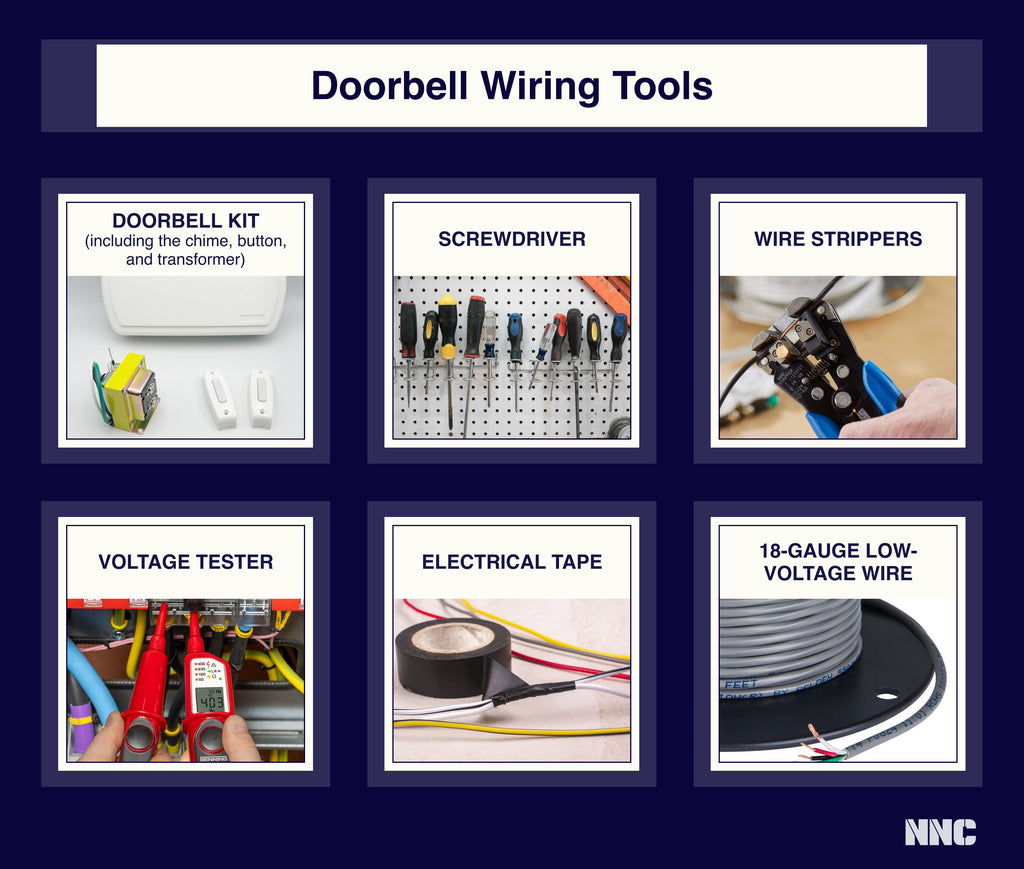
Must-Have Tools for Safe Connection
- Screwdriver set – Both Phillips and flathead for various screw types in junction boxes and transformer terminals
- Precision wire stripper – With 18-22 gauge setting specifically for low-voltage doorbell wires
- Digital multimeter – Absolutely critical for verifying power is off and testing output voltage
- Electrical tape – For insulating connections and marking wires
Selecting the Right Transformer for Your Doorbell System
Choose your replacement transformer based on your specific doorbell requirements:
– 16V transformer – Standard for mechanical chime systems and basic wireless doorbells
– 24V transformer – Required for video doorbells, intercom systems, and smart doorbells
– Tri-volt transformer – Most versatile option supporting 8V, 16V, and 24V outputs
Critical reminder: Smart doorbells like Ring Pro or Nest Hello require 16-24V AC power with minimum 10VA capacity—check your device specifications before purchasing.
Shut Off Power Before Handling Electrical Connections
Proper Circuit Shutdown Procedure
- Identify the correct breaker – Look for labels like “doorbell,” “chime,” or “front door” at your electrical panel
- Turn off power completely – Flip the breaker to OFF position with firm motion
- Double-verify with multimeter – Test at transformer location to confirm zero voltage
Safety warning: If your electrical panel lacks specific doorbell labeling, turn off the main power to your entire house. Never attempt transformer work with live electrical connections—it creates serious shock and fire hazards.
Confirm Zero Voltage Before Proceeding
Test each connection point with your multimeter:
– Between black and white wires (should read 0V)
– Between black and ground wires (should read 0V)
– At transformer output terminals (should read 0V)
This verification step takes only 30 seconds but prevents potentially dangerous mistakes.
Remove the Old Transformer Without Damaging Wiring
Access the Junction Box Safely
Remove the cover plate using your screwdriver. Inside, you’ll find two distinct wire groups:
– High-voltage wires: Thick black (hot), white (neutral), and green/bare (ground)
– Low-voltage wires: Thin wires leading to your doorbell button and chime
Disconnect Wires in Proper Sequence
High-voltage side procedure:
– Unscrew wire nuts connecting transformer wires to house wiring
– Carefully separate each connection: black from black, white from white, ground from ground
– Support wires to prevent them from falling back into the wall
Low-voltage side procedure:
– Note which terminals each doorbell wire connects to
– Loosen terminal screws and remove the thin wires
– Temporarily secure wires with electrical tape to keep them accessible
Remove the Transformer Unit
- Unscrew the mounting screws holding the transformer to the junction box
- Gently pull the unit out while keeping wires separated
- Set aside the old transformer for reference during new installation
Connect Your New Transformer to Household Wiring
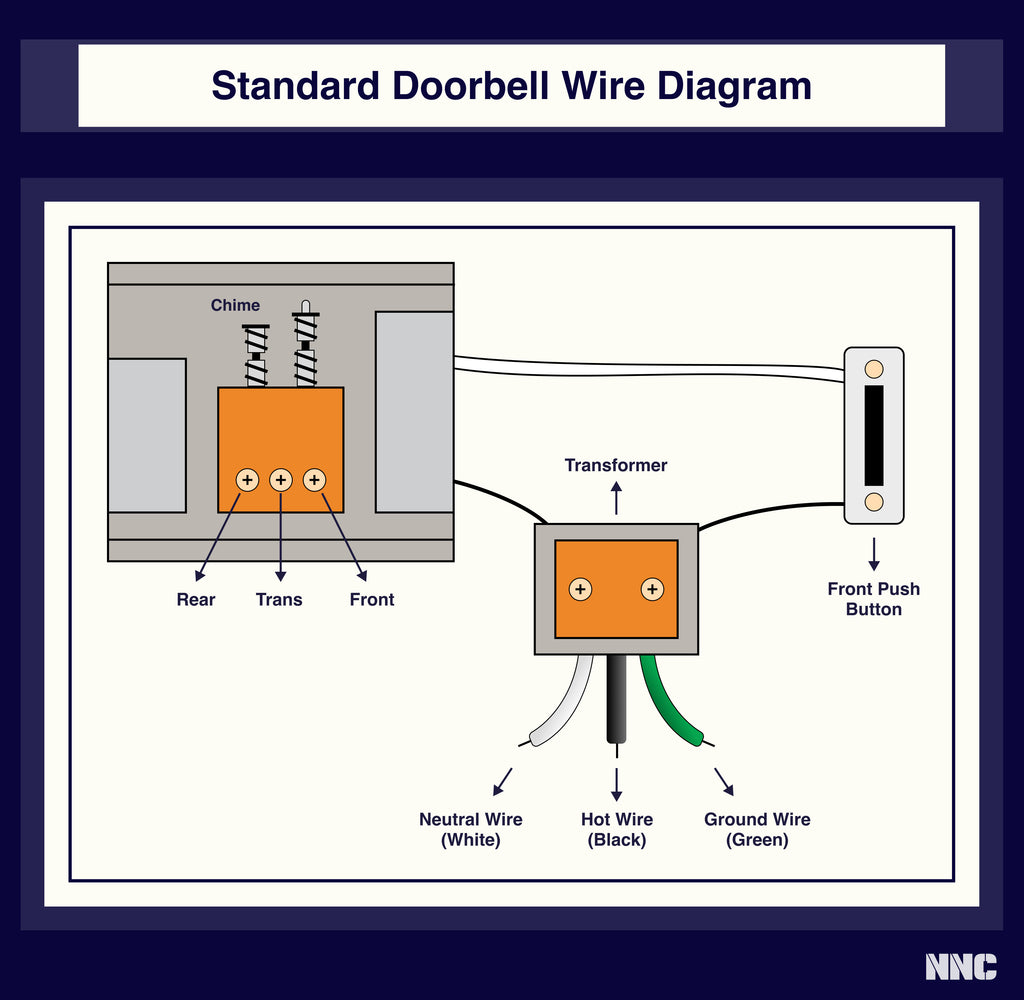
High-Voltage Wiring Connections
Match wires by color for proper connections:
– Black to black – Hot wire connection (most critical for safety)
– White to white – Neutral wire connection
– Green/bare to green/bare – Ground wire connection (required by electrical code)
Secure connection process:
1. Strip ½” of insulation from wire ends using proper gauge setting
2. Twist matching wires together clockwise with firm pressure
3. Screw on wire nuts until tight with no exposed copper
4. Gently tug each connection to verify security
Mount the Transformer Correctly
- Position the new transformer in the junction box with terminals facing outward
- Align mounting holes with existing brackets or drill new holes if needed
- Tighten screws until secure but avoid cracking plastic housings
Complete the Low-Voltage Doorbell Circuit Connections
Connect Doorbell Wires to Transformer Terminals
Your transformer has two screw terminals for low-voltage output:
– No polarity requirement – Either wire can connect to either terminal
– Multiple doorbells: Connect separate wires to each terminal (never combine on one)
For dual-door installations:
– Run separate 18-gauge wires from front and back doorbell buttons
– Connect each wire pair to the transformer terminals
– Label wires with electrical tape for future reference
Verify Chime Box Wiring
From transformer to chime:
– Use 18-2 thermostat wire (18-gauge, 2-conductor)
– Connect one wire from transformer to “TRANS” terminal on chime
– Connect other wire through doorbell button to “FRONT” or “REAR” terminal
Test Your Transformer Installation Thoroughly
Power Restoration and Initial Check
- Restore circuit power – Turn on the breaker at your electrical panel
- Monitor for issues – Watch for signs of overheating or unusual buzzing
- Verify output – Use multimeter to confirm 16V or 24V at transformer terminals
Complete Doorbell Function Test
Press your doorbell button and evaluate:
– Clear, strong chime sound – Indicates proper transformer connection
– Weak or no sound – Check low-voltage wire connections for tightness
– Buzzing or humming – Signals loose connections or transformer overload
Immediate action: If the doorbell doesn’t function, turn off power immediately and recheck all wire nuts and terminal connections before proceeding.
Avoid These Five Common Transformer Installation Mistakes
Dangerous High-Voltage Errors
- Reversed hot/neutral connections – Creates safety hazard even if doorbell functions
- Missing ground connection – Violates electrical code and safety standards
- Loose wire nuts – Causes arcing that can lead to electrical fires
Costly Low-Voltage Mistakes
- Combining multiple wires on one terminal – Overloads transformer capacity
- Using incorrect wire gauge – 18-20 gauge is standard; thinner wires cause voltage drop
- Creating short circuits – Bare wires touching metal or each other
Prepare Your Transformer for Smart Doorbell Compatibility
Match Transformer Specifications to Smart Doorbell Requirements
Before connecting modern smart doorbells:
– Ring Video Doorbell: Requires 16-24V AC with minimum 10VA capacity
– Nest Hello: Needs 16-24V AC, 10VA minimum with stable power
– Arlo Video Doorbell: 16-24V AC, 10VA minimum for reliable operation
Upgrade necessity: If your current transformer is 16V but your smart doorbell needs 24V, replace the transformer before installing your new doorbell.
Smart Doorbell Installation Tips
- Check existing wiring – Older homes may need wire gauge upgrades
- Verify transformer capacity – Video doorbells draw significantly more power
- Consider professional installation – For complex electrical systems or uncertainty
Maintain Your Doorbell Transformer for Long-Term Reliability
Preventative Maintenance Schedule
Monthly checks:
– Listen for unusual buzzing from transformer location
– Verify doorbell responds promptly to button presses
– Check for visible signs of overheating
Annual maintenance:
– Tighten all terminal screws (power off first)
– Inspect wire insulation for damage or deterioration
– Clean transformer of accumulated dust and debris
Troubleshoot Common Transformer Issues
- No doorbell sound: Check breaker, test connections, verify transformer output
- Weak operation: Tighten connections, check for damaged wires, verify wire gauge
- Transformer overheating: Turn off immediately—indicates serious overload or short
Recognize When to Call a Professional Electrician
Electrical Code Requirements
Local codes may require professional installation for:
– New circuit installations (typically requires permit)
– Systems needing GFCI protection
– Homes with aluminum wiring (requires special handling)
Safety Concerns Requiring Expert Help
Contact a licensed electrician immediately if you notice:
– Scorch marks on transformer or wiring
– Frequent breaker trips when using doorbell
– No ground wire in your electrical box
– Persistent buzzing or overheating after proper installation
Connecting a doorbell transformer correctly ensures your doorbell system operates safely and reliably for years. By following these precise steps and respecting electrical safety protocols, you can successfully complete this project even without professional experience. Remember that when working with household electricity, taking extra time to verify connections and test thoroughly always beats rushing through the job. Your properly installed transformer will power everything from basic chime systems to advanced video doorbells—giving you peace of mind every time someone rings your door.


