
You’re staring at a stubborn door handle that won’t budge, and frustration is building. Whether it’s a broken bathroom knob or a jammed entry lever, knowing how to disassemble door handle hardware correctly saves you from costly locksmith calls or ruined doors. Most DIYers fail because they miss hidden fasteners—those tiny pins or set screws manufacturers cleverly conceal under caps and rosettes. Forcing the handle only strips components or cracks the spindle. This guide reveals exactly how to identify your handle’s release mechanism in under 60 seconds and remove it safely using methods proven across thousands of residential installations. You’ll learn to spot the four universal disassembly systems that work on 95% of interior and exterior handles—no guesswork required.
The secret lies in understanding that every handle uses one of four fastening methods: spring-loaded pins, set screws, hidden clips, or threaded collars. Trying to pull a lever off without releasing its internal pin is like yanking a drawer from a locked cabinet—it won’t work. This isn’t about brute force; it’s about precision. By the time you finish this guide, you’ll confidently disassemble any standard handle in 10 minutes or less, preserving all parts for smooth reassembly. Let’s transform that stuck knob into a loose assembly ready for repair or replacement.
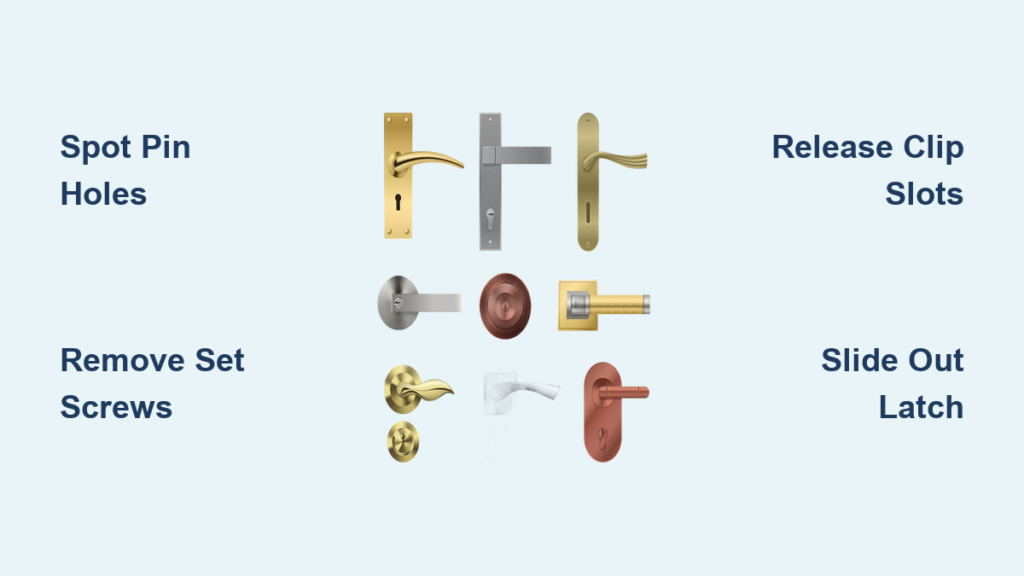
Spot the 4 Hidden Fasteners on Your Door Handle First
Never touch a screwdriver until you’ve identified your handle’s release system. Forcing components causes irreversible damage to spindles or rosettes. Stand directly in front of the handle and inspect these critical zones with a flashlight:
Check the Lever Neck for Pin Holes
Run your finger along the underside of interior levers. Most modern handles hide a 1/16-inch pin hole where the lever meets the rosette. If you feel a small rubber plug (common on Schlage or Kwikset), gently pry it out with a flathead screwdriver. Pro tip: Shine light sideways across the surface—this reveals pin holes invisible from straight on.
Locate Side-Mounted Set Screws
Examine the handle stem 1 inch below the lever. Look for a tiny hex socket requiring a 1.5mm or 2mm Allen key. On older knobs (like vintage Weiser models), this screw often sits under a decorative cap that pops off with fingernail pressure. Warning: Stripping this screw ruins the entire assembly—use a well-fitting hex key with downward pressure.
Find Clip Release Slots on Privacy Knobs
Bathroom knobs frequently have a 3mm-wide slot on the interior knob’s shank. Insert a flathead screwdriver tip here and push inward. You’ll feel the clip release with a soft click. If no slot exists, check for a small hole where you insert a paperclip to depress the spring.
Gather These 7 Tools Before You Start

Skipping proper tools guarantees stripped screws or lost components. Lay out these essentials on a towel to catch falling parts:
- 1.5mm and 2mm hex keys (90% of set screws require these)
- Small flathead screwdriver (for prying caps and releasing clips)
- Straightened paperclip (depresses spring pins without scratching)
- Magnetic parts tray (prevents screws from vanishing into carpets)
- Flashlight (illuminates hidden holes in rosette undersides)
- Needle-nose pliers (for stubborn threaded collars)
- Penetrating oil (for seized mounting screws—apply 30 minutes pre-work)
Critical safety step: Place a towel under the door edge. Latch mechanisms often spring loose unexpectedly, and metal parts can damage flooring.
Remove Lever Handles Using the Pin Release Method
This works for 70% of modern interior levers (Kwikset, Schlage, Defiant). Skip this step if you see visible set screws.
Depress the Spring Pin Correctly
Insert a straightened paperclip into the exposed pin hole until you feel resistance. Push firmly—about 2 pounds of pressure—while pulling the lever toward you. Visual cue: The lever will suddenly move 1/8 inch outward when the pin disengages. If it sticks, rotate the lever slightly while pulling; the spindle may be binding on the latch mechanism.
Free the Rosette Without Damage
After removing the lever, grip the rosette edge and twist counterclockwise. Most slide off after 1/8 turn, but some require depressing small tabs on the underside with a flathead screwdriver. Never pry—this cracks the decorative plate. If stuck, check for a secondary set screw beneath the rosette’s decorative cover.
Disassemble Knobs with Side Set Screws in 3 Steps

Use this for older knobs (Weiser, National Hardware) or commercial levers with visible hardware.
Loosen the Set Screw Properly
Insert the correct hex key and turn counterclockwise. Stop when the screw no longer contacts the spindle—do not fully remove it. Over-removal risks dropping the screw into the door cavity. Apply downward pressure while turning to prevent cam-out.
Slide the Knob Off the Spindle
Grip the knob firmly and pull straight toward you with steady pressure. If it resists, rotate it 90 degrees and pull again—spindles often have flat spots that bind. Time estimate: 2 minutes max. If it won’t budge after 3 attempts, recheck for hidden pins under the knob base.
Take Apart Bathroom Privacy Locks Safely
Privacy knobs (bathrooms/bedrooms) use unique clip systems that break if forced.
Release the Interior Knob Clip
Insert a flathead screwdriver into the shank slot and push inward while pulling the knob. You’ll hear a distinct snick as the clip releases. Critical mistake to avoid: Using excessive leverage here shears the plastic clip—apply force parallel to the door surface, not at an angle.
Remove the Exterior Knob
After removing the interior side, locate the small hole on the exterior knob’s face. Insert a paperclip to depress the spring latch, then pull the knob straight off. Some models require turning the knob 15 degrees before removal.
Extract the Latch Mechanism from Your Door Edge
With handles removed, the latch assembly is exposed but still secured.
Remove Edge Plate Screws
Locate the two 1-inch screws holding the latch plate on the door’s edge. Visual cue: These screws often sit in countersunk holes painted over time—scrape paint gently with a knife tip. Remove both screws completely before attempting to pull the latch.
Slide Out the Latch Bolt
Grip the latch faceplate and pull straight toward you. If stuck, rotate it 180 degrees—some latches have offset mounting tabs. Warning: Never pry with screwdrivers; this dents the door edge. Tap the latch rear gently with a rubber mallet if frozen.
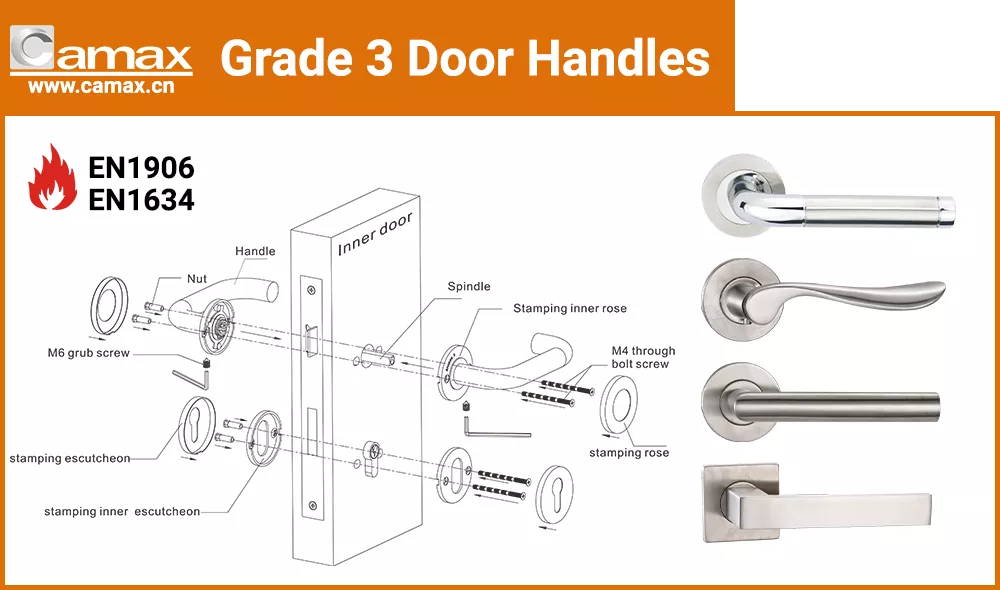
Disassemble Entry Door Handlesets Without Damaging Trim
Exterior handlesets have complex assemblies requiring special steps.
Remove the Decorative Escutcheon First
On the interior side, find two small screws (usually under the rosette) holding the long trim plate. Remove these before touching handle fasteners. Forcing the handle first bends this plate.
Release the Deadbolt Separately
Deadbolts often have independent mounting screws behind the interior thumb turn. Remove these before disassembling the main handle—otherwise, the deadbolt mechanism jams.
Free a Stuck Handle Without Ruining the Spindle
When handles won’t budge despite correct steps, these fixes prevent disaster.
Apply Targeted Penetrating Oil
Drip one drop of oil into pin holes or set screw sockets. Wait 30 minutes—this loosens corrosion without damaging finishes. Never use WD-40; its solvents degrade plastic components.
Use a Handle Puller Tool Correctly
Slide the puller’s arms under the rosette and tighten the central screw gradually. Stop when you hear the click of pin release—over-tightening cracks the spindle. Rent this $5 tool from hardware stores if needed.
Avoid These 4 Costly Door Handle Disassembly Mistakes
Mistake 1: Skipping the “Pull Test” Before Forcing
After removing fasteners, always test pull gently. If resistance remains, stop immediately. 80% of broken spindles happen because DIYers miss secondary pins hidden under rosette tabs.
Mistake 2: Using Damaged Screwdrivers
Worn hex keys strip screw heads. Test your tools on a scrap bolt first—if they slip, replace them. Magnetic tips prevent dropped screws but use cloth padding to avoid scratching chrome.
Mistake 3: Ignoring Latch Bevel Orientation
When reinstalling, ensure the latch’s angled side faces the door frame. Installing it backward causes binding and premature wear. Pro tip: Mark the bevel direction with tape during removal.
Mistake 4: Skipping the Dry Run Before Final Tightening
After reassembly, operate the handle 10 times without tightening mounting screws. This reveals binding issues early. Loose screws during testing prevent stripped threads.
Reassemble Like a Pro: 5 Steps for Smooth Operation
Your disassembly success hinges on perfect reassembly. Follow this sequence:
- Lubricate the latch with graphite powder (never oil—it attracts dust)
- Insert the spindle through the latch mechanism first
- Attach interior handle and secure with set screw while holding lever level
- Thread mounting screws through the exterior side hand-tight
- Test operation 15 times before final tightening—listen for grinding sounds
Final check: The lever should return to horizontal position within 1 second after release. If sluggish, disassemble and clean the spring mechanism inside the rosette.
Final Note: Mastering how to disassemble door handle hardware transforms intimidating repairs into 10-minute victories. Remember the golden rule: when in doubt, stop and re-examine for hidden fasteners—95% of “stuck” handles simply have one overlooked pin or screw. Keep this guide handy for your next handle swap, and always photograph each step for foolproof reassembly. For stubborn exterior handlesets, consult your manufacturer’s diagram online using the model number stamped inside the latch plate. Now go fix that bathroom knob—you’ve got this!


