
Your doorbell stays silent when visitors arrive, and you’ve already ruled out dead batteries or a faulty chime unit. That nagging suspicion? It’s probably a broken doorbell wire hiding inside your walls. Don’t panic—most doorbell systems run on safe 16V low-voltage circuits, meaning you can often fix broken doorbell wire issues yourself without calling an electrician. This guide reveals exactly where to hunt for hidden breaks and how to repair them using simple tools and proven techniques, saving you hundreds in service calls.
Turn Off Power Before Touching Wires
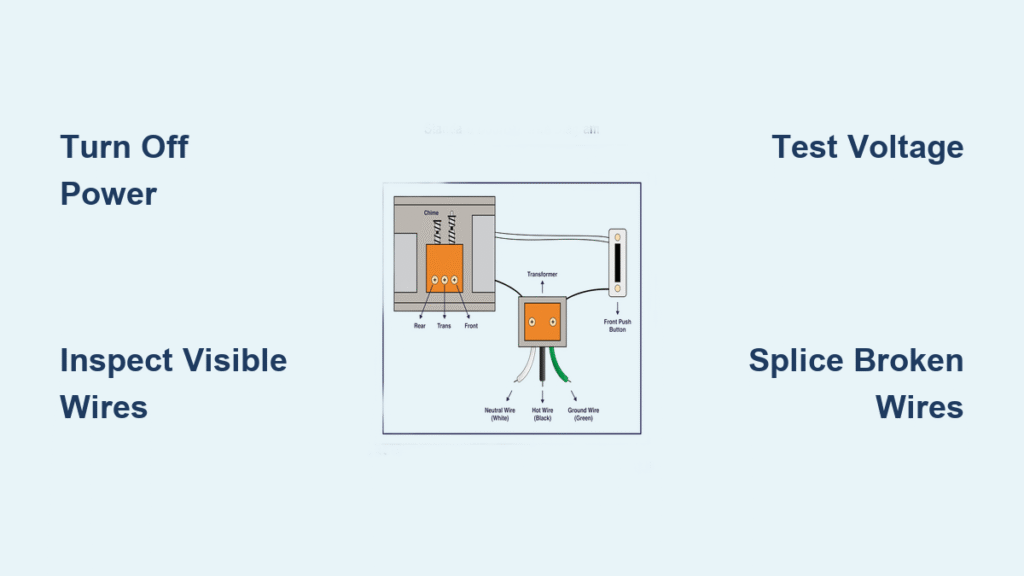
Never skip this critical safety step, even with low-voltage systems. Locate your circuit breaker panel and switch off the breaker labeled “doorbell” or “chime.” If unlabeled, turn off the main breaker temporarily. Put on electrician’s gloves before handling any wires—while 16V won’t kill you, it can still deliver a painful zap. After powering down, press the doorbell button. If it rings, you’ve turned off the wrong breaker. Keep testing breakers until the system goes completely silent. This verification step ensures you’re working on a de-energized circuit.
Inspect Visible Wiring for Damage

Start where wires are exposed instead of guessing about hidden breaks. Check these high-failure zones first:
– Behind the doorbell button (remove faceplate with a putty knife)
– Around the chime unit in hallways or closets
– Near the transformer (typically mounted near electrical panels or HVAC systems)
– In unfinished basements or attics where wires run openly
Look for crushed sheathing, kinked sections, or chew marks from rodents. Doorbell cable contains 18-gauge copper wires inside a plastic jacket. When you spot damaged sheathing, carefully slice it open with a utility knife to inspect internal conductors. Broken copper strands require immediate splicing—don’t attempt to tape over severed wires.
Button Bypass Test to Isolate the Problem
Remove the doorbell button by unscrewing its mounting plate. Disconnect the two wires from its terminals and touch the bare ends together. If the chime rings instantly, your button is dead—replace it. If silence persists, the issue lies with wiring, transformer, or chime unit. This 30-second test eliminates the most common failure point before you dig deeper.
Voltage Verification at Critical Points
Grab a $10 low-voltage test light or digital multimeter for these checks:
Transformer output test: Touch probes to the transformer’s two screw terminals. You should read 16V AC (check the transformer label for exact voltage). No reading? The transformer needs replacement. Correct reading? Move to the chime unit.
Chime terminal test: Have someone press the doorbell button while you test voltage at the chime’s terminals. If transformer shows 16V but chime gets zero voltage, you’ve confirmed broken doorbell wire between components. For homes with front/back buttons, if one works while the other fails, the non-working button’s wiring is definitely compromised.
Splice Broken Wires Without Wall Demolition
Secure Connector Method for Exposed Breaks
When you find a break in accessible wiring (like behind the button), follow these steps:
- Strip ½ inch of insulation from both broken wire ends using wire strippers
- Twist copper strands together clockwise until tight
- Screw on a twist-on wire connector until no copper shows
- Wrap the entire connection with black electrical tape for moisture protection
- Gently tug wires to ensure no pull-out
Pro tip: Mark wire functions with colored electrical tape—red for front door, blue for back door—before disconnecting anything. Take a photo of connections with your phone for reference.
Extension Technique for Gapped Wires
When wires lack slack for direct splicing:
- Cut 6-inch lengths of 18-gauge replacement wire (sold in spools at hardware stores)
- Strip ½ inch from both ends of extension wires and broken segments
- Connect one extension wire between each broken end using wire connectors
- Tape each splice individually, then wrap the entire repair bundle
- Test continuity with your multimeter before reinstalling
Critical warning: Never stretch or knot wires to close gaps—this creates future break points. Always add slack with proper extensions.
Locate Hidden Breaks in Wall Runs

When the break is buried behind drywall, avoid destructive hunting with these pro methods:
Tone generator solution: Plug a $25 tone generator into the chime unit terminals. Use the included probe to trace the signal along walls—sound stops at the break location. These tools detect wires through 2 inches of drywall.
Check these hidden failure hotspots:
– Areas where staples penetrate studs (over-tightened staples slice insulation)
– Sharp 90-degree bends near corners (causing wire fatigue over time)
– Points where wires pass through metal studs (chafing against edges)
– Zones near HVAC ducts (temperature swings crack brittle wires)
Pro tip: Tap walls with a hammer handle while listening for hollow sounds indicating accessible chases. Drill ⅜-inch inspection holes only at these strategic points.
Fix Button-Specific Wiring Failures

Electronic doorbell buttons often fail due to diode issues rather than broken wires. Diode troubleshooting steps:
- Remove button faceplate and unscrew mounting screws
- Locate the small black diode (looks like a tiny cylinder with a silver band)
- Ensure the band faces toward the chime unit—not the transformer
- Test by pressing the button—if music starts then cuts off, the diode is dead
Replacement trick: Use needle-nose pliers to hold the diode in place while reconnecting wires in tight spaces. Warning: Continuous ringing means a short circuit—immediately disconnect power and check for crossed wires.
Prevent Future Wire Failures
Installation Upgrades That Last
- Staple properly: Use low-voltage staples that grip without crushing—wires should wiggle slightly when pressed
- Protect stud penetrations: Install metal wire guards where cables pass through framing
- Waterproof outdoor connections: Apply dielectric grease to button terminals before reassembly
- Document routes: Sketch wire paths during repairs for future troubleshooting
Annual Maintenance Checklist
Spring: Check outdoor buttons for moisture damage, test both buttons, inspect transformer connections
Fall: Clean dust from chime unit, verify battery backups, test system after electrical work
When to Convert to Wireless
Abandon wire repairs if:
– Breaks occur behind tile or finished cabinetry
– Rodent damage affects multiple wall sections
– Previous owners used undersized 22-gauge wire
– You’re remodeling and want to eliminate wiring
Wireless conversion benefits: Battery-powered transmitters last 1-2 years, offer visual alerts for hearing-impaired users, and allow multiple chimes throughout large homes. Installation takes 15 minutes—no wiring required.
Quick Diagnosis Flowchart: Silent Doorbell Edition
System completely dead?
1. Verify circuit breaker is OFF (test with multimeter)
2. Check transformer output (must show 16V AC)
3. Perform button bypass test (touch wires together)
4. Test voltage at chime during button press
5. Inspect visible wire sections for breaks
Intermittent operation?
1. Tighten all terminal screws at button/chime
2. Check for moisture in outdoor button housing
3. Test during extreme temperatures (heat/cold)
4. Replace wire if symptoms persist after cleaning
Final repair insight: 90% of “broken doorbell wire” issues actually occur at connection points—not mid-wall breaks. Always start your diagnostic process at the button, chime, and transformer terminals before assuming wires are severed inside walls. With systematic testing and proper splicing techniques, you’ll restore your doorbell in under an hour using tools you likely own. For persistent issues after completing these steps, consider a wireless upgrade—it solves chronic wiring problems permanently while adding modern features like smartphone alerts.


