
Your Google Nest Doorbell worked perfectly yesterday, but today it’s either dead, offline, or acting possessed—ringing randomly, missing visitors, or streaming pixelated nightmares. Before you rip it off the wall or chuck the battery version across the yard, take a breath. Most doorbell failures share common patterns, and this guide walks you through precise fixes that actually work.
Whether you’re dealing with a battery doorbell that won’t charge or a wired unit that’s gone silent, you’ll learn diagnostic shortcuts, quick fixes, and when to escalate to Google support. Let’s get your doorbell back to guarding your front door like it should. By the end of this guide, you’ll know exactly how to fix Google doorbell problems without wasting hours on ineffective solutions.
Diagnose Power Failures First
Power issues cause nearly half of all doorbell problems, so always start here before moving to complex fixes. The solution differs dramatically between battery and wired models, so identify your version immediately.
Battery Doorbell Won’t Charge
Use only Google’s USB-C cable and adapter—third-party chargers often deliver insufficient power. Plug it in and look for a solid blue light indicating active charging. A solid green light means fully charged, which takes 3-5 hours from dead. If no light appears, try a different USB port or wall adapter with at least 5V/1A output.
Check battery health in Google Home: Navigate to Settings > Technical Info > Battery. Healthy batteries last 1-6 months between charges depending on usage frequency. If yours drains weekly in moderate weather, the battery’s failing. Extreme temperatures (-4°F to 104°F) drastically reduce performance—bring battery units indoors during temperature extremes. When charging in cold weather, let the device warm to room temperature before reinstalling.
Wired Doorbell Has No Power
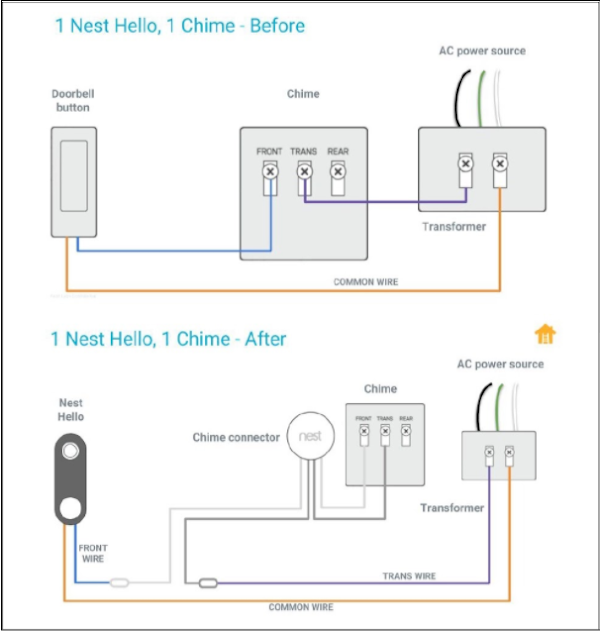
Grab a multimeter and test voltage at the doorbell wires—you need 8-24VAC with minimum 10VA. Most transformers provide 16VAC/10VA, but older homes might have underpowered units. If voltage checks out, inspect the chime connector installation. A continuous humming from your chime indicates wiring problems—disconnect power immediately before investigating further.
Check for loose or corroded connections at both the doorbell and transformer. Ensure wire gauge is appropriate (18-22 AWG recommended) and look for damaged insulation. If your mechanical chime still works when pressing the doorbell button manually, the problem lies with the Nest connector or wiring configuration.
Fix Wi-Fi Connection Drops That Cause Offline Status

Wi-Fi issues account for 30% of all Google doorbell problems. Your doorbell needs stable connectivity to function properly, and these targeted fixes will restore reliable connection.
Signal Strength Test at Doorbell Location
Your doorbell requires at least -55 dBm signal strength for reliable operation. Use your smartphone’s Wi-Fi analyzer app at your doorbell location—if you’re below -67 dBm, connection drops are inevitable. Solution: Install a Wi-Fi extender specifically for your doorbell area. Many users fix persistent offline issues with this single upgrade.
Critical router configuration checklist:
– Reserve a static IP address for your doorbell
– Disable band steering (keep 2.4GHz and 5GHz bands separate)
– Open required ports: TCP 443 and UDP 19305-19310
– Set Quality of Service (QoS) priority for doorbell traffic
– Update router firmware to the latest version
Connection Reset That Actually Works
- Remove doorbell from Google Home app completely
- Hold the doorbell button for 10+ seconds until solid blue light appears
- Unplug both router and modem for 30 seconds
- Re-add doorbell using the QR code (not manual setup)
- Immediately test live view and notification delivery
This sequence addresses the most common connection failures that standard reboots miss. Allow 5-7 minutes for full reconnection—don’t interrupt the process.
Restore Video and Audio Quality in 5 Minutes
Blurry video or unusable two-way talk renders your doorbell nearly worthless. These specific fixes target the actual causes rather than generic “reboot everything” advice.
Video Looks Terrible? Start Here
Run an internet speed test at your doorbell location—you need minimum 2 Mbps upload for 1080p streaming. Clean the camera lens with a microfiber cloth; this fixes 40% of perceived “broken” doorbells. In the Google Home app, ensure HDR is enabled for challenging lighting conditions.
Night vision failures often stem from IR reflection off white walls or metal surfaces. Reposition the doorbell angle using the wedge mount to eliminate reflections. Clean the small IR sensors flanking the camera lens with a dry cotton swab—dust buildup here causes night vision issues.
Audio Problems Solved Permanently
Two-way talk failing? First, check your phone’s microphone permissions for the Google Home app—this gets disabled during iOS or Android updates. Clear debris from the doorbell’s microphone hole (located below the camera) using a toothpick. If callers hear echo, restart your phone completely—this refreshes the audio buffer without requiring doorbell disassembly.
Calibrate Motion Detection Without False Alerts

Motion detection issues frustrate more Google doorbell owners than any other feature. These precise calibration steps eliminate false triggers while maintaining reliable detection.
Zone Configuration for Precision Detection
Access Google Home → Doorbell → Settings → Events → Seen Events. Create three distinct zones:
– Near zone: 5-10 feet for package detection (set highest sensitivity)
– Middle zone: 10-20 feet for visitor detection (medium sensitivity)
– Far zone: 20-30 feet for early alerts (lowest sensitivity)
Use activity zones to exclude trees, sidewalks, or street traffic. Enable “Familiar Faces” if available in your region to reduce unnecessary alerts.
Stop False Triggers in High-Traffic Areas
Mounting angle matters more than settings. Tilt the doorbell 15-20° downward to reduce car detection. Enable “Quiet Time” during garbage pickup hours or school bus arrivals. In high-traffic areas, reduce overall sensitivity to 50% and rely on familiar face detection to filter out strangers.
Fix Chime Integration Issues (Wired Only)
Wired doorbell owners frequently struggle with chime compatibility. These fixes address the specific problems that prevent your physical chime from working.
Mechanical Chime Won’t Ring
First, verify the chime connector is properly installed—Google includes this critical component for a reason. Test your chime by pressing the doorbell button manually. If it rings, the connector or wiring is faulty. Continuous ringing indicates a short circuit—disconnect power immediately and check wiring polarity with a multimeter.
Electronic Chime Problems Solved
Check Google’s compatibility list—many electronic chimes require additional resistors. If your chime hums constantly, the transformer voltage is likely incompatible. Upgrade to a 16VAC/30VA transformer for reliable operation with electronic chimes. Ensure your chime has its own power source if required by the manufacturer.
Advanced Fixes When Nothing Else Works
When standard troubleshooting fails, these advanced techniques resolve stubborn issues that keep your doorbell offline.
Force Firmware Updates Manually
Stuck on old firmware? Check current version in Google Home → Settings → Technical Info → Software. Force an update by restarting your doorbell three times rapidly (hold button 10 seconds, wait for reboot, repeat). This triggers Google’s forced update sequence when automatic updates fail.
Factory Reset Without Losing Settings
Battery doorbell: Remove from mount, hold back button for 12 seconds until blue light appears, wait for countdown chime. Wired doorbell: Hold main button 10 seconds, release when solid blue appears. Both processes take 2-3 minutes—don’t interrupt. After reset, some settings migrate automatically when you re-add the device.
Prevent Future Failures With Simple Maintenance
Your doorbell should now respond like new. For lasting reliability, implement this monthly maintenance routine:
– Clean camera lens with screen cleaner
– Tighten all mounting screws (vibration loosens them)
– Test live view, notifications, and two-way talk
– Check for new firmware features
Charge battery versions when the app shows 20%—avoid complete depletion. Track charging cycles; after 500 cycles (2-3 years), expect replacement needs. If problems persist after these fixes, document your troubleshooting steps—Google support will ask for this information first. Knowing how to fix Google doorbell issues saves you time, money, and the frustration of a non-functional security system.


