
You’ve bought beautiful blackout curtains for your patio door, only to discover every standard curtain rod has a center bracket blocking the curtain from sliding fully open. That frustrating “thud” when your curtain hits the middle support—preventing you from accessing 30% of your sliding glass door—isn’t just annoying; it defeats the purpose of having curtains for privacy and light control. This guide solves that exact problem by eliminating the center bracket barrier. You’ll learn proven methods to achieve full curtain traversal so your sliding door operates freely while maintaining a polished look. Whether you’re installing heavyweight blackout drapes or lightweight sheers, these techniques work for any sliding door in under two hours.
Ditch the Center Bracket: Your First Rule for Sliding Door Curtains
Standard curtain rods force a center support bracket that physically blocks curtains from sliding completely off your sliding glass door. This design flaw leaves you with limited visibility and restricted access every time you try to open the door. The solution isn’t stronger brackets or fancier hardware—it’s choosing systems engineered for unobstructed travel. Your curtain must clear the entire door width when open, requiring at least 6-12 inches of extension beyond the door frame on each side for proper stack-back. Ignoring this rule guarantees you’ll battle snagged curtains and compromised functionality.
Why Center Brackets Fail Sliding Doors
Center brackets create three critical problems: First, they leave curtains partially covering the glass even when “fully open,” blocking natural light and views. Second, they prevent blackout curtains from forming a complete seal against light leaks. Third, they force you to awkwardly maneuver around stacked fabric when sliding the door open. This isn’t a minor inconvenience—it renders expensive curtains nearly useless for their primary purpose. The fix requires eliminating the obstruction entirely through specialized mounting approaches.
Critical Measurement Mistakes to Avoid
Measure your sliding door width, then add 12-24 inches total (6-12 inches per side) for curtain stack-back space. Most homeowners underestimate this, resulting in curtains that still cover part of the glass when open. Use a laser level to mark bracket positions 4-6 inches above the door frame—high enough for full curtain clearance but low enough to maintain visual balance. Never eyeball this; a 1/8-inch height difference between brackets causes visible sagging and uneven operation. Confirm your wall surface type (drywall, plaster, tile) before selecting anchors—it determines your mounting security.
Install a Traversing Track System for Professional Results
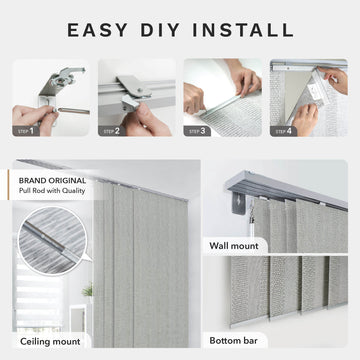
Traversing tracks are engineered specifically for unobstructed sliding door curtain operation. Unlike standard rods, these systems use ceiling- or wall-mounted rails with gliders that allow curtains to travel the entire track length without obstruction. This is the only solution that guarantees smooth movement for heavy blackout drapes while maintaining a seamless aesthetic.
Mounting Your Track Above the Door Frame
Locate wall studs using a stud finder—brackets must anchor into solid wood for heavy curtains. Mark track positions 3-6 inches above the door header, extending 6 inches beyond each side of the frame. Drill pilot holes slightly smaller than your anchors, then secure track brackets with 2.5-inch screws. For plaster walls, use toggle bolts rated for 50+ lbs per bracket. Test track stability by hanging a 10-lb weight before attaching curtains—any flexing indicates insufficient mounting.
Hanging Curtains on Gliders Correctly
Thread curtain hooks through the fabric header tape, then clip them onto track gliders. Space gliders every 4-6 inches across the curtain width—too few causes bunching, too many creates drag. For motorized systems, install the motor unit at the track’s closed end according to manufacturer specs. Test operation by manually sliding curtains before activating motorization. Pro Tip: Add 2 extra gliders at each curtain edge to prevent “flagging” (fabric flipping outward during movement).
Build a Heavy-Duty EMT Conduit Rod for Under $50
EMT conduit creates a sturdy, center-bracket-free rod that outperforms expensive retail options. This DIY solution uses 3/4-inch or 1-inch galvanized electrical tubing painted to match your decor. Its rigidity prevents sagging across 8-foot spans while costing less than pre-made traversing systems.
Cutting and Finishing Your Conduit Rod
Measure door width plus 24 inches (12 inches per side), then cut EMT tubing with a hacksaw or pipe cutter. Deburr cut edges with sandpaper to prevent fabric snags. Clean thoroughly with acetone, then apply metal primer followed by 2 coats of spray paint (matte black or oil-rubbed bronze hides imperfections best). Allow 24 hours drying time—rushing this causes sticky residue on curtains.
Mounting Brackets for Maximum Support
Install heavy-duty ceiling brackets 1 inch inside your rod’s endpoints. For drywall, use 3-inch toggle bolts drilled into ceiling joists—never rely on drywall anchors alone for heavy curtains. Position brackets so the rod slopes slightly downward toward the door (1/4 inch per foot) to prevent curtain drift. Critical Warning: Skip this slope adjustment and your curtains will constantly slide shut from minor vibrations.
Use Heavy-Duty Tension Rods for Temporary Installations
Heavy-duty tension rods work for lightweight sheers when drilling isn’t an option. Choose rods rated for 10+ lbs of tension with non-slip rubber caps. This solution fails for blackout curtains or frequent use but serves well for rentals or temporary setups.
Preventing Tension Rod Collapse
Measure your door frame’s interior width precisely—tension rods require exact sizing. Extend the rod until it creates firm pressure against both sides of the frame, then add 1/8 inch more for friction. Place folded rubber shelf liner between rod ends and frame to prevent slippage. Never use tension rods for curtains over 5 lbs—sudden collapse can damage flooring or injure pets.
Ceiling-Mounted Systems for Floor-to-Ceiling Drapes

Ceiling tracks create dramatic, full-height curtains that maximize privacy and light control. Mount tracks directly to ceiling joists 2-4 inches from the wall, allowing curtains to hang straight down without side gaps. This method works perfectly with motorized systems for voice-controlled operation.
Motorized Track Installation Essentials
Install motor units at the track’s closed end, ensuring power access via concealed wiring. Program open/close limits using the remote—set the “open” position 2 inches beyond full door clearance to prevent fabric catching. For vaulted ceilings, use angled mounting brackets to maintain vertical curtain alignment. Pro Tip: Add a manual override cord during installation for power outages.
Avoid These 3 Costly Installation Errors

Skipping the Level Check
A crooked rod creates cascading problems: curtains won’t stack evenly, fabric bunches on one side, and the entire system appears unprofessional. Use a 48-inch level during bracket marking—never trust a bubble level smaller than the door width. Recheck alignment after mounting each bracket with a laser level.
Underestimating Curtain Weight
Heavy blackout curtains require structural mounting. For every pound of curtain weight, you need 5 lbs of mounting strength. Standard drywall anchors (35-lb capacity) fail with just 7 lbs of curtain weight. Always anchor into studs or use 75-lb+ toggle bolts for ceilings. Test by hanging double the curtain weight before final installation.
Ignoring Stack-Back Space
Curtains require physical space to stack when open. Measure your curtain’s compressed width (typically 1/3 of fabric width) and ensure wall space accommodates it. If your left wall is only 10 inches wide but curtains need 15 inches of stack space, choose a ceiling track that extends past the wall edge. Otherwise, you’ll have permanent fabric blocking your view.
Final Installation Checklist Before Hanging Curtains
- Bracket Stability Test: Apply 20 lbs of downward force—zero movement indicates secure mounting
- Full Travel Test: Slide an empty rod/gliders across the entire length—no resistance points
- Clearance Verification: Confirm curtains clear door handles by 2+ inches when open
- Light Leak Check: Close blackout curtains in daylight—no visible gaps along track
- Operation Smoothness: Open/close 10 times without snagging or uneven movement
Final Note: Installing curtain rods over sliding glass doors succeeds only when you eliminate center obstructions. The traversing track system delivers flawless operation for heavy drapes but requires precise mounting. The EMT conduit rod offers professional results for under $50 with basic DIY skills—just remember the critical slope adjustment. Tension rods serve only as temporary fixes for lightweight fabrics. Always prioritize bracket anchoring into structural supports over cosmetic placement. Within two hours, you’ll transform frustrating partial coverage into smooth-operating curtains that fully clear your sliding door. For ongoing performance, tighten mounting hardware quarterly and vacuum track systems monthly to prevent glider jamming.


