
That stubborn exterior door handle that sticks or won’t turn is more than just an inconvenience—it’s a security risk for your home. When your front door handle fails, you’re left fumbling with keys while potential intruders get a free look at your home’s vulnerabilities. The good news? Installing a new exterior door handle is a DIY project most homeowners can tackle in under two hours with the right approach. This guide cuts through the confusion to show you exactly how to install exterior door handle hardware that operates smoothly and provides reliable security.
Whether you’re replacing a broken handle, upgrading to a smart lock system, or installing hardware on a newly hung door, proper installation is critical. A poorly installed handle can lead to misaligned latches, compromised security, and frustrating daily operation issues. By following these precise steps, you’ll ensure your new exterior door handle functions perfectly for years to come. Let’s get your entryway looking sharp and operating securely with a professional-quality installation.
Essential Tools for Exterior Door Handle Installation
Before removing a single screw, gather these specific tools to ensure your how to install exterior door handle project goes smoothly. Having everything ready prevents mid-project interruptions that can leave your door partially disassembled and insecure. The right drill bits are non-negotiable—using an incorrect size will create gaps that compromise both function and security.
You’ll need:
– Phillips and flat-head screwdrivers (precision sizes for handle sets)
– 2 1/8-inch hole saw with pilot bit
– 1-inch spade or Forstner bit
– Tape measure with fractional markings
– Center punch or awl for precise drilling points
– Sharp utility knife and wood chisel (1/2-inch)
– Hammer with controlled striking surface
– Masking tape to prevent wood splintering
– High-quality exterior door handle set with matching backset
Preparing Your Exterior Door for Handle Replacement
Skipping proper preparation is the #1 reason DIYers struggle when trying to install exterior door handle hardware. Even if you’re replacing identical hardware, doors shift over time requiring minor adjustments to ensure perfect alignment. This preparation phase takes just 15 minutes but prevents hours of frustration trying to make mismatched components work.
Removing Your Existing Door Hardware Completely
Start by removing all visible screws from both interior and exterior handle plates. If your handle won’t turn, look for a small release pin on the interior side—often hidden beneath decorative caps that pop off with a flat-head screwdriver. Once handles are removed, extract the latch mechanism by unscrewing the two long mounting screws through the door edge. Don’t force stubborn components; sometimes penetrating oil applied to screw heads helps break corrosion.
Verifying Your New Handle Components Match Door Specifications
Before drilling anything, confirm your new handle matches your door’s critical measurements. The backset (distance from door edge to hole center) must be either 2 3/8″ or 2 3/4″—measure your existing setup or the door edge. Hold the new latch against the door edge to verify the bore hole size (typically 2 1/8″) and edge hole (1″) align with your door’s current configuration. If replacing with different hardware, use masking tape to outline new hole positions directly on the door surface.
Drilling the Perfect Latch Hole for Exterior Handles
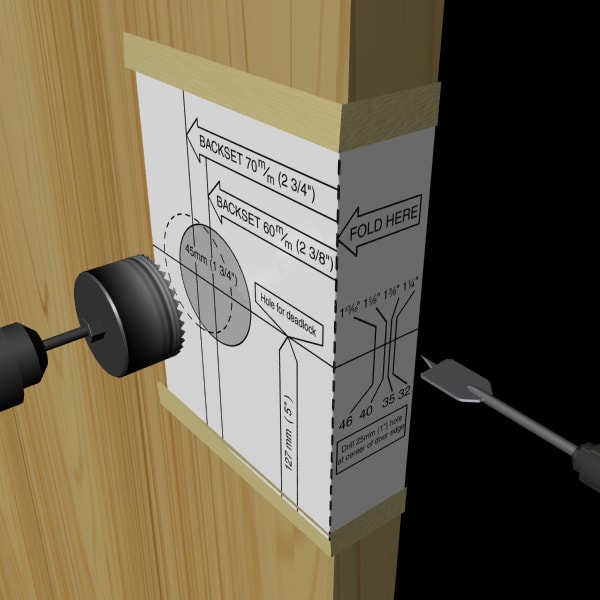
The latch hole installation separates professional results from amateur attempts when you learn how to install exterior door handle systems. This edge hole must be precisely positioned to ensure the latch bolt extends and retracts without binding—a misaligned hole causes handle stiffness and premature wear.
-
Position the latch plate against the door edge, aligning its center with your marked backset line. Use a pencil to trace the plate’s outline precisely.
-
Apply masking tape along the cutting line to prevent wood splintering. With your chisel bevel down, carefully remove wood within the outline to the depth of the latch plate—about 1/8 inch for most residential doors.
-
Drill the 1-inch edge hole using a spade bit at low speed. Place scrap wood behind the drilling area to prevent blowout. Stop drilling when the bit emerges into the main bore hole—over-drilling weakens the door structure.
Creating the Main Bore Hole for Handle Installation
The main bore hole houses the handle mechanisms and must be perfectly perpendicular to the door face. Even a slight angle here causes handle misalignment that makes operation difficult and accelerates component wear. This is where many DIYers rush and ruin their how to install exterior door handle project.
Measure twice to confirm your backset (2 3/8″ or 2 3/4″) from the door edge to the bore hole center. Clamp scrap wood behind your drilling point to prevent tear-out. Start drilling at the lowest speed setting with firm, consistent pressure—let the hole saw teeth do the work rather than forcing it. Periodically withdraw the bit to clear wood chips and check alignment. When the pilot bit emerges through the door, slow down dramatically to avoid splintering the exit surface.
Securing the Exterior Door Latch Mechanism
With both holes drilled, it’s time to install the latch—the component that actually locks your door. Proper latch installation ensures smooth operation and prevents the common issue of handles feeling “sticky” after installation.
Insert the latch mechanism into the edge hole with the beveled side facing the direction the door closes (the sloped side should face the door jamb). The latch bolt should slide freely when pressed. Secure the latch plate with the provided screws, but don’t fully tighten yet—this allows minor adjustments during final testing. Verify the latch extends and retracts smoothly by manually pressing the bolt; if resistance occurs, check for wood debris in the hole or misaligned components.
Installing the Door Strike Plate for Secure Closure
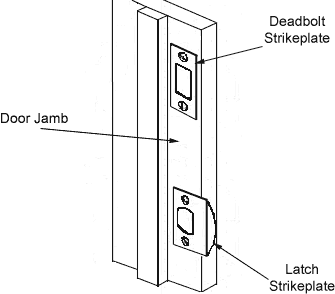
The strike plate is your door’s first line of defense, yet it’s often installed incorrectly during exterior handle installation. A poorly fitted strike plate causes doors to stick, won’t latch properly, or creates gaps that compromise security.
Close the door gently and mark where the latch bolt contacts the jamb. Use these marks to chisel a recess for the strike plate that matches its thickness—typically 1/8 inch deep. The hole for the latch bolt should be slightly larger than the bolt itself (about 1/16 inch clearance). Position the strike plate so the latch enters its curved channel smoothly, then secure with 2-inch screws that penetrate deep into the solid wood of the jamb for maximum holding power.
Mounting the Interior Handle Assembly Correctly
Many DIYers focus all attention on the exterior handle but neglect proper interior installation, which affects overall operation. The interior components must align perfectly with the exterior mechanism for smooth function.
Slide the interior spindle through the main bore hole from the inside. Position the interior handle so its mounting plate sits flush against the door. Most handles use set screws to secure the handle to the spindle—tighten these just enough to hold position without stripping the soft metal. Don’t fully tighten mounting screws yet; this allows minor alignment adjustments after exterior installation.
Attaching the Exterior Door Handle Properly
This is where your how to install exterior door handle project comes together. The exterior handle must align perfectly with the interior mechanism while maintaining weather resistance.
Position the exterior handle over the spindle protruding through the door. Align any drive slots or tabs with the spindle ends. Many exterior handles snap into place with a quarter-turn—listen for the click that confirms proper engagement. Before securing mounting screws, test handle operation to ensure smooth rotation without binding. Apply exterior-grade silicone sealant around the mounting plate edges to prevent moisture intrusion that causes rust and corrosion.
Installing Keyed Lock Mechanisms (If Applicable)
For handles with keyed entry, proper lock cylinder installation prevents the frustrating “key turns but nothing happens” scenario. Always install the lock cylinder in the unlocked position with the latch retracted.
Insert the key cylinder through the exterior faceplate, connecting it to the interior mounting plate. The tailpiece (the small metal rod extending from the cylinder) must engage precisely with the latch mechanism. Test key operation multiple times before final assembly—turning resistance indicates misalignment that needs correction. Once verified, secure all mounting plates while maintaining proper cylinder alignment.
Final Testing and Professional Adjustments
Never skip this critical phase of your exterior door handle installation. Proper testing ensures security, smooth operation, and longevity of your new hardware.
Start by operating both handles through multiple cycles—interior and exterior—checking for smooth motion without sticking. Close the door slowly to verify the latch engages the strike plate correctly. If the door binds, slightly deepen the strike plate mortise or adjust its position. Tighten all mounting screws in a star pattern to distribute pressure evenly. Apply graphite powder (never oil) to the latch mechanism for lasting smooth operation. Finally, check exterior seals to ensure no gaps allow moisture penetration behind the mounting plates.
Pro Tip: After 48 hours, recheck all screws—wood can compress slightly as it settles around new hardware. This simple step prevents future loosening that causes annoying handle wobble.
With your new exterior door handle properly installed, enjoy the confidence of knowing your main entry is both secure and operating smoothly. This upgrade not only improves security but also enhances your home’s curb appeal—making that daily approach to your front door just a little more satisfying.


