

Your sliding glass door has become a privacy nightmare. Every passerby gets an uninvited view of your living room, and harsh afternoon sun turns your space into a greenhouse. Vertical blinds solve both problems instantly—but only if installed correctly. A poorly mounted system will snag on door handles, sag in the middle, or leave frustrating light gaps. This guide delivers battle-tested steps for a professional installation that glides smoothly and blocks every ray. You’ll learn exactly how to measure for zero gaps, avoid the #1 handle-clearance mistake 80% of DIYers make, and choose between ceiling or wall mounting for your specific door.
Essential Tools for Flawless Vertical Blind Installation
Skip any of these tools and you’ll risk crooked brackets or wall damage. For sliding door installations, you need specialized equipment beyond basic household items. Grab a sturdy A-frame ladder—working at ceiling height requires stability. Your drill must handle masonry bits if mounting above tile or stone thresholds. Crucially, invest in a laser level instead of a bubble level; the longer span of sliding doors magnifies even 1/8-inch errors. Don’t forget heavy-duty hollow-wall anchors rated for 50+ pounds—standard anchors fail under blind weight.
- Must-have checklist: 12V cordless drill with 3/16″ masonry bit, laser level, 25-foot tape measure, stud finder (Zircon StudSensor recommended), drywall anchors (ToggleBot anchors for hollow walls), 1.5″ #8 coarse-thread screws for wood studs
- Pro tip: Test anchors in scrap drywall first. Load them with 2x the blind’s weight (check manufacturer specs) for 24 hours. If anchors pull through, upgrade to snap-toggle anchors.
Precision Measurements That Prevent Light Leaks
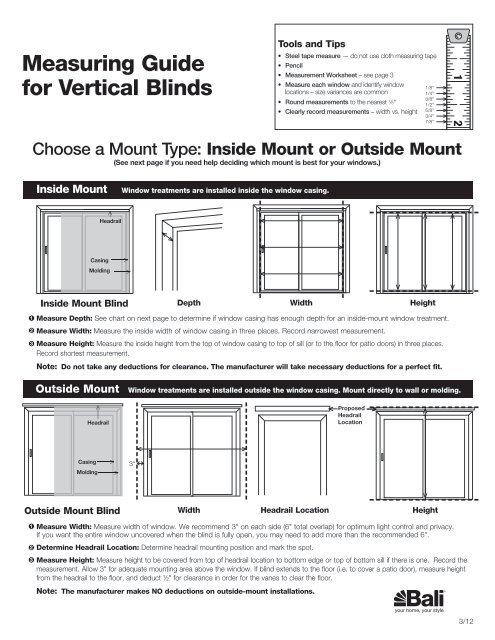
Measuring wrong ruins vertical blinds on sliding doors 90% of the time. Forget single-point measurements—doors warp and frames aren’t square. For outside mounts (95% of door installations), measure width at top, middle, and bottom of the frame. Use the smallest width measurement, then add 6 inches total (3″ per side) for full coverage beyond the glass. Height requires two critical checks: from ceiling to floor and from door header to floor. The difference reveals your mounting height buffer.
Critical clearance calculation: Open your sliding door fully. Measure the vertical arc of the handle at its highest point. Your vanes must clear this by 1.5 inches minimum. If clearance is under 2″, ceiling mounting becomes mandatory—wall mounting will cause collisions. For split systems (doors opening from center), measure each panel separately. Deduct 1/4″ from total width for center gap to prevent vanes binding.
Mounting Surface Selection: Ceiling vs. Wall Decoded
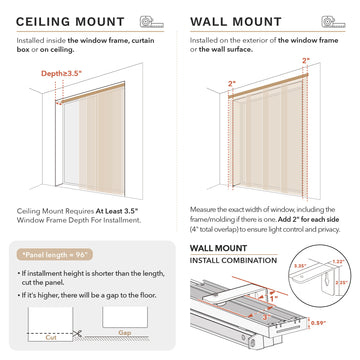
Ceiling mounting eliminates handle interference permanently. This method positions vanes above the door’s operational zone. Ideal for doors with protruding handles or frequent use. Locate ceiling joists with a stud finder—joists run perpendicular to floorboards. If joists don’t align with your marks, install a 1×2″ mounting board spanning two joists, then attach brackets to the board. This distributes weight safely.
Wall mounting works only with perfect clearance. Measure from door header to your marked bracket position. If this distance is less than your handle’s arc height plus 1.5″, skip wall mounting. For brick or tile walls, use masonry anchors and a hammer drill. Never mount brackets lower than 4 inches above the header—this causes vanes to scrape the door track during operation.
Step-by-Step Installation: From Marking to Final Test
Mark Bracket Positions with Laser Precision
Position your ladder centered on the door. Place the headrail against the ceiling, extending 3″ beyond each side of the glass. Rest a 4-foot level on the rail. Activate your laser level to project a horizontal line across the ceiling. Mark bracket holes through the rail’s mounting slots—do not eyeball positions. For split systems, mark the center point first using a plumb bob from the door’s meeting stile. Install the center bracket 1/8″ left of center to prevent vane jamming.
Warning: If drilling near electrical conduits (common above sliding doors), shut off power at the breaker first. Use a stud finder with AC wire detection.
Drill Pilot Holes and Secure Brackets
Pre-drill holes 1/16″ smaller than your screw diameter. For drywall, insert anchors before bracket placement—forcing anchors during bracket mounting twists the bracket out of level. Drive screws until snug, then back off 1/4 turn before final tightening. This prevents drywall blowout. Check bracket alignment with the laser line after each screw. For ceiling joists, use 2.5″ structural screws.
Time-saver: Attach brackets to the headrail first using temporary screws. Lift the entire assembly into position, then drive permanent screws through rail slots. Reduces ladder climbing by 60%.
Load Vanes and Connect Control Systems
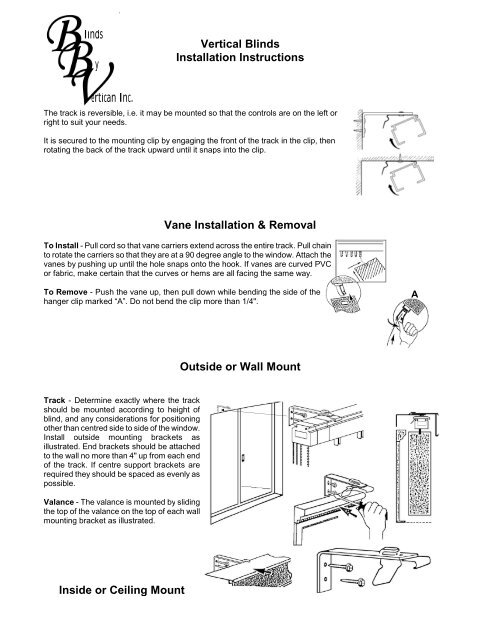
Insert carriers onto the headrail track first—most failures happen here. Snap carriers in until you hear two distinct clicks. Space them evenly using the manufacturer’s template (usually 3.5″ apart). Hang vanes by hooking the top tab into carrier clips, then rotating downward until locked. For split systems, install left-side vanes first—right-side vanes often have a reverse hook mechanism.
Attach the tilt wand by inserting its base into the headrail’s geared end cap. Pull firmly until it clicks. Thread the draw chain through pulleys in this sequence: master carrier → right pulley → left pulley → wand housing. Test chain tension—ideal slack is 2 inches between pulleys.
Final Operational Testing Protocol
Operate the tilt wand through full 180° rotation. Vanes should move in perfect unison with no lag. If vanes bind, realign carriers using a flathead screwdriver. Pull the draw chain to stack vanes fully. They must clear the door jamb by at least 2 inches when gathered. Open and close the sliding door 10 times while observing vane-handle clearance. If vanes sway toward the door, add a bottom-weight clip to every third vane.
Troubleshooting tip: If chains jump pulleys, reduce tension by shortening the chain at the wand housing. Never lubricate pulleys—dust attraction worsens skipping.
Sliding Door-Specific Fixes You Can’t Skip
Split system installation is non-negotiable for center-opening doors. Single-rail blinds will block door movement. During measurement, note the exact gap between door panels when closed—your center bracket must sit within this gap. Install left and right headrails independently, testing each side’s operation before connecting center brackets.
Handle clearance requires dynamic testing. Place a laser pointer on the handle during door operation. Trace its arc on the wall. Your vane bottom must sit above this line. If clearance is tight, mount the headrail 1 inch higher and trim vanes equally from the top—never the bottom.
Prevent track sag on wide doors. For spans over 8 feet, add a center support bracket midway between end brackets. Use a tension rod temporarily across the track during installation to maintain alignment.
Ceiling vs. Wall Mounting: Which Wins for Your Door?
Ceiling mounting dominates for sliding doors. It creates seamless floor-to-ceiling coverage and eliminates handle interference. Best for rooms with 9+ foot ceilings where the height won’t overwhelm the space. Requires precise joist location but delivers rock-solid stability. Downside: slightly more complex alignment due to overhead work.
Wall mounting suits low-clearance situations. Only viable if you have 5+ inches of header space above the door. Calculate your “stackback”—the width vanes occupy when fully drawn. For a 10-foot door, stackback can be 24 inches. Ensure this space is clear of furniture and door handles. Wall mounting fails when installers ignore stackback, causing vanes to collide with door jambs.
Maintenance Secrets for Lifelong Smooth Operation
After installation, perform these monthly: Wipe vanes with microfiber cloth dampened with 1:10 vinegar-water solution. Vacuum track grooves with a brush attachment to prevent dust buildup. Every 6 months, remove 3 carrier clips, clean the track with rubbing alcohol, and reinsert clips. If chains become stiff, rub paraffin wax along pulley contact points—never use oil-based lubricants.
For corded systems, immediately replace frayed draw chains. Upgrade to cordless mechanisms using retrofit kits (available for most brands). This eliminates child safety hazards while adding motorization capability. If vanes develop a permanent curve, remove them overnight and hang weights from the bottom to restore straightness.
Final tip: Photograph your bracket positions before disassembly for future replacements. Keep 2 spare vanes and carriers in your closet—sun exposure fades replacement parts within months. With this installation method, your vertical blinds will operate silently for 10+ years, transforming that glaring sliding door into a privacy fortress that welcomes light on your terms.


