
That frustrating moment when you’re deep in work only to be interrupted—again—by someone who didn’t see your hastily taped “Do Not Disturb” note. Or the exhaustion of new parenthood when you desperately need baby’s door to signal “Sleeping Infant Inside.” How to make a door knob hanger solves these problems with a personalized, professional-looking solution you can create in under an hour. Forget flimsy store-bought signs that slide off or look generic. This DIY project transforms ordinary materials into sturdy, eye-catching indicators that stay put through multiple door openings. Whether you’re crafting a “Shhh… In a Meeting” sign for your home office or a “Knock Before Entering!” tag for your teenager’s room, this guide delivers exactly what you need: clear, actionable steps using budget-friendly supplies. You’ll learn to build a hanger that fits any standard door knob while adding your unique creative flair—no advanced skills required.
Why Your DIY Door Knob Hanger Solves Common Household Messaging Problems
Standard door signs fail because they’re either too flimsy to stay visible or too generic to convey urgency. A custom door knob hanger you make yourself solves both issues by fitting perfectly over round knobs and communicating your specific need—whether it’s “Baby Sleeping” for new parents or “Deep Work in Progress” for remote workers. Unlike mass-produced versions that often slip off after two door openings, your handmade version uses a secure hanging mechanism tailored to your door’s dimensions. Most importantly, it transforms a functional item into personal decor that matches your home’s aesthetic. When you make a door knob hanger with intentional design choices, family members actually notice and respect the signal instead of overlooking another disposable note. This isn’t just about convenience; it’s about creating household harmony through thoughtful communication.
Essential Materials for Your Door Knob Hanger Project (3 Base Options)

Your material choice determines durability and decoration options. Skip generic “materials list” headings and focus on real-world applicability for different skill levels.
Wood Options for Long-Lasting Professional Results
Choose 1/8-inch plywood, balsa wood, or pre-cut craft wood blanks from hardware stores for hangers that withstand daily use. A 4×6-inch piece creates standard signage, while thicker 1/4-inch wood supports heavier finishes. Always sand edges first—this prevents splinters and creates smooth painting surfaces. Hardware stores often cut wood to size for free if you bring your template, eliminating the need for power tools at home.
Cardboard and Cardstock Solutions for Quick Projects
Grab a manila file folder or 110-lb cardstock for same-day results. The cardboard’s rigidity outperforms standard paper while remaining cuttable with scissors. For extra durability, glue two layers together with wood glue before decorating. This option shines for temporary signs like “Happy Birthday!” where longevity matters less than speed. Avoid cereal boxes—they warp easily and lack structural integrity for repeated use.
Felt and Fabric Alternatives for Child-Friendly Crafting
Thick felt (at least 2mm) works beautifully for kid-safe projects. Its no-fray edges eliminate sanding needs, and fabric markers create vibrant designs without paint fumes. Cut two identical shapes and glue them back-to-back for double-sided messaging. This material’s soft texture prevents door damage during frequent hanging—critical for households with delicate antique doors.
Step 1: Design Your Door Knob Hanger Message and Shape for Maximum Impact
Your design determines whether the sign gets ignored or acted upon. Start by measuring your actual door knob—most require a 1.5-inch gap between hanging points. Sketch directly on your base material using a pencil and ruler: rectangles (3.5″x5.5″) suit formal messages, while circles or clouds soften “Do Not Disturb” for kids’ rooms. For legibility, keep text block height under 2 inches with bold, sans-serif fonts. Pro tip: Write your message backward on tracing paper, then flip and rub it onto your base for perfect transfer—no shaky freehand lettering needed. Always leave 0.5 inches of clear space around edges to prevent paint bleed during decoration.
Step 2: Cutting Your Door Knob Hanger Base Without Special Tools
Skip the jigsaw with these accessible techniques. For wood: clamp your template to the board, then use a coping saw with short, controlled strokes. Rotate the wood—not the saw—to maintain straight lines. Cardboard requires a utility knife: score along your outline three times with a metal ruler as guide before cutting through. Felt needs sharp fabric scissors—cut in one smooth motion without stopping to avoid jagged edges. Critical warning: Never cut toward your body. Place materials on scrap wood and anchor with non-slip matting. After cutting, immediately check fit by placing the hanger over your actual door knob; adjust size if it slides off when tilted.
Step 3: Sanding Edges Smooth for Safe, Professional Results
This step separates amateur from professional-looking hangers. Use 220-grit sandpaper wrapped around a block for wood edges—sanding in the direction of the grain prevents scratches. Apply light pressure until edges feel uniformly smooth (about 30 seconds per side). For cardboard, lightly sand only the cut edges to remove fibers that catch paint. Felt requires no sanding but benefits from a quick run with a lint roller to remove stray fibers. Hold your hanger up to light after sanding; any dark lines indicate rough spots needing more work. This isn’t optional: unsanded edges absorb uneven paint, creating blotchy finishes that look cheap.
Step 4: Painting and Lettering Your Door Knob Hanger Sign Clearly
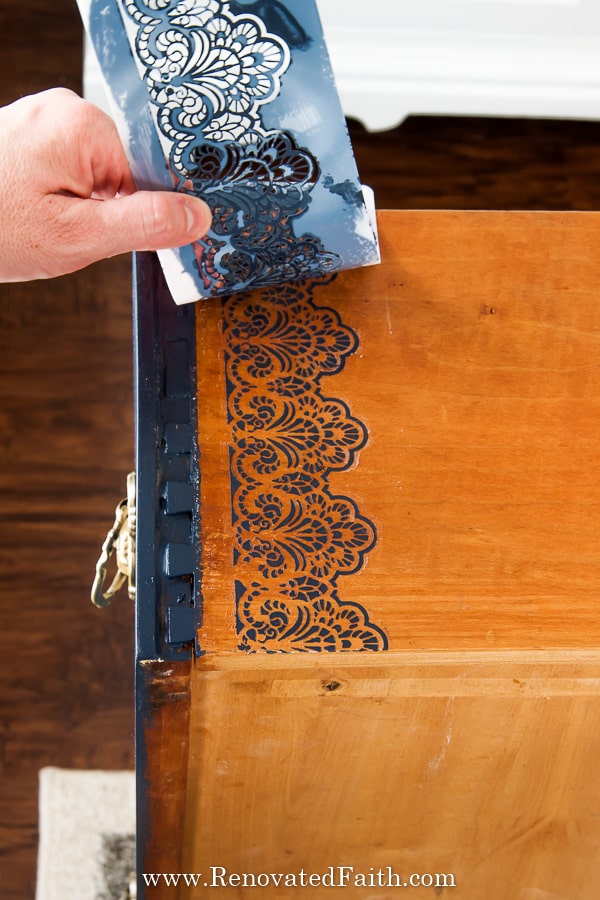
Achieve crisp results with this painting sequence: First, apply one thin coat of white acrylic primer—this blocks wood grain and makes colors pop. Let dry 20 minutes. Next, paint your base color with craft paint using a 1/2-inch flat brush; two thin coats beat one thick coat that drips. For lettering: print your message at actual size, cut out letters, and tape the sheet over your hanger. Use an X-Acto knife to trace through letters, creating stencil grooves. Remove paper, then fill grooves with paint using a stippling motion (dabbing brush vertically). Wait 10 minutes before carefully peeling off excess paint at stencil edges. Skip markers—they bleed on porous surfaces and fade faster than paint.
Step 5: Installing the Hanging Mechanism That Fits Any Door Knob
A poorly designed hanger slips off after two uses. Create a secure loop with these tested methods: For ribbon, drill two 1/8-inch holes 1 inch apart at the top. Thread 18-inch satin ribbon through both holes from front to back, then tie ends in a square knot on the backside—this creates a 2-inch loop that won’t stretch. For hardware-free hanging, glue a small metal keyring to the back using E6000 adhesive; it hooks directly over knobs without sliding. Test your hanger by hanging it on a closet knob and opening/closing 10 times—adjust loop size if it dislodges. Never use string; it frays quickly and creates weak points.
Step 6: Adding Personal Touches and Protective Coatings
Make your hanger last months instead of days with these finishing touches. Apply a clear matte Mod Podge sealant with a foam brush—this protects against moisture from hands without adding shine. For wood hangers, rub mineral oil into the backside to prevent warping from humidity. Add dimension with glued-on elements: small wooden shapes for 3D lettering, or glitter applied only to painted areas (avoid raw wood/cardboard where it won’t adhere). For nurseries, attach a tiny fabric bow; for offices, use metallic accents that catch light. Crucially, let sealant dry 24 hours before first use—rushing this causes sticky surfaces that attract dust.
5 Creative Door Knob Hanger Messages for Every Room in Your Home
Move beyond basic “Do Not Disturb” with context-specific messaging. For home offices: “Camera On—Please Wait” with a red border signals active video calls better than generic warnings. Nurseries need dual-sided signs: “Baby Asleep—Walk Quietly” on one side, “Awake & Playing” on reverse. Teen rooms respond to humor: “Enter Only If Bringing Snacks” in bold comic font reduces door slamming. Guest rooms shine with hospitality: “Welcome, [Name]!” paired with local attraction icons. Most effective are seasonal switches—“Deck the Halls Inside!” for holidays or “Summer Vacation Mode: Knock Loudly” in July. Always match message tone to household dynamics; stern warnings backfire in playful families.
Kid-Friendly 5-Minute Door Knob Hanger: No Tools Required
When children need to create their own “Do Not Disturb” signs, skip sharp tools entirely. Grab a bright file folder and fold it vertically into a 4×6-inch “A” shape—no cutting needed. Use washable markers to write messages on both sides (thick letters show through better). Punch a single hole through the folded top edge with a standard office hole punch. Thread 12 inches of yarn through, tie ends securely, and trim excess. The folded design creates instant rigidity while the yarn loop stretches over knobs effortlessly. Kids can decorate with stickers during assembly—no drying time required. This version withstands 2-3 weeks of use before needing replacement, perfect for short-term needs.
Fixing Common Door Knob Hanger Problems Before They Happen
Avoid these frequent pitfalls: Slipping hangers occur from oversized loops—measure your knob diameter and make loops only 10% wider. Faded messages happen when skipping primer; always seal painted surfaces. Warped wood results from uneven paint coats—apply identical layers front and back. For cardboard versions that bend, reinforce the back with glued-on craft stick lattice. If your hanger tilts sideways when hung, add a small adhesive-backed felt pad to the bottom edge for counterbalance. Pro tip: Keep a “hanger repair kit” with spare ribbon, sandpaper scraps, and touch-up paint—most issues take under 60 seconds to fix.
Creating your own door knob hanger transforms a simple craft into a powerful household communication tool. By following these precise steps, you’ll produce signs that stay securely in place while conveying your exact message with professional polish. Remember to measure your specific door knob before cutting, seal all painted surfaces, and test hanging stability before final installation. The real magic happens when family members consistently respect these personalized signals—reducing interruptions during critical moments whether you’re nursing a newborn or closing a business deal. For ongoing success, rotate designs seasonally to maintain visual impact, and always involve kids in making their own versions to encourage compliance. Your next project? Try making coordinating hangers for all household doors using the same base technique—each under $3 to produce. The confidence of knowing your “Do Not Disturb” sign will actually work is worth far more than the minimal effort invested.


