
That icy sliver of air sneaking under your door isn’t just annoying—it’s silently hiking your energy bills by up to 20% during extreme weather. A homemade door wind stopper (also called a draft snake or excluder) seals this gap instantly, blocking cold drafts, dust, and noise while keeping your heated or cooled air where it belongs. Forget expensive store-bought versions. In this guide, you’ll discover exactly how to make a custom wind stopper tailored to your door’s unique gap using basic sewing skills and household materials. You’ll save money, reduce energy waste, and enjoy a cozier home in under 30 minutes.
Why Your DIY Wind Stopper Beats Store-Bought Models
Commercial wind stoppers often fail because they’re one-size-fits-all. A homemade version solves your exact draft problem. Measure your door gap first—most exterior doors have a 3/4-inch to 1.5-inch space underneath. Fill your stopper with dense rice or beans to match this height, creating a perfect seal that flexes to uneven floors. Unlike rigid store models, your DIY version will contour to baseboards and thresholds, eliminating costly air leaks. Plus, you control the aesthetics—choose fabric matching your decor instead of generic beige tubes. This simple project pays for itself in one winter’s reduced heating costs.
Grab These 7 Must-Have Supplies Before You Start Sewing
Don’t waste time mid-project hunting for materials. Gather these essentials first—all available at craft stores or in your pantry.
Choose the Right Fabric for Maximum Durability
Skip flimsy quilting cotton. Your wind stopper needs heavyweight fabric to withstand daily foot traffic and door sweeps. Reach for:
* Canvas or duck cloth (best for high-traffic areas)
* Upholstery-weight cotton (ideal for decorative rooms)
* Denim or corduroy (adds texture and grip)
* Heavy twill (resists fraying at seams)
Pro Tip: Pre-wash and iron fabric to prevent shrinkage after your stopper is complete. For pet-friendly homes, select tightly woven fabrics that won’t snag claws.
Select Your Filler Based on Door Gap Size
The filler determines sealing power. Match it to your draft severity:
* Heavy drafts (exterior doors): Use rice or dried beans (1.5x denser than pellets)
* Medium drafts (interior doors): Poly-pellets or lentils (less messy than rice)
* Light drafts (closets): Recycled plastic bags or fabric scraps
* Moisture-prone areas: Clean cat litter (absorbs humidity)
Critical Warning: Never use sand—it compacts unevenly and can burst seams. Rice is ideal but must be completely dry to prevent mold. Add 1 tablespoon of cornstarch per cup to absorb ambient moisture.
Essential Tools Checklist
- Measuring tape (not a ruler—measure door width precisely)
- Rotary cutter or sharp fabric scissors
- Sewing machine with heavy-duty needle (size 90/14)
- ½-inch wide funnel (chocolate syrup bottles work in a pinch)
- Fabric clips (avoid pins—they slip on thick materials)
- Iron (for crisp seam folds)
- Chalk marker (visible on dark fabrics)
Measure Twice: The Exact Math for a Gap-Proof Wind Stopper
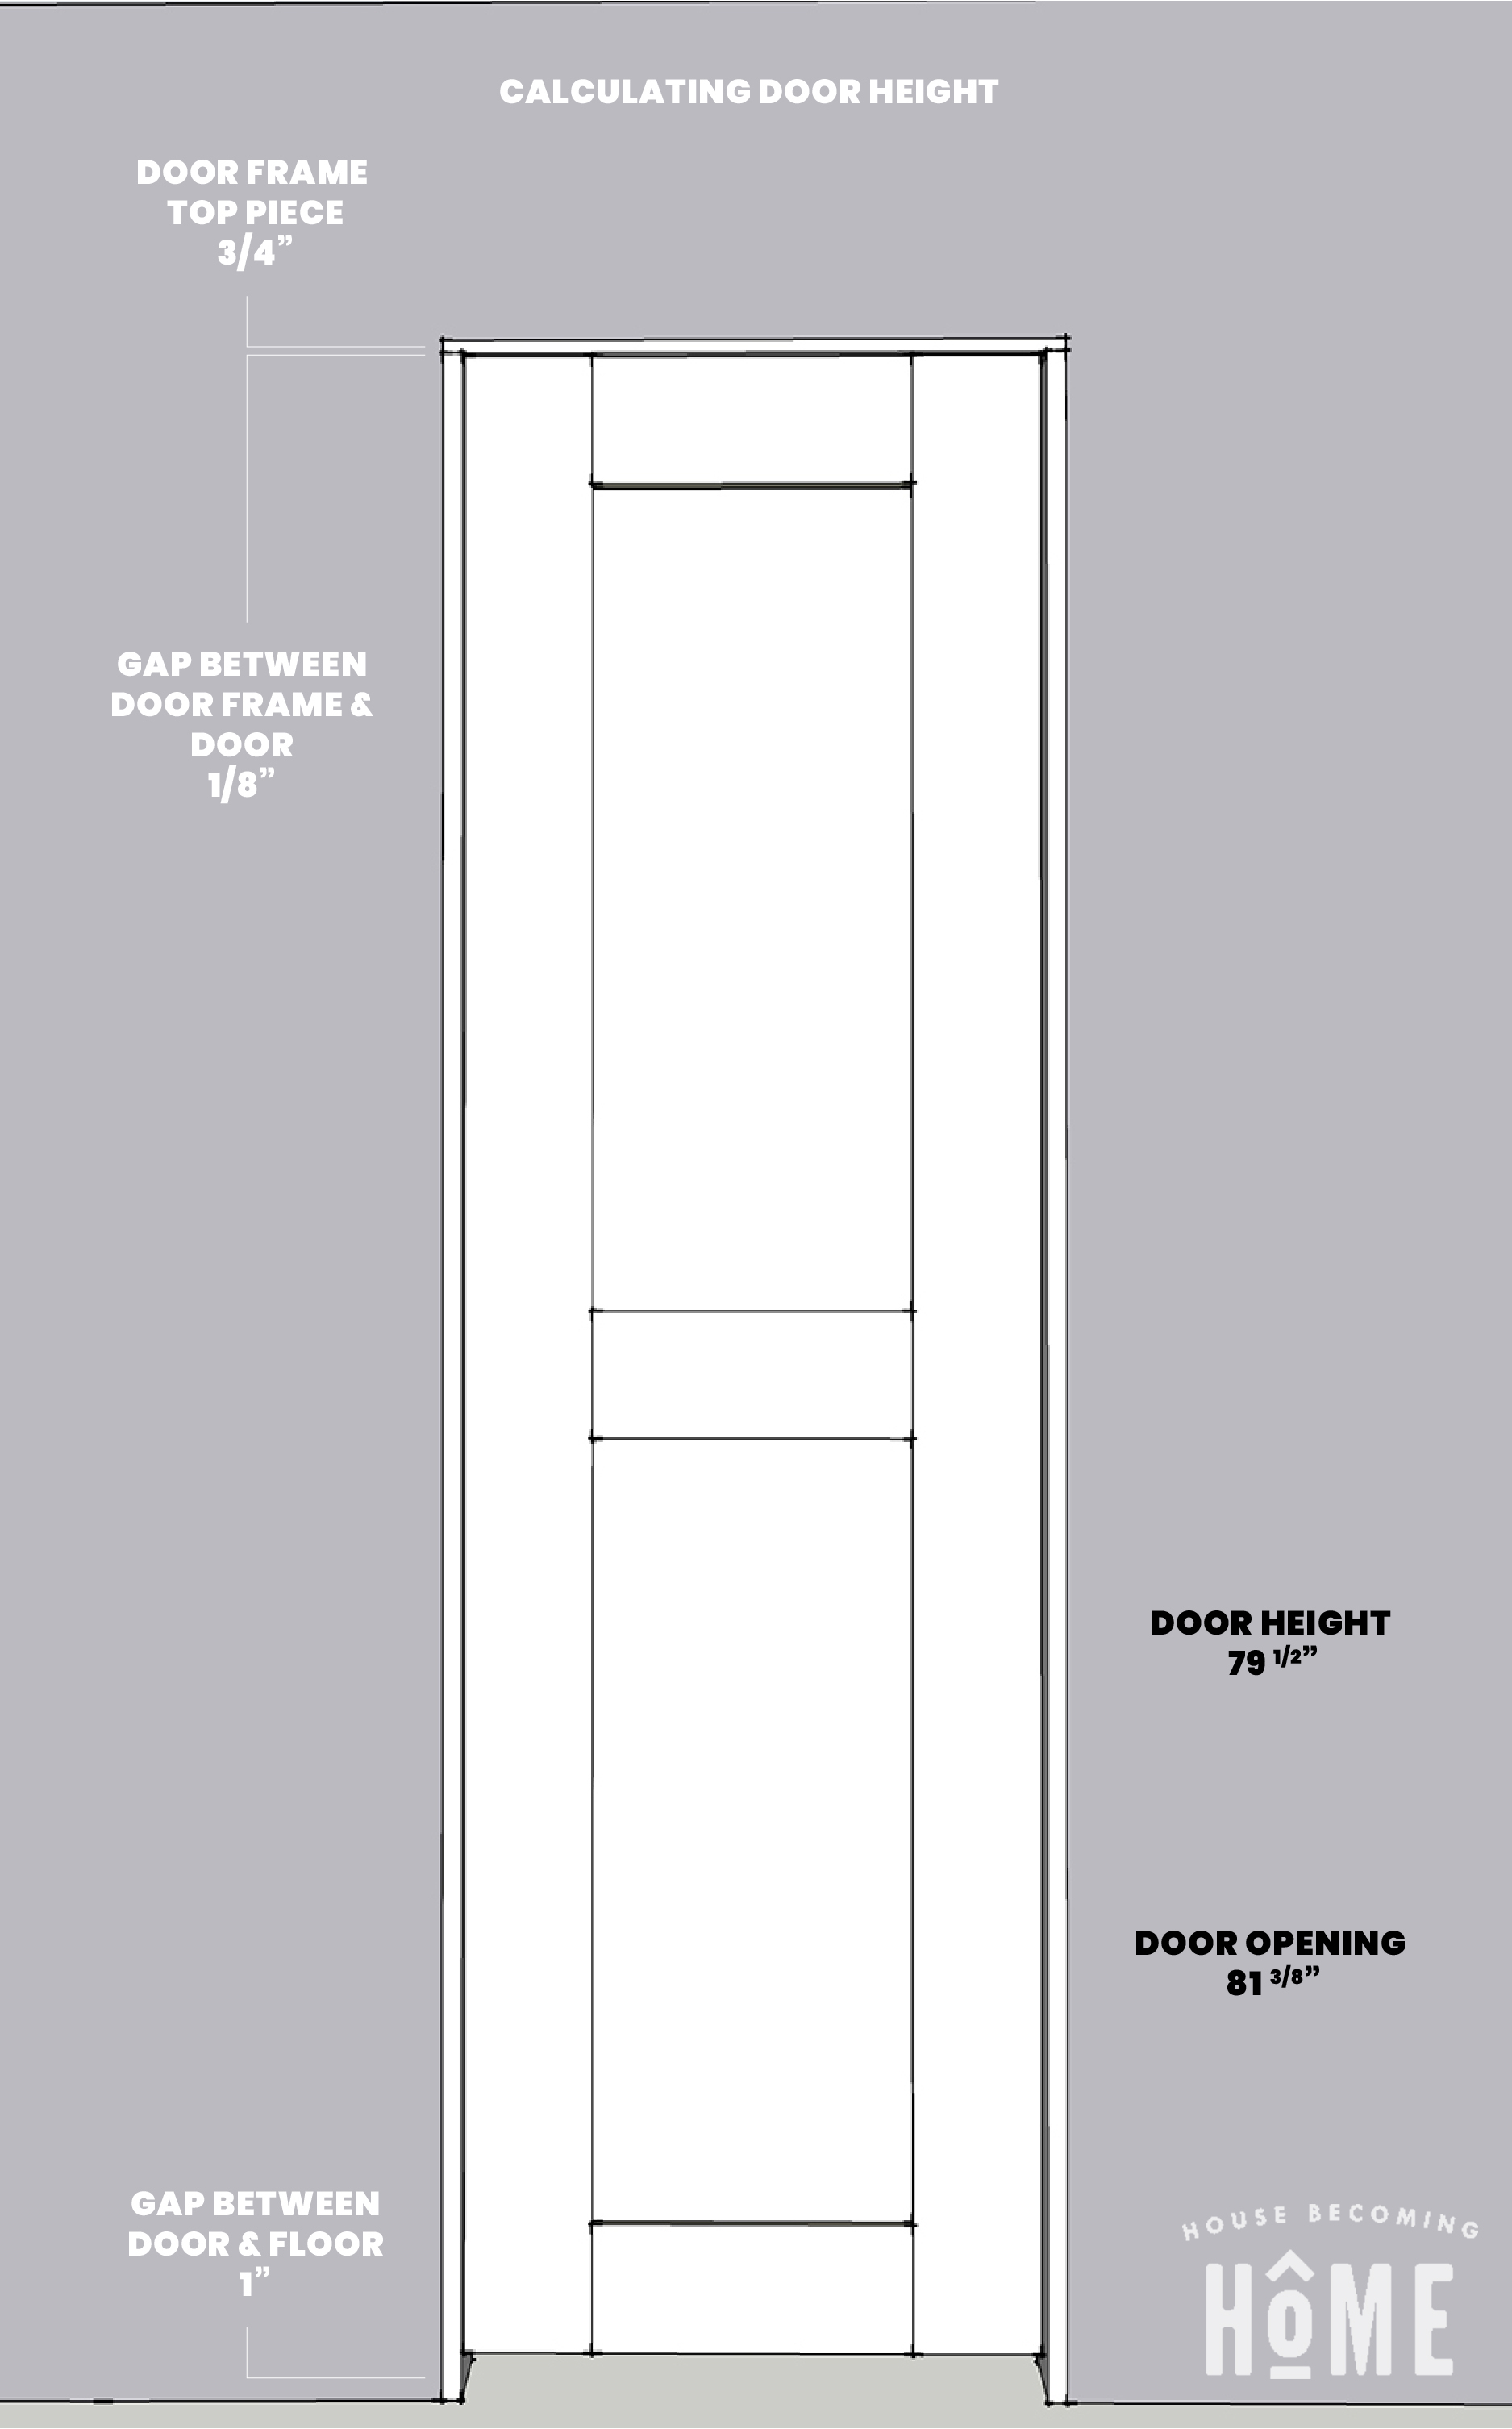
A stopper that’s 1 inch too short leaves a draft highway. Get measurements right on the first try.
Calculate Your Door’s Perfect Dimensions
- Measure door width at floor level (most doors taper). Add 5 inches to this number—for a standard 36-inch door, cut fabric to 41 inches long.
- Determine filler depth: Place a business card under your door. If it slides freely, you need a 1.5-inch diameter stopper. Use this formula:
Fabric width = (3.14 × desired diameter) + 1 inch seam allowance
Example: For a 1.5-inch stopper (4.71-inch circumference), cut fabric 5.75 inches wide.
Why 5 extra inches? This allows the ends to curve upward against door jambs, creating a 360-degree seal commercial models miss. Test your math: Roll a newspaper to your calculated diameter—if it blocks light under your door, you’ve got it right.
Sew Your Wind Stopper in 5 Foolproof Steps (No Expertise Needed)
Follow this sequence to avoid common mistakes that cause filler leaks or lumpy shapes.
Step 1: Cut and Prep Fabric Like a Pro
Cut one rectangle using your measurements. For a 36-inch door:
– Length: 41 inches (door width + 5 inches)
– Width: 5.75 inches (for 1.5-inch diameter)
Iron fabric flat—wrinkles cause uneven seams. Place chalk marks every 10 inches along the length to guide filler distribution later.
Step 2: Sew the Tube Seam Without Puckering
With fabric right sides together, align short ends. Pin with fabric clips (they won’t snag thick material). Sew a ½-inch seam using a longer stitch length (3.0mm). Backstitch firmly at start/end—this seam bears all the weight. Turn tube right-side-out using a safety pin taped to the end.
Step 3: Seal the First End for Zero Leaks
Fold raw edge inward ¼ inch, then fold again ½ inch to encase raw fabric. Iron flat. Topstitch close to the inner folded edge with tight stitches (2.0mm length). This double-fold method prevents rice grains from escaping—skip this and you’ll have filler dust everywhere.
Step 4: Fill to 85% Capacity (The Critical Mistake Most Make)
Attach funnel to open end. Pour filler slowly while shaking tube downward. Stop at 85% full—for a 41-inch stopper, that’s about 4 cups of rice. Overfilling causes bulges that prevent flat contact with the floor. Test firmness: It should bend easily over your knuckle but not feel empty.
Step 5: Close the Final End with a Hidden Stitch
Fold raw edge inward ½ inch twice to match the first end. Hand-sew using a ladder stitch:
1. Knot thread inside the tube
2. Stitch through folded fabric fold (not filler!)
3. Pull tight after every 3 stitches
4. Hide knot inside the tube
Never machine-stitch the final end—it risks puncturing filler. Check for leaks by holding stopper over a light source—no grains should be visible.
Fix These 3 Common Wind Stopper Failures Immediately

Even perfect construction can fail if placed wrong. Solve these issues in minutes.
Stopper Slides on Hardwood or Tile Floors
- Cause: Smooth surfaces + light filler
- Fix: Glue non-slip rug pad strips (1-inch wide) along the bottom seam using E6000 adhesive. Let dry 24 hours before use. For rentals, use removable adhesive dots under the stopper.
Gaps Appear at Door Jambs
- Cause: Stopper too short for door width
- Fix: Unstitch one end, add a 3-inch fabric extension, then resew. Never stretch the stopper—it creates weak spots. For French doors, make two separate stoppers.
Filler Settles at One End
- Cause: Overfilling or uneven shaking
- Fix: Add 2-3 horizontal fabric dividers during construction: After Step 2, sew vertical lines every 12 inches through both fabric layers. This traps filler in compartments.
Maintain Your Wind Stopper for Years of Draft Blocking
Extend lifespan with these pro maintenance moves.
Cleaning Without Destroying It
- Spot clean only: Damp cloth with 1:1 water/vinegar solution
- Never immerse: Moisture ruins rice/bean fillers
- Deep clean hack: Make a zippered cover—remove for machine washing while filler stays dry inside
Seasonal Swaps for Year-Round Comfort
- Winter: Rice + dried beans (heaviest seal against cold)
- Summer: Poly-pellets (won’t attract pests in humidity)
- Allergy season: Add dried lavender to filler (repels dust mites)
Why This $5 DIY Beats $30 Store Models
Commercial wind stoppers use thin fabric and light fillers that flatten in weeks. Your handmade version lasts years because:
– Custom density: Match filler weight to your exact draft severity
– Reinforced seams: Double-folded ends prevent leaks
– Perfect length: 5-inch overhang seals jambs completely
– Eco-friendly: Upcycled fillers like plastic bags cut waste
Place your finished stopper under the door tonight. Within minutes, you’ll feel the difference—no more icy ankles in winter or whistling gaps in summer. This isn’t just a craft project; it’s a permanent fix for uncomfortable rooms and bloated energy bills. When the wind howls outside, your draft-free sanctuary stays perfectly comfortable.
Final Pro Tip: Make two stoppers—one for your front door, one for the bedroom. Keep them in a closet ready for seasonal changes. For sliding glass doors, double the width measurement and use extra-heavy filler to combat larger gaps. You’ve now mastered the simplest, most effective weapon against drafts—no contractor needed.


