
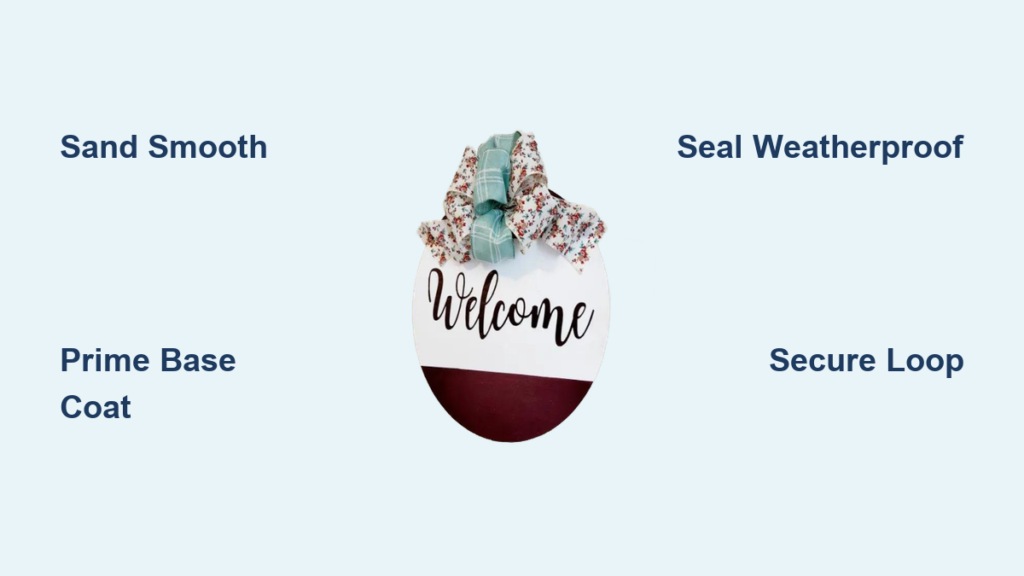
That blank front door begging for personality? A handmade round door hanger solves it instantly—no fancy tools required. Unlike mass-produced decor, your custom creation welcomes guests with genuine warmth while reflecting seasonal changes or family milestones. Learning how to make a round door hanger transforms basic supplies into eye-catching focal points that cost pennies compared to store-bought versions. You’ll discover why circular designs outlast flat alternatives through weather shifts, plus exactly which materials prevent peeling paint disasters. By the end of this guide, you’ll confidently craft weather-resistant hangers that survive porch swings and playful kids alike.
Most beginners waste hours sanding rough edges or choosing the wrong sealer—only to watch their artwork crack after two rain showers. I’ve watched crafters skip the critical sanding step, then struggle as paint flakes off within weeks. Your solution starts with selecting the right foundation: a 1/4-inch thick wooden circle (8-12 inches wide) provides the perfect blend of sturdiness and lightness. Forget flimsy cardboard—it warps instantly outdoors. This guide cuts through guesswork with battle-tested techniques from start to hang, so your creation lasts seasons instead of weeks. Let’s transform that blank wooden round into a showstopper.
Gather Your Round Door Hanger Crafting Supplies
Skipping proper material prep guarantees frustration later—especially when glue fails or paint runs. Use this exact checklist to avoid mid-project store runs and ensure professional results. Every item serves a specific purpose in creating durable, photo-worthy decor.
Must-Have Materials for Flawless Execution
- Wooden base: An 8-12 inch diameter sanded wooden circle (avoid cardboard—it warps outdoors)
- Paint system: Acrylic craft paint plus primer for raw wood, assorted brushes (wide for base coats, small for details)
- Design tools: Stencils, paint pens, or decoupage medium for transferring patterns
- Embellishments: Faux florals, wood-slice accents, or monogram letters sized proportionally
- Adhesives: High-temp hot glue gun for heavy items, strong craft glue for delicate pieces
- Finishing kit: Fine-grit sandpaper (220), matte/satin spray sealer, and weatherproof hanging ribbon
Critical Mistakes to Avoid Now
Never skip sanding your wooden base—those microscopic splinters sabotage paint adhesion. And resist cheap craft paint; artist-grade acrylics resist UV fading. Pro tip: Buy two extra glue sticks. Hot glue cools faster than you think when attaching heavy floral picks, and re-melting creates weak bonds.
Sand Your Wooden Circle Base Smooth for Perfect Painting

Rough surfaces invite premature chipping—especially where hinges rub against your door. Proper preparation takes 10 minutes but multiplies your hanger’s lifespan threefold. This step separates amateur attempts from gallery-worthy results.
Why Sanding Makes or Breaks Your Finish
Grab 220-grit sandpaper and smooth the entire wooden circle, including edges. Focus on any grain splinters that catch your fingernail—they’ll bubble under paint. Wipe thoroughly with a dry microfiber cloth afterward; dust particles cause dimples in your base coat. Test smoothness by stroking the surface palm-down: if it snags skin, sand 30 seconds more. Skipping this invites peeling within weeks as humidity swells untreated wood.
Paint a Flawless Base Coat Without Brush Streaks
Thin layers beat thick globs every time—especially on curved surfaces where drips hide in shadows. Rushing this step wastes paint and creates texture that shows through delicate designs. Patience here ensures crisp lettering later.
Step-by-Step Painting Technique
- Apply primer first if using raw wood (prevents tannin bleed-through)
- Load a wide brush with paint, then wipe excess on the can’s rim
- Paint in long, even strokes following the circle’s curve
- Let dry 60+ minutes before adding second coat
- Repeat for third coat if light colors show wood grain
Never dunk your brush deep in paint—saturating causes drips on edges. For foolproof coverage, hold the wooden circle vertically while painting; gravity pulls paint downward for smoother distribution. Matte finishes hide minor imperfections better than glossy.
Create Your Custom Design: Stencils, Freehand, or Decoupage
This is where personality shines—whether a spring floral motif or family monogram. The key? Working with your base coat’s texture, not against it. Many crafters ruin hours of work by pressing too hard with stencils.
Three Foolproof Design Methods
Stenciling success: Tape stencils firmly, then dab paint upward with a stencil brush (not side-to-side). Lift tape immediately after painting to prevent peeling wet paint.
Freehand confidence: Sketch designs lightly in pencil first—eraser marks vanish under base coat. Start with simple shapes like leaves or script initials.
Decoupage magic: Cut paper/fabric slightly larger than your circle, then apply decoupage medium to both surfaces. Smooth from center outward to avoid bubbles.
Pro tip: Practice designs on scrap paper first. If paint bleeds under stencils, your brush is too wet or you’re pressing too hard.
Attach Decorative Elements and Personalized Lettering
Embellishments make or break visual balance—lopsided flowers scream “rushed project.” Strategic placement creates focal points that draw eyes naturally. Many crafters glue heavy items first, causing the hanger to tilt when hung.
Precision Placement and Secure Attachment
Arrange all decorations on your painted circle before gluing. Step back 3 feet to check balance—your eye catches asymmetry faster than close-up. For heavy items like wood slices:
– Apply hot glue in zigzags (not dots) for maximum grip
– Press firmly for 30 seconds while cooling
– Add a drop of craft glue underneath for insurance
For lettering: Use paint pens on dry paint, or glue pre-cut wooden letters. Outline letters with a darker pen for instant dimension. Never glue items within 1 inch of the edge—they’ll snag on door frames.
Seal Your Round Door Hanger for Weatherproof Durability
Skipping sealing sacrifices months of enjoyment for 10 minutes of work. Unprotected paint fades after one summer, while sealed pieces withstand porch swings and rainstorms. This is your hanger’s armor against the elements.
Professional-Grade Sealing Process
- Work outdoors on cardboard (fumes are strong)
- Hold spray can 10 inches from surface
- Apply first coat in light, even passes
- Wait 20 minutes between coats
- Do 2-3 total coats for outdoor use
Avoid thick coats—they drip on curved edges. Test spray pattern on scrap wood first. Matte sealer prevents glare that hides your artwork. If using polycrylic, brush in circular motions to avoid streaks.
Secure Your Hanging Loop with Weatherproof Adhesive
A failed hanger loop means your masterpiece crashes to the porch—a preventable tragedy. Weak adhesive choices cause 90% of hanging failures. Your loop must endure wind gusts and curious hands.
Foolproof Hanging Methods
For ribbon: Cut 18 inches, fold into loop, and glue knot to the back’s top center with hot glue. Reinforce with craft glue. For heavy hangers: Screw a small D-ring into the wood first, then thread twine through it. Always test hang your piece before final placement—press down firmly to check glue strength. Never glue loops directly over painted edges; the curve creates weak points.
Final Quality Check and Hanging Your Finished Piece
Rushing this step invites frustration later. A 2-minute inspection prevents weeks of regret when your hanger tilts or sheds petals. Professionals always verify these three elements before installation.
The 3-Point Professional Inspection
- Balance test: Hang temporarily—does it sit perfectly level? Adjust loop placement if tilted.
- Durability check: Gently tug embellishments—nothing should wiggle. Re-glue loose items.
- Surface scan: Wipe front with dry cloth to remove dust; fingerprints show instantly on matte finishes.
Hang 4-6 inches below your door knocker for ideal visibility. In high-wind areas, add a second loop at the bottom for stability.
7 Pro Tips for a Flawless Round Door Hanger
Distress Edges Like a Pro
After base coat dries, lightly sand edges with 220-grit paper for vintage charm. Wipe dust away before adding designs—the contrast makes colors pop.
Master the Layering Timeline
Wait 2 hours between major steps: base coat → design → embellishments → sealing. Rushing causes smudges that ruin months of work.
Choose Outdoor-Safe Embellishments
Avoid paper flowers or cardboard—they disintegrate in humidity. Stick to UV-resistant silk florals and sealed wood accents.
Prevent Paint Bleed Under Stencils
Seal stencil edges with Mod Podge first. Let dry 5 minutes—it creates a barrier against paint seepage.
Skip the Sketchpad
Project designs onto your circle using smartphone light—tape a printed design behind thin paper, then trace with window sunlight.
Double-Seal Heavy Items
After gluing bulky florals, add a thin coat of sealer over just the glued area before final sealing. This locks adhesives in place.
Store Off-Season Properly
Keep hangers in acid-free tissue paper inside a flat container—not rolled up. This prevents warping for next year’s use.
Creating a round door hanger delivers instant gratification with lasting impact. You’ve now mastered the exact sequence that transforms $10 of supplies into heirloom-quality decor—no prior crafting skills needed. Remember the golden rule: patience during prep prevents frustration later. Start with a simple monogram hanger this weekend, then experiment with seasonal themes. Each piece you make becomes a conversation starter that reflects your style far better than store-bought alternatives. Hang your first creation proudly, then share your results—the porch of your dreams starts with this single round canvas.


