

Your sliding glass door looks beautiful—until you install vertical blinds that leave glaring light gaps, drift open on their own, or scrape the floor. The culprit? Inaccurate measurements. Getting vertical blinds to fit perfectly over sliding glass doors is 90% measurement precision and 10% installation. One wrong number means vanes that won’t close properly, uneven stacks that hit door handles, or blinds that look embarrassingly crooked. This guide cuts through the confusion with field-tested steps used by professional installers. You’ll learn exactly where to place your tape measure, how to calculate for tricky obstructions, and why your “door width” measurement is actually irrelevant. Follow these steps, and your vertical blinds will glide smoothly while blocking every sliver of light.
Why Outside Mount is Non-Negotiable for Sliding Glass Doors
Forget trying to squeeze vertical blinds inside your sliding door frame—it won’t work. Sliding glass doors lack the deep recesses needed for inside mounts, and the track mechanism requires unobstructed space for the door to glide. Vertical blinds must mount outside the frame on the wall or ceiling above the door. This positioning creates the clearance needed for vanes to sweep fully open without hitting the door hardware. If you attempt an inside mount, you’ll end up with blinds that jam against the door’s edge, leave 6-inch light gaps on both sides, and tilt at awkward angles. The only exception? Rare commercial doors with 4+ inch-deep frames—but 99% of residential sliding doors require outside mounting. Your first decision: ceiling mount (for dramatic floor-to-ceiling looks) or wall mount (simpler installation).
Critical Wall vs. Ceiling Mount Differences
- Wall mount: Install headrail 2-4 inches above the door frame on the wall. Ideal for standard 8-foot ceilings.
- Ceiling mount: Attach headrail directly to ceiling drywall. Best for vaulted ceilings or minimalist aesthetics.
- Pro Tip: Measure ceiling height first. If less than 96 inches, choose wall mount to avoid vanes hitting the door handle.
Essential Tools That Prevent Measurement Disasters

Using a flimsy cloth tape measure or skipping the level guarantees misaligned blinds. These tools cost under $20 but save costly remakes:
– Metal tape measure (25+ feet): Fabric tapes stretch; metal gives millimeter accuracy.
– 4-foot level: Non-negotiable for marking your mounting line. Shorter levels miss wall imperfections.
– Laser level (optional but game-changing): Projects a perfectly straight line across 15 feet in seconds.
– Painter’s tape: Mark mounting points without damaging walls.
What Happens Without These Tools?
Skipping the level causes the #1 vertical blind failure: vanes drifting open/closed on their own. A 1/8-inch tilt over 8 feet makes the entire system unbalanced. Using a cloth tape? You’ll lose 1/4 inch in stretch alone—enough to create light gaps.
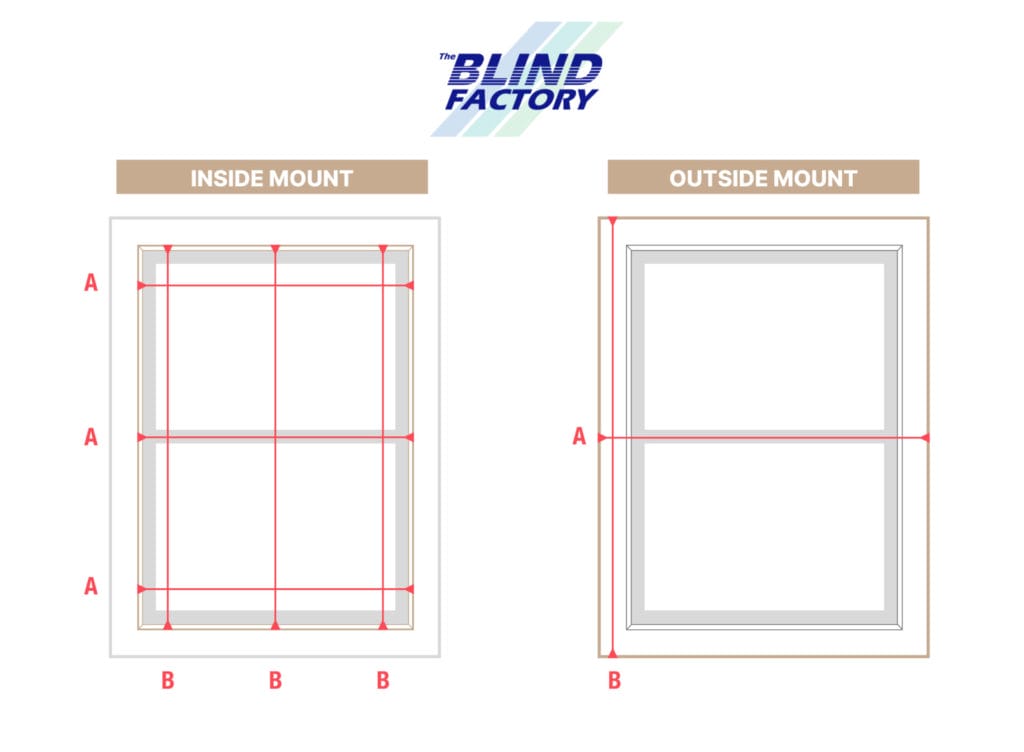
Step-by-Step: Measuring the Critical Width for Perfect Coverage
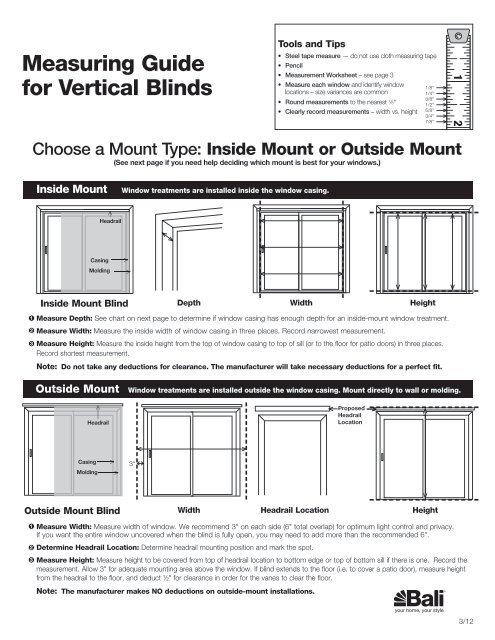
Width errors cause the most visible failures—gaps that leak light or vanes that won’t meet in the middle. This isn’t about measuring your door; it’s about measuring the wall space you want covered.
Find Your True Start and End Points
- Hold a yardstick horizontally above the door frame. Extend it 3-4 inches beyond the left and right edges of the door opening. This is your minimum coverage zone for privacy.
- Check for obstructions: Slide the yardstick toward the wall. If it hits a door handle, lock, or trim, extend further until it clears (add 1 inch minimum).
- Mark these points lightly with pencil. Never measure just the door width—this guarantees gaps.
Take Three Width Measurements—Then Pick the Smallest
- Measure at the top (near your mounting line), middle (door handle height), and bottom (near floor). Walls bow; doors aren’t perfectly square.
- Example: Top = 96.25″, Middle = 95.75″, Bottom = 96.5″. Your effective width is 95.75″ (the smallest).
- Add overlap: +6 to +12 inches total (+3 to +6 per side). For our example: 95.75″ + 8″ = 103.75″ Order Width.
Why Add Extra Width?
- Less than 3 inches/side: Light bleeds around edges during sunrise/sunset.
- Exactly the door width: Vanes stop 2 inches from the frame—zero privacy.
- Pro Tip: For bedrooms, add 4 inches/side. For living rooms, 3 inches/side suffices.
How to Determine the Correct Length for Your Vertical Vanes
Length errors cause vanes to drag on floors, get caught in door tracks, or float awkwardly above handles. Your “length” is the vane drop—not the total height from ceiling to floor.
Measure from Headrail Bottom—Not Top
- Mark your mounting line (using the level) 3-4 inches above the door frame.
- Measure downward from the bottom edge of where the headrail will sit to your endpoint:
- Floor clearance: Stop 0.5–1 inch above floor. Critical for carpeted rooms (vanes sink into pile).
- Door handle clearance: End 1 inch below handle to avoid snags.
- Dramatic look: Floor-to-ceiling? Measure ceiling height, then subtract 1.5 inches.
Headrail Height Trap
The headrail itself is 2–4 inches tall. If you measure from ceiling to floor and order that length:
– Vanes will be 2–4 inches too short (since headrail sits above them).
– Fix: For ceiling mounts, Order Length = (Ceiling height) – (Headrail height) – (0.5″ floor gap).
Avoiding Door Handles and Locks: The Stack Space Secret
When vanes close, they “stack” to one side. Door handles can block this motion, leaving a permanent gap. Here’s how to prevent it:
Calculate Required Stack Depth
- Place a ruler against the wall where the headrail mounts.
- Extend it horizontally toward the door until it touches the farthest point of the handle/lock.
- Add 1 inch: If handle sticks out 2.5″, your stack depth must be ≥3.5″.
- Order vanes with a “stack back” of this depth. Most manufacturers build this into width calculations.
Two-Blind Systems for Wide Openings
For doors wider than 96 inches:
1. Divide total width by 2 (e.g., 120″ door = 60″ per blind).
2. Add 1.5–3 inches overlap per blind: 60″ + 2.5″ = 62.5″ Order Width per blind.
3. This forces vanes to cross-center, eliminating middle gaps.
Top 5 Measurement Mistakes That Ruin Vertical Blind Installation
Mistake #1: Measuring Only at One Height
Walls aren’t square. If you measure width only at the top but the bottom is 1/2 inch narrower:
– Vanes won’t close fully at the bottom.
– Fix: Always take top/middle/bottom width measurements. Use the smallest.
Mistake #2: Ignoring Wall Bow
Holding your level against a bowed wall gives false readings.
– Fix: Place level at multiple points along your mounting line. Adjust for high/low spots.
Mistake #3: Forgetting Headrail Height in Length
Ordering “96-inch length” for a 96-inch ceiling? Vanes will be 3 inches too short.
– Fix: Order Length = (Mounting point to floor) – (0.5″ clearance).
Mistake #4: Not Accounting for Trim Thickness
Baseboards or crown molding add hidden depth. A handle might clear the door but hit the trim.
– Fix: Measure protrusion including all moldings.
Mistake #5: Using Door Width as Reference
Your door width is irrelevant. Focus on the wall coverage zone.
– Real Example: 72″ door often needs 80–84″ blind width for proper coverage.
Quick-Reference Measurement Chart for Every Scenario
| Situation | Width Calculation | Length Calculation | Critical Tip |
|---|---|---|---|
| Standard Single Door | Door width + 8″ total (4″ per side) | Floor to 1″ below handle | Measure width at 3 heights; use smallest |
| Two Blinds for Wide Door | (Total width ÷ 2) + 2.5″ per blind | Same as single door | Order overlap so vanes cross-center by 2″ |
| Ceiling Mount | Door width + 10″ | Ceiling height – 1.5″ | Subtract headrail height (3″) from order length |
| Handles/Locks Present | Door width + 6″ | Handle height + 2″ | Stack depth must exceed handle protrusion by 1″ |
Final Checklist Before Placing Your Blind Order
Before you hit “submit” on your blind order, verify these non-negotiables:
– [ ] Width measured at top, middle, bottom—using the smallest number
– [ ] Length measured from headrail bottom (not top or ceiling)
– [ ] Stack depth confirmed against door handles (add 1″ buffer)
– [ ] Level line verified with 4-foot level at 3 points
– [ ] Order format is WIDTH x LENGTH (e.g., 104″ x 92.5″)
Mismeasured vertical blinds cost $150+ to remake and install. But with these steps, you’ll get it right on the first try. Once installed, maintain smooth operation by vacuuming vanes monthly and checking bracket tightness quarterly. If your measurements still feel uncertain, most retailers offer free virtual consultations—send your wall photos before ordering. Now go enjoy that unobstructed view, knowing your blinds will close tighter than a bank vault when you need privacy or darkness.


