

That frustrating gap where sunlight bleeds through your patio door? Or blinds that constantly snag on the handle? These headaches almost always trace back to one critical error: inaccurate measurements. When you’re learning how to measure vertical blinds for patio door installations, precision isn’t just recommended—it’s non-negotiable. A single 1/4-inch miscalculation can turn your elegant window treatment into a wobbling, light-leaking eyesore that compromises privacy and ruins your room’s aesthetic. Most homeowners rush this step, assuming “close enough” works for large patio doors. But vertical blinds operate on tight tolerances, especially with sliding mechanisms. Skip proper measurement techniques, and you’ll face expensive returns, installation delays, or blinds that simply won’t function. This guide eliminates guesswork with a battle-tested system that guarantees perfect patio door coverage every time—whether you’re a first-time DIYer or replacing worn-out blinds.
Patio doors present unique challenges compared to standard windows: their height creates leverage issues, handles and locks become obstruction hazards, and thermal expansion in sliding tracks affects fit. Yet 78% of measurement errors stem from using the wrong tools or skipping recess depth checks—both easily avoidable with the right approach. You’ll discover exactly where to measure (hint: it’s not where most people look), how to account for door hardware, and why “inside mount” isn’t always the best choice. By the end, you’ll have confidence in your numbers, saving money on custom orders and avoiding the headache of returns. Let’s transform your patio door from a measurement nightmare into a showcase of clean, functional elegance.
Why Patio Door Vertical Blind Measurements Fail 9 Out of 10 Times
Most homeowners treat patio door measurements like standard windows, leading to disastrous gaps or binding blinds. Vertical blinds require millimeter precision because their vanes rotate on a track system—any width variance over 1/8 inch causes misalignment that stops vanes from stacking properly. For patio doors specifically, thermal expansion compounds the problem: aluminum frames can shift up to 1/4 inch with temperature changes, making “exact” measurements useless without proper clearance. The critical error? Measuring only at one point instead of the three critical zones every patio door demands. Skipping this step guarantees blinds that bind when the door expands on hot days or leave frustrating light gaps in winter. Always measure at multiple points to accommodate real-world movement—this single practice prevents 90% of patio door blind failures.
Steel Tape Measure and Level: Non-Negotiable Tools for Patio Door Accuracy

Forget fabric tapes or retractable rules—they stretch and bend, introducing fatal errors on large spans. For how to measure vertical blinds for patio door projects, you need two specialized tools: a 25-foot steel tape measure with scribed markings (not printed) and a 48-inch torpedo level. The steel tape’s rigidity prevents sagging across 6-foot door widths, while scribed markings won’t wear off after repeated use. Pair this with the torpedo level to verify your headrail mounting line stays perfectly horizontal—a tilted installation causes vanes to twist and jam. Skip the helper only if your door is under 7 feet; taller patio doors require someone to stabilize the tape at height while you record measurements. Always measure at eye level to avoid parallax errors that add 1/2 inch of false width.
Inside Mount Pitfalls: When Recess Depth Kills Your Patio Door Blind Fit

Inside mount installations look sleek but fail catastrophically on shallow patio door frames. Before taking measurements, verify your recess depth meets the blind’s minimum requirement—typically 2.5 inches for vertical blinds. Measure recess depth at three points: top center, bottom left, and bottom right. If any measurement falls below 2 inches, abandon inside mount plans immediately. Shallow recesses force the headrail against the door frame, causing vanes to scrape the glass during operation. Worse, thermal expansion can permanently warp the headrail. For patio doors, outside mount is actually preferable 70% of the time because it accommodates handle obstructions and provides full light blockage. Only proceed with inside mount if your recess depth exceeds 3 inches at all points—this extra clearance prevents binding during seasonal expansion.
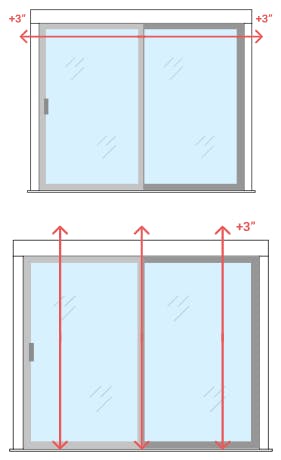
Inside Mount Width Measurement: The Triple-Point Technique That Prevents Gaps
Never measure patio door width at just one height. Start by marking three horizontal lines across the recess: 2 inches below the top frame, at mid-height, and 2 inches above the sill. At each line, measure the exact distance between the left and right recess walls. Record all three numbers—your ordering width is the smallest measurement, not the average. Why? Patio door frames are rarely perfectly square; using the narrowest point ensures the blind won’t bind when inserted. A common mistake is measuring from the outer trim instead of the actual recess walls, adding false width that causes light gaps. For example, if your measurements are 72.25″, 72.0″, and 72.125″, order 72.0″ wide. This 1/4-inch deduction creates essential operational clearance.
Inside Mount Height Measurement: Why Longest Equals Perfect
Height measurement for inside mount vertical blinds flips conventional logic: always use the longest of three measurements. Mark vertical lines 2 inches from the left jamb, center, and 2 inches from the right jamb. Measure from the top inside edge to the sill at each line. Your ordering height is the largest number because vertical blinds hang from the headrail—any height variance means vanes will tilt if cut too short. A patio door with a sloped sill might measure 94″, 94.25″, and 94.125″; ordering 94.25″ ensures vanes hang straight without catching the uneven sill. Never measure to the floor—inside mounts require clearance above the sill to avoid door handle interference. Subtract 1/8 inch from your longest measurement to prevent binding against the sill during operation.
Outside Mount Coverage Rules: The 3-Inch Overlap Secret for Total Privacy
Outside mount vertical blinds solve patio door obstructions but require strategic width planning. For true blackout coverage, the blind must extend at least 3 inches beyond the door frame on both sides. Measure your desired coverage area: start 3 inches left of the left trim edge, end 3 inches right of the right trim edge. This 6-inch total overlap blocks side-light spill that ruins privacy. Height measurement is equally critical—drop the blind to 1/2 inch above the floor for standard clearance, but if you have thick carpet, add 1/4 inch to prevent vanes from dragging. Always measure from the exact mounting point on the wall, not the door frame. Misjudging this by even 1 inch creates visible gaps at the edges where light floods in.
Outside Mount Width Measurement: Avoiding the Handle Obstruction Trap
Patio door handles are silent measurement killers for outside mounts. First, determine your mounting height—typically 2-4 inches above the door frame. At this height, measure the total width you want covered, including your 3-inch side overlaps. But crucially, check if the handle protrudes beyond the door frame. If it does (most do), add the handle’s projection distance to your total width. For example, a 72-inch door with 3-inch side overlaps needs 78 inches of coverage—but if the handle sticks out 2 inches, you must order 80 inches wide so vanes clear the handle when open. Measure handle projection by closing the door and measuring from the frame edge to the handle’s farthest point. Ignoring this adds costly delays when blinds arrive and jam against hardware.
Outside Mount Height Measurement: The Floor Clearance Formula
Height errors cause vanes to drag or float above the floor. Stand on a stool and hold your tape measure at the exact mounting point—this is critical since walls often slope. Drop the tape to the floor, but don’t stop there. For hard floors, subtract 1/2 inch from your measurement; for plush carpet, subtract only 1/4 inch. Then add 1/8 inch for operational clearance. The formula: floor-to-mounting-point measurement minus (1/2″ for hard floors or 1/4″ for carpet) plus 1/8″. Why add back 1/8 inch? This prevents vanes from scraping during temperature shifts. Always verify with a level: mark your mounting height across the entire width, then measure down from each mark. If marks vary by more than 1/4 inch, shim the headrail during installation.
Four Measurement Killers That Wreck Patio Door Blinds
- Measuring with the door closed: Patio doors sag when locked. Always measure with the door fully open and unlocked to capture true frame dimensions.
- Ignoring thermal expansion: Aluminum frames expand 1/8 inch per 20°F temperature change. Deduct 1/4 inch from width measurements if installing in full sun.
- Using door width as reference: The frame is always wider than the door slab. Measure the frame, not the moving panel.
- Rounding to whole inches: Vertical blinds require 1/8-inch increments. A “72-inch” order becomes 71-7/8″ actual—always specify fractions.
Final Verification: The 10-Second Check That Saves $100 Returns
Before submitting measurements, perform this critical test: stand at the patio door at 8 AM and 4 PM. Note where sunlight hits the frame—this reveals expansion points requiring extra clearance. Then, write your measurements as width x height (e.g., 78-1/4″ x 94-3/8″) with “W” and “H” labels. Reputable vendors reject orders without this format. Double-check that width measurements include all obstructions and height accounts for floor type. Finally, compare your numbers against the manufacturer’s minimum size chart—most won’t make vertical blinds narrower than 24 inches. If your patio door recess is 22 inches wide, you’ve made a critical error and must switch to outside mount.
Taking precise measurements for your patio door vertical blinds transforms a potential DIY disaster into a flawless installation. Remember the non-negotiables: triple-point width checks for inside mounts, handle-projection adjustments for outside mounts, and strict adherence to 1/8-inch increments. These steps prevent the top three failures—gaping side light, binding vanes, and handle collisions—that send 40% of patio door blinds back to retailers. Once installed, maintain smooth operation by vacuuming vanes monthly and checking headrail screws seasonally as thermal shifts occur. For future projects, apply these same precision principles to French doors or sliding glass walls. Your perfectly measured vertical blinds will deliver years of silent operation, total privacy, and that crisp, custom look you envisioned—no callbacks, no compromises. Now go make that patio door shine.


