

That silent doorbell has haunted your front porch for months. You’ve endured package thieves walking off with deliveries, neighbors pounding on your door, and the awkward dance of pretending you didn’t hear the knock. The good news? Replacing your old doorbell is one of the most straightforward home repairs you’ll ever tackle—most wired systems take just 1-2 hours, while wireless upgrades finish in under 15 minutes. Forget expensive repair calls or complex electrical work; this low-voltage project requires only basic tools and zero professional experience. By the time you finish this guide, you’ll have a crisp “ding-dong” announcing visitors instead of that embarrassing silence.
Worn-out doorbells aren’t worth fixing. Modern replacements cost less than $30 and solve persistent issues like weak chimes, intermittent buzzing, or complete failure. Whether your vintage unit finally gave up or you’re upgrading for smart features, this step-by-step process works for 95% of homes. You’ll avoid common pitfalls like mislabeled wires or transformer confusion while gaining confidence to handle basic home electronics. Let’s transform your silent entryway into a properly announced welcome zone.
Identify Your Doorbell Type Before Starting
Wired vs. Wireless: Which Fits Your Situation?
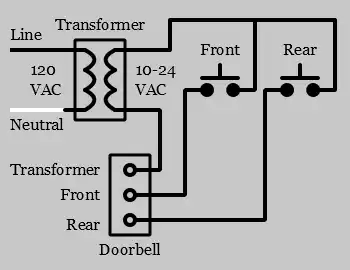
Wired doorbells tap into your home’s electrical system through a low-voltage transformer, delivering reliable power without battery changes. They’re ideal when replacing an existing wired setup—you’ll reuse the same wiring but upgrade the button and chime. Wireless models operate on batteries and install in minutes with no electrical work, making them perfect if your current system is dead or you lack wiring. Your choice hinges on two factors: whether wires already run to your door (visible behind the old button) and your comfort level handling screw terminals.
Critical Decision Checklist
- Choose wired if: You have existing wires at the door/chime locations and want permanent, maintenance-free operation
- Choose wireless if: No wires exist, your transformer is faulty, or you prefer zero electrical contact
- Cost reality: Both options cost $20-$50—far cheaper than repair calls or ignoring the problem
- Time investment: Wired takes 1-2 hours; wireless finishes in 10-15 minutes
Cut Power Safely—Non-Negotiable First Step

Locate and Disable the Correct Circuit Breaker
Your doorbell uses safe low-voltage current, but skipping this step risks shorts or shocks. Head straight to your electrical panel and find the breaker labeled “doorbell” or “chime”—it’s usually a 16V circuit near lighting breakers. Flip it firmly to OFF. Never assume wires are dead; this system connects to household current via the transformer. Skipping power disconnection is the #1 cause of avoidable mistakes during replacement.
Verify Power Is Truly Off
Press your doorbell button after flipping the breaker. If you hear any chime, buzz, or click, you’ve targeted the wrong circuit. Keep testing breakers until the button produces absolute silence. This confirmation step takes 10 seconds but prevents dangerous surprises when handling wires. Maintain this power-off state until final testing—no exceptions.
Swap the Doorbell Button in 5 Minutes
Remove the Old Button Without Losing Wires
Stand outside at your front door with a screwdriver. Remove the two screws securing the button plate to the wall, then gently pull the unit outward. You’ll see two thin wires (usually copper or multicolored) attached to screw terminals. Critical tip: Before disconnecting anything, tape these wires to the wall with masking tape. This prevents them from slipping back into the wall cavity—a frustrating setback that adds 20 minutes to your project.
Connect Your New Button Correctly (Polarity Doesn’t Matter)
Unscrew the wires from the old button’s terminals and attach them to your new unit’s matching screws. Unlike complex electronics, doorbell buttons don’t require specific wire polarity—either wire can connect to either terminal. Once secured, remove the tape, carefully guide the wires into the wall opening, and mount the new button with its screws. Pro warning: Don’t overtighten screws; snug is sufficient to avoid cracking plastic housings.
Upgrade the Chime Unit Without Wiring Chaos
Find and Prep Your Indoor Chime Box
Your chime unit hides inside your home, typically in hallways or near entryways—listen for its location when someone presses the button. Remove its mounting screws with a screwdriver, then pull the unit gently from the wall. You’ll see 3-5 wires connected to labeled terminals like “Front,” “Rear,” and “Trans.” This is your make-or-break moment: Before detaching any wires, label each one with masking tape indicating its terminal (e.g., “Front”). Skipping this causes 80% of installation failures.
Install the New Chime Unit Step-by-Step
Thread your labeled wires through the new chime baseplate, then mount it to the wall using the provided screws. Connect each wire to its matching terminal—front wire to “Front,” transformer wire to “Trans,” etc.—ensuring wires wrap clockwise around screws for secure contact. Tighten screws firmly but avoid stripping plastic terminals. Finally, snap the decorative cover into place. Expert note: If your new chime has extra terminals (like “Rear” for side doors), leave them empty unless adding secondary buttons later.
Test and Troubleshoot Like a Pro
Power Up and Validate Full Functionality
Return to your electrical panel and flip the doorbell breaker back to ON. Immediately press the button 5-6 times in succession while standing near the chime. Listen for clear, consistent tones—not weak buzzes or distorted sounds. Walk to distant rooms (kitchen, bedroom) to confirm audibility throughout your home. Critical test: If using a smart doorbell, verify app notifications trigger during this phase.
Fix Common Post-Installation Issues Fast
- No sound? Double-check wire connections at both button and chime. Loose screws cause 70% of “dead” installations.
- Weak or scratchy chime? Your transformer may be failing—common in homes over 15 years old. Replace it if old wiring shows corrosion.
- Intermittent operation? Re-tighten all terminal screws; moisture or vibration often loosens connections over time.
- Wireless not working? Replace batteries immediately—cheap alkalines cause most “faulty unit” false alarms.
Wireless Installation: Zero Wiring Required

Complete Setup in Under 10 Minutes
If avoiding electrical work, wireless models solve everything. Insert batteries into both the outdoor button and indoor chime unit (typically AA or CR2032). Mount the button with adhesive strips or screws, placing it 4-5 feet high for accessibility. Position the chime unit centrally in your home, plugging it into any outlet. Press the sync button on both units until the chime emits a confirmation tone—done. Key advantage: No circuit breakers touched, no wire labels needed, and you can relocate the chime anywhere.
Avoid Battery Failure Surprises
Wireless doorbells need battery swaps every 12-18 months. Set phone reminders for spring and fall to test operation and replace batteries proactively. Pro tip: Keep spare batteries taped inside your electrical panel—this ensures you never face a “dead doorbell during a storm” crisis.
Know When to Call an Electrician
Transformer Replacement Scenarios
If your entire system died suddenly and the transformer (a small metal box near your electrical panel) shows rust, burns, or frayed wires, stop. Replacing transformers involves working inside your main electrical panel—a job requiring professional expertise. Similarly, if you’re installing a doorbell where none existed before, an electrician must run new low-voltage wiring from the panel to your door. Red flag: If you smell burning near the transformer or see discolored wires, shut off power immediately and call a pro.
Prevent Future Failures with Simple Maintenance
Monthly and Annual Checkups
Test your doorbell weekly by pressing the button while in different rooms—this catches volume loss early. Every six months, remove the button cover and wipe contact points with a dry cloth to prevent corrosion. Once yearly, inspect the chime unit for loose wires or insect nests (common in outdoor buttons). Critical habit: Replace wired system batteries before holidays when visitors increase—never let guests face silent treatment during Thanksgiving!
Your doorbell now announces arrivals reliably, eliminating months of delivery disasters and awkward neighbor interactions. Whether you chose the 2-hour wired refresh or 10-minute wireless swap, you’ve mastered a fundamental home skill that builds confidence for future projects. Remember: consistent testing prevents 90% of failures, and that satisfying “ding-dong” is your reward for taking control. Press your new button one last time—listen to that perfect chime, and welcome guests properly at last.


