

That familiar “ding dong” suddenly silent? Or maybe your current Ring doorbell’s video quality can’t capture package thieves clearly. Whatever your reason, learning how to replace Ring doorbell takes less time than brewing your morning coffee—just 30-60 minutes for most homeowners. Whether you’re upgrading from an older model or replacing a faulty unit, this guide delivers the exact steps to get your new Ring doorbell operational without electrician fees or frustration.
You’ll discover the critical pre-installation steps most DIYers skip, how to avoid wiring mistakes that kill your doorbell chime, and the professional mounting techniques that ensure crystal-clear video of every visitor. No more guessing whether you need special tools or if your existing wiring is compatible—let’s get your front door security back online.
Download Ring App Before Touching Tools
Skipping this step wastes hours troubleshooting connection issues after mounting. Stand at your front door with your phone to verify Wi-Fi signal strength—weak signals cause choppy video and missed alerts. Download the Ring app from ring.com/app or your device’s app store, then create your account right there at the door. This strategic move prevents the common mistake of mounting your Ring only to discover poor connectivity.
Connect Ring to Wi-Fi During Setup
Your Ring must connect to Wi-Fi before physical installation for proper configuration:
- Open phone Settings > Wi-Fi and select the network starting with “Ring-“
- Return to the Ring app and navigate to Wi-Fi settings
- Choose your home network and enter the password
- Wait for the confirmation signal—four blue flashes means success
- If your signal is weak, place a Wi-Fi extender near your router before proceeding
This initial connection ensures your Ring recognizes your home network during setup. Trying to connect after mounting often requires awkward ladder work or drilling new holes when you need to reposition for better signal.
Cut Power to Prevent Electrical Damage

Critical safety step: Locate your doorbell circuit breaker and flip it to “off” before removing the old unit. Most doorbell systems operate at 16-24 volts, but power surges during replacement can fry both your old and new doorbell. Take thirty seconds to verify power is off by pressing your existing doorbell button—if it still chimes, you’ve got the wrong breaker. This simple precaution prevents costly mistakes in how to replace Ring doorbell systems.
Remove Existing Doorbell Without Damaging Wires
Preserve your existing wiring to simplify the replacement process. Start by prying off the decorative faceplate with a flathead screwdriver. Remove the mounting screws holding the unit to your wall, then gently pull the device forward to expose the two low-voltage wires. Before disconnecting, take a photo of the wiring configuration—this visual reference prevents connection errors with your new Ring.
Loosen the terminal screws and slide the wires free, then immediately tape them to the wall with painter’s tape. This prevents the wires from slipping back into the wall cavity, a common frustration that adds 15+ minutes to how to replace Ring doorbell projects. If your wires are frayed or damaged, trim the ends with wire cutters and strip 1/4 inch of fresh insulation.
Match Your Ring Model to Installation Type
Your replacement process differs significantly based on whether you’re installing a battery-powered or wired model. Check your new Ring box for model identification—Ring 3, 4, and 2nd Gen operate on rechargeable batteries, while Pro and Elite models connect directly to your existing doorbell wiring.
Charge Battery Models Properly
For Ring 3 and 4 with removable batteries:
– Remove the bottom security screw using the included tool
– Lift off the faceplate and slide the battery down to release
– Plug into the charger—red and green lights indicate charging
– Full charge (up to 6 hours) shows green light only
For 2nd Gen models with internal batteries:
– Connect the entire unit to the charging cable
– Watch the blue circular indicator fill as it charges
– Solid blue light confirms full charge
Charging before installation prevents the headache of removing your newly mounted Ring after discovering low battery. This preparation step is essential in how to replace Ring doorbell systems without multiple mounting attempts.
Perfect Your Mounting Position Before Drilling
Your camera angle affects security for years—take five minutes to get it right. Open the Ring app’s live view feature and hold your new doorbell at potential mounting heights (48-52 inches is standard). Walk up to the door as a visitor would, checking that the preview captures head-to-toe footage without cutting off shoulders.
Use the included bubble level to keep your mounting bracket straight, marking hole positions with a pencil through the bracket slots. For brick or stucco surfaces, drill 1/8″ pilot holes first. If your siding angles outward, attach the wedge mount before the main bracket to ensure proper camera orientation. This precision positioning prevents the most common Ring replacement mistake: poor video angles requiring remounting.
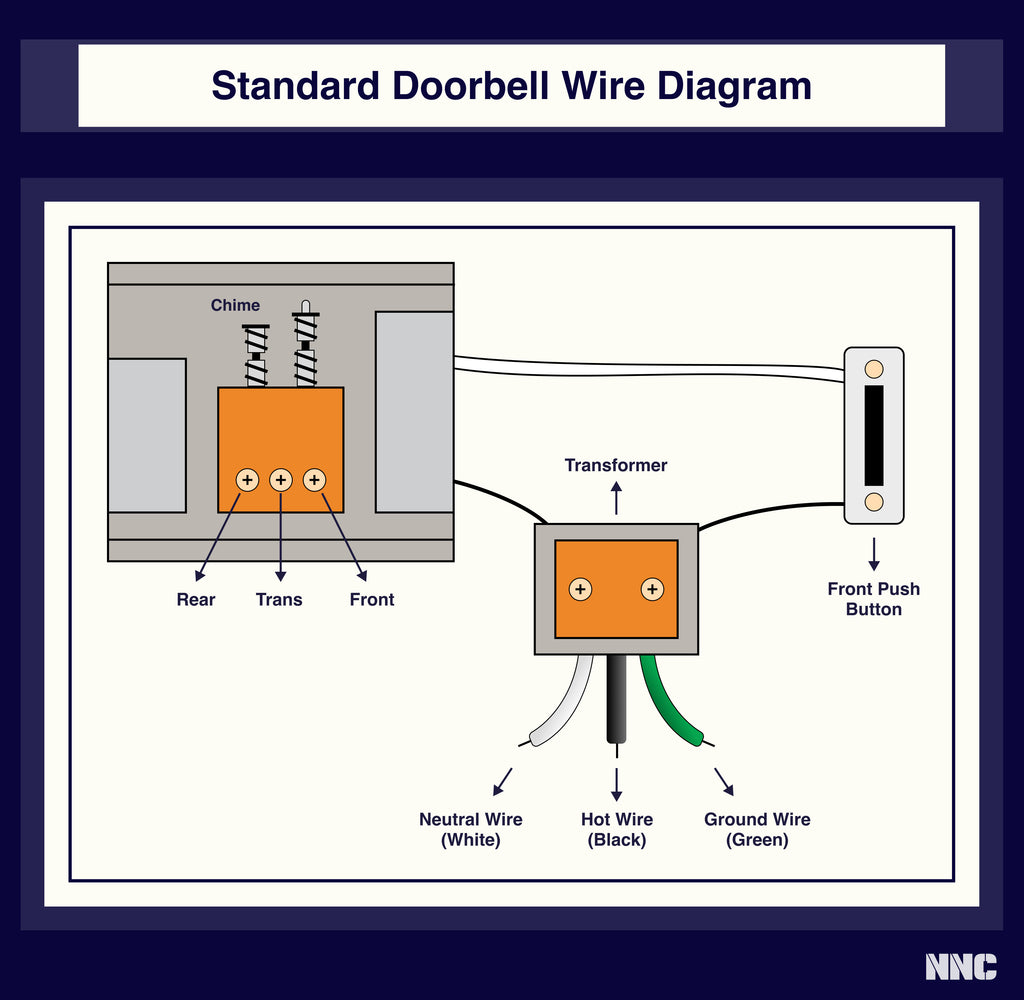
Connect Wires Without Chime Failures
Your existing doorbell wires power the new Ring—no electrical expertise needed. Loosen the terminal screws on the mounting bracket, then wrap one wire clockwise around each screw. Tighten until snug but don’t overtighten—this can strip plastic terminals. Gently tug each connection to verify security.
Digital chime warning: If you have a digital doorbell system (electronic “ding dong” without physical hammers), install the included diode with the white marking facing your house wiring. Mechanical chimes (actual hammers hitting metal plates) don’t require this component. This detail is crucial in how to replace Ring doorbell units while maintaining chime functionality.
Mount and Secure Your New Ring Doorbell
Slide your Ring onto the bracket tabs until it clicks firmly into place. Restore power at the breaker box, then press the doorbell button—successful installation triggers both your indoor chime and a phone notification within three seconds. If nothing happens, double-check wire connections before assuming failure.
Tighten the bottom security screw using the included tamper-resistant tool. This specialized screw prevents theft by requiring a unique tool for removal. Skip this step and you’ve essentially installed a free camera for porch pirates. Proper securing completes the how to replace Ring doorbell process with professional results.
Configure Motion Settings for Maximum Security
Fresh installations need customized motion zones to avoid false alerts. Open the Ring app and navigate to Motion Settings > Motion Zones. Draw detection boxes that cover your porch but exclude street traffic. Test by walking through your defined zones—adjust sensitivity until normal foot traffic triggers alerts but passing cars don’t.
Enable both doorbell press and motion notifications for comprehensive coverage. This configuration step transforms how to replace Ring doorbell from simple hardware swap to optimized security system.
Avoid These Common Replacement Mistakes
- Skipping Wi-Fi testing: Leads to poor video quality after mounting—always verify signal strength first
- Overtightening screws: Cracks plastic brackets or strips mounting holes—hand-tight is sufficient
- Reversed wires: Doorbell works but chime fails—swap wire positions and retry
- Ignoring diode requirements: Digital chimes stay silent without proper diode installation
These errors add hours to what should be a straightforward how to replace Ring doorbell process. Prevention takes seconds; correction requires dismounting your Ring.
Test Every Feature Before Calling It Done
Don’t assume functionality after installation. Press the doorbell button to verify both chime and notification within three seconds. Cover the camera with your hand to test night vision activation. Use the app’s two-way audio to confirm clear communication. Walk through your motion zones to validate detection settings. This comprehensive testing ensures your how to replace Ring doorbell project delivers complete functionality.
Maintain Your New Ring for Long-Term Performance
Keep your replacement doorbell operating like new with these simple habits:
– Monthly: Wipe the camera lens with a microfiber cloth
– Quarterly: Check battery levels in the app (wired models show “hardwired” status)
– Annually: Tighten mounting screws—weather exposure can loosen connections over time
These maintenance steps extend the life of your Ring doorbell replacement, ensuring years of reliable security without needing to learn how to replace Ring doorbell again soon.
Your Ring doorbell replacement is complete. The smart wiring you preserved means future upgrades will take minutes—not hours—as newer models snap onto your existing bracket. Next time your neighbor complains about blurry doorbell footage, you’ll know exactly how to help them swap their own Ring with confidence.


