
That annoying squeak every time you grab your storm door handle. The wobbly knob that barely turns. Or worse—the handle that’s completely broken, leaving you struggling to get in and out of your home. If your storm door handle has seen better days, you’re not alone. Thousands of homeowners face this exact problem each year, and the good news is you don’t need to call a professional to fix it. Replacing a storm door handle is one of the most straightforward DIY home repairs you can tackle, requiring minimal tools and taking less than half an hour once you know the process. This guide will walk you through exactly how to replace storm door handle components successfully, whether yours is broken, worn out, or simply outdated. By the end of this article, you’ll have the confidence to complete this repair yourself and restore both the security and aesthetic appeal of your entryway.
Essential Tools for Storm Door Handle Replacement
Before you begin the actual handle replacement process, gather these specific tools to ensure a smooth repair. Having everything ready prevents unnecessary interruptions mid-project. You’ll need a Phillips #2 screwdriver for most handle assemblies, though some older models may require a flathead. A cordless drill with precision settings comes in handy for stubborn screws but use it carefully on low torque to avoid stripping hardware. Keep a tape measure nearby to verify alignment measurements, and have a utility knife ready to remove any stubborn adhesive from the old handle mounting points. Most importantly, purchase the correct replacement handle—storm door handles come in various sizes and configurations, so measure your existing handle’s backset (the distance from edge of door to center of handle) before buying. Universal kits work for many standard doors, but specialty doors may require model-specific replacements. Pro tip: Place all removed screws and small parts in a magnetic tray to prevent losing them during the replacement process.
Locating the Interior Access Panel
The first physical step in your storm door handle replacement involves finding and opening the interior access panel. This small cover, usually made of plastic or thin metal, conceals the mounting hardware connecting your interior and exterior handles. On most modern storm doors, this panel sits directly behind the interior handle and measures approximately 2-3 inches wide by 4-5 inches tall. Carefully insert your flathead screwdriver under the panel’s edge and gently pry it open—many snap into place rather than being screwed down. If your panel is secured with screws, remove them completely and set them aside in your magnetic tray. Take a moment to examine how the panel attaches, as you’ll need to reinstall it identically when finishing the job. Some panels have specific orientation requirements with tabs that fit into corresponding slots.
Documenting Your Existing Handle Configuration
Before removing any components, take a clear photo of your existing handle assembly with your smartphone. This simple step prevents confusion during reassembly, especially since storm door mechanisms can vary significantly between manufacturers. Pay particular attention to how the spindle (the square metal rod connecting interior and exterior handles) aligns with the latch mechanism. Note any washers, springs, or retaining clips that might fall out when you remove the main assembly. Many DIYers skip this documentation step only to struggle later trying to remember where each small component belongs. If your storm door has a locking mechanism, capture how the lock cylinder interfaces with the handle assembly. This visual reference becomes invaluable when installing your new handle, potentially saving you 10-15 minutes of troubleshooting during installation.
Removing the Old Storm Door Handle Assembly
With your tools ready and documentation complete, you can begin the physical removal process. Start by identifying the long mounting screws that connect the interior and exterior handle assemblies through the door. These typically run horizontally through the door thickness and measure 2-3 inches in length. Using your Phillips screwdriver, carefully loosen each screw while stabilizing the opposite side with your free hand—this prevents the screws from spinning uselessly inside their channels. If the screws prove stubborn, apply gentle pressure while turning to break any corrosion. As you remove each screw, place it immediately in your magnetic tray along with any washers. Once all mounting screws are removed, gently pull both handles away from the door simultaneously. The entire assembly—including latch mechanism, connecting rods, and handle components—should come free as a single unit.
Handling Delicate Internal Components
As the handle assembly separates from the door, pay special attention to any small internal components that might detach. Many storm door handles incorporate small springs that provide resistance and return action to the handles. These tiny springs can easily go flying if not contained. Some models also use plastic or metal retainers that hold the spindle in place. If you notice any components falling out, stop immediately and collect them before proceeding. Place these small parts in a separate container labeled “small parts” to prevent confusion during reassembly. For models with separate latch mechanisms, note how the latch bolt interfaces with the handle assembly—this orientation must be replicated exactly with your new hardware. If your old handle has significant wear, take note of which components showed the most damage, as this might indicate alignment issues to correct during your storm door handle replacement.
Installing Your New Storm Door Handle
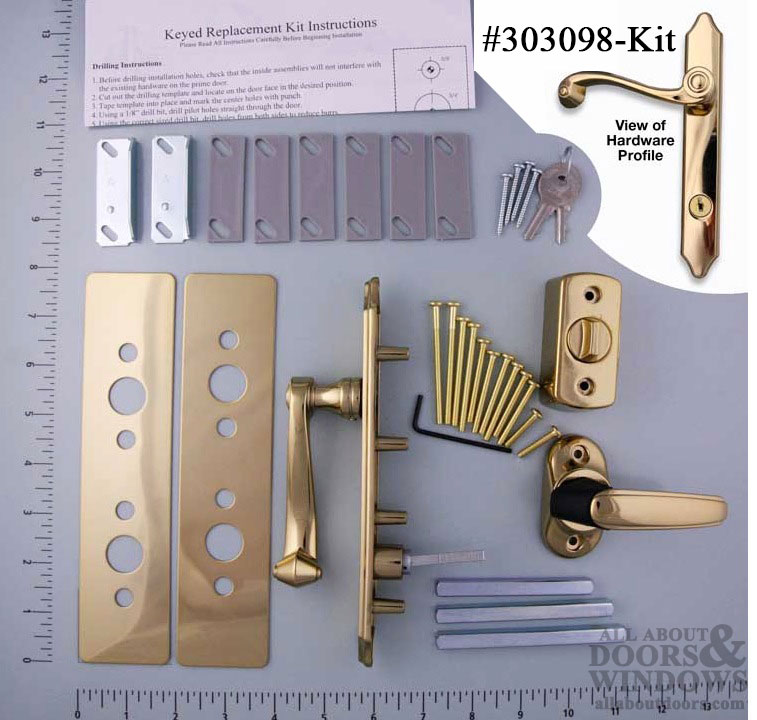
Begin installation by preparing your new handle components according to the manufacturer’s instructions. Most replacement kits include both interior and exterior handles, a latch mechanism, mounting hardware, and sometimes alignment templates. Before inserting anything into the door, perform a dry assembly of the new components outside the door to understand how they connect. Test the action of the handles and latch mechanism—quality replacements should operate smoothly with consistent resistance. Pay attention to any directional indicators on the latch mechanism; the beveled side must face the door jamb to allow proper closing. If your new handle includes an adjustable backset, set it to match your door’s existing configuration before installation.
Achieving Perfect Alignment During Installation
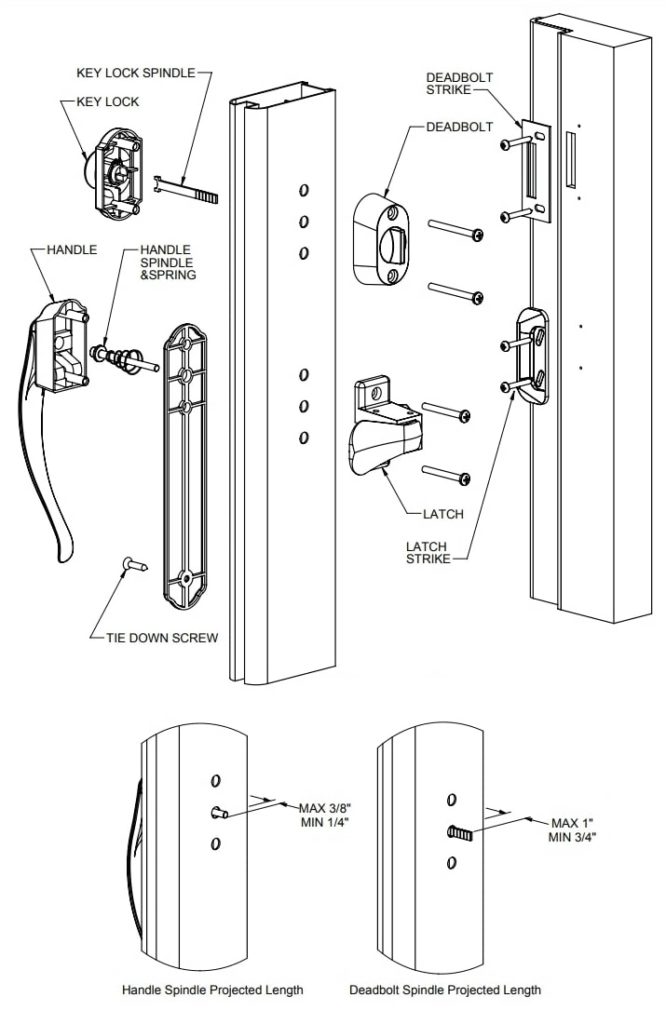
Proper alignment makes the difference between a handle that operates smoothly and one that binds or fails prematurely. Start by inserting the new latch mechanism into the edge of the door, ensuring the angled side faces the door jamb. Feed the connecting rods through their respective holes if your model uses them. Have a helper hold the exterior handle in position while you work from inside the door—this prevents misalignment during installation. Slide the interior mounting plate onto the square spindle, then loosely insert the long mounting screws through both sides. At this stage, the screws should be tight enough to hold the assembly in place but loose enough to allow minor adjustments. Test the handle operation repeatedly before final tightening, checking that the latch retracts fully and springs back smoothly. Proper alignment during this phase prevents the most common post-installation issues with storm door handle replacement.
Final Testing and Professional-Quality Adjustments
After securing the mounting screws, conduct thorough testing before reinstalling the interior access panel. Operate the handle through multiple full cycles, both opening and closing the door. Listen for any scraping or binding sounds that indicate misalignment. Check that the latch fully retracts when pulling the handle and springs back completely when released. Close the door gently to verify the latch catches properly in the strike plate. If the door doesn’t close smoothly, you may need to adjust either the latch position or strike plate alignment. For handles with locking mechanisms, test both locked and unlocked positions multiple times. Make incremental adjustments to the mounting screws—tightening one side slightly more than the other can often correct minor alignment issues. This testing phase typically takes 5-10 minutes but prevents frustration later.
Troubleshooting Common Post-Installation Issues

Even with careful installation, you might encounter minor issues requiring adjustment. If the handle feels loose but all screws are tight, the problem likely lies with inadequate compression between the interior and exterior mounting plates—add thin washers to increase clamping force. When the latch doesn’t fully retract, check for internal binding by removing the mounting screws slightly and testing the mechanism outside the door. Misaligned strike plates cause the most common “door won’t latch” problems; use a chisel to carefully deepen the strike plate recess if needed. For handles that stick or don’t return smoothly, apply a small amount of dry lubricant (graphite powder works best) to the internal mechanism—never use oil-based lubricants that attract dirt. Remember that most issues stem from minor alignment problems rather than defective hardware, so systematic troubleshooting usually resolves them quickly.
Preventing Future Storm Door Handle Problems
Once your new handle operates perfectly, implement these maintenance practices to extend its lifespan. Clean the mechanism annually by removing the interior access panel and blowing out dust with compressed air. Apply a small amount of silicone-based lubricant to moving parts every 6-12 months, focusing on the latch bolt and internal springs. Check mounting screw tightness quarterly, as normal use can gradually loosen them. If you live in a coastal area with salt air or high humidity, consider upgrading to marine-grade stainless steel hardware during your next storm door handle replacement for enhanced corrosion resistance. Most importantly, address minor issues immediately—don’t wait until a slightly loose handle becomes completely inoperable. Regular maintenance prevents 80% of common handle failures and ensures your storm door continues providing security and weather protection for years to come.
Replacing your storm door handle doesn’t require specialized skills or expensive tools—just careful attention to detail and systematic execution. By following these precise steps for how to replace storm door handle components, you’ve not only saved significant money compared to professional service but also gained valuable home maintenance skills. The entire process should take no more than 30 minutes once you’re familiar with the steps. Remember that proper alignment during installation prevents most common problems, so don’t rush the testing phase. If you encounter persistent issues despite careful installation, consult your handle manufacturer’s specific instructions or visit their website for model-specific troubleshooting. With your newly installed handle operating smoothly, you’ve enhanced both the security and curb appeal of your home—a small project with significant impact. For future reference, keep your smartphone photo of the original assembly and note any special considerations for your specific door model—this documentation will make any future handle replacements even quicker and easier.


